


7
26
1
2
3
4
8
1
2
1
2
3
4
2
3
4
1
Ïîòàéíàÿ ñòðî÷êà
Óñòàíîâêà ìàøèíû
1 Âûáîð ñòðî÷êè: E èëè F
2 Äëèíà ñòåæêà: 2 - 3
3 Íàòÿæåíèå âåðõíåé íèòè: 1 - 4
4 Ïðèæèìíàÿ ëàïêà: ëàïêà äëÿ ïîòàéíîé
ñòðî÷êè G
1.
Óñòàíîâêà ëàïêè äëÿ ïîòàéíîé ñòðî÷êè.
Èäåàëüíûé ïîòàéíîé ñòåæîê âîçìîæåí òîëüêî
íà òîëñòûõ òêàíÿõ.
Ïðèêðåïèòå ëàïêó äëÿ ïîòàéíîé ñòðî÷êè êàê íà
ðèñóíêå. Ñëîæèòå òîëñòóþ òêàíü ïî ñõåìå
îñòàâèâ îòîãíóòûé êðàé îò 0.4 äî 0.7 ñì
1 Îáîðîòíàÿ ñòîðîíà òêàíè
2
îò 0.4 äî 0.7 ñì
3 Òîëñòûå òêàíè
4 Òîíêèå è ñðåäíèå òêàíè
2.
Îòðåãóëèðóéòå ïîëîæåíèå èãëû ïðè
íåîáõîäèìîñòè òàê, ÷òîáû èãëà òîëüêî
ïðèõâàòûâàëà êðàé ñ ëåâîé ñòîðîíû.
3.
Îñëàáüòå âèíò è ñîïîñòàâüòå íàïðàâèòåëü íà
ëàïêå ñî ñêëàäêîé íà òêàíè. Èãëà äîëæíà òîëüêî
ïðèõâàòûâàòü ñêëàäêó. Åñëè èãëà óõîäèò
ñëèøêîì äàëåêî âëåâî, ïåðåäâèíüòå íåìíîãî
íàïðàâèòåëü âëåâî. Åñëè èãëà íå çàõâàòûâàåò
ñêëàëó, ïåðåäâèíüòå íàïðàâèòåëü âïðàâî.
Øåéòå, íàïðàâëÿÿ ñëîæåííûé êðàé âäîëü
íàïðàâèòåëÿ.
5 Âèíò
6 Ñêëàäêà
7 Íàïðàâèòåëü
4.
Ïî îêîí÷àíèè ðàñêðîéòå òêàíü ëèöåâîé
ñòîðîíîé íàâåðõ.
ÏÐÈÌÅ×ÀÍÈÅ:
Åñëè ñòåæêè áóäóò ëîæèòüñÿ ñëèøêîì äàëåêî
âëåâî, îíè áóäóò âèäíåòüñÿ íà ëèöåâîé ñòîðîíå
òêàíè.
5
6
7
7
1
2
3
4
1
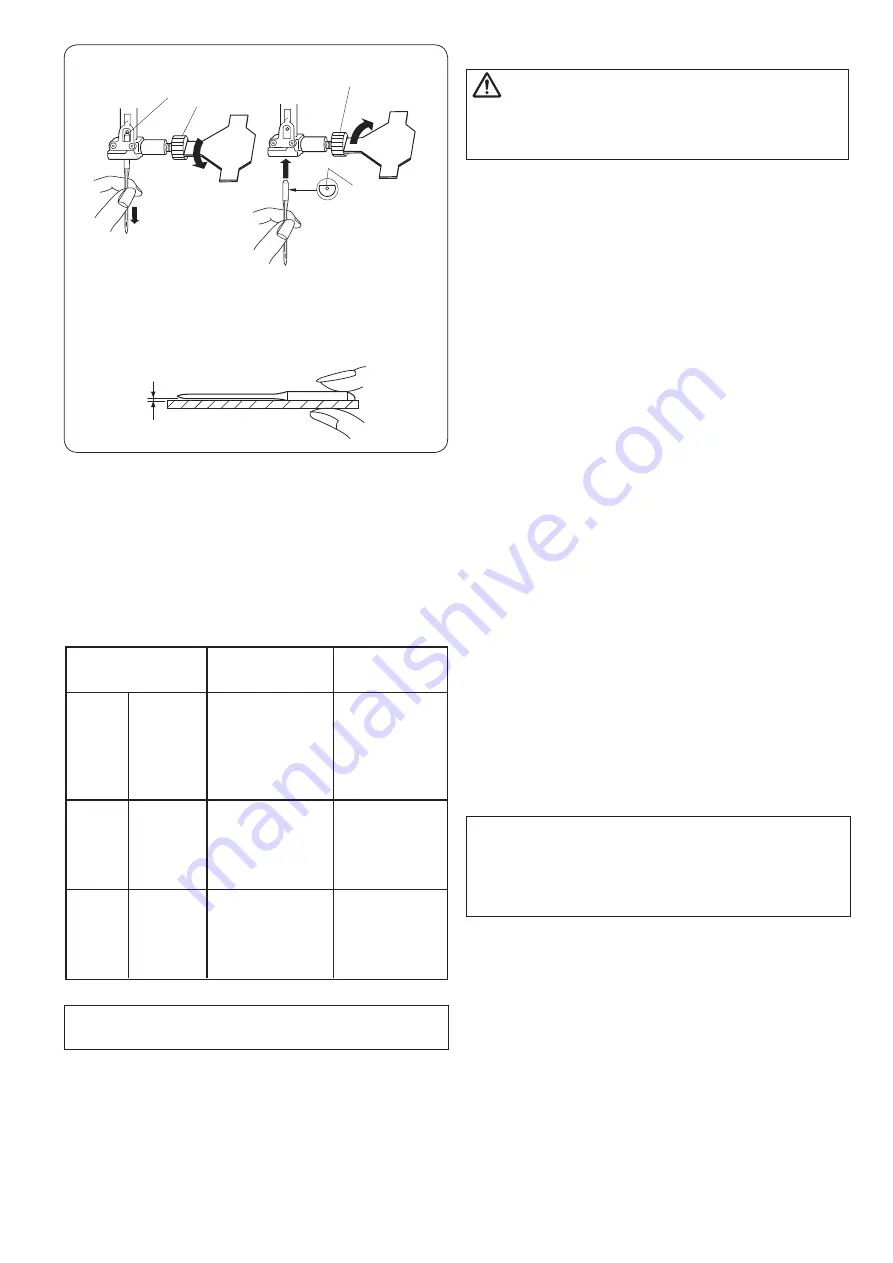
Ñìåíà èãë
ÂÍÈÌÀÍÈÅ!
Ïåðåä çàìåíîé èãë îòêëþ÷àéòå ïèòàíèå
ìàøèíû.
1.
Ïîâåðíèòå ìàõîâîå êîëåñî ïðîòèâ ÷àñîâîé
ñòðåëêè è ïîäíèìèòå èãëó â âåðõíåå ïîëîæåíèå.
Îïóñòèòå ïðèæèìíóþ ëàïêó.
Îñëàáüòå âèíò èãîëüíîãî ñòåðæíÿ, ïîâåðíóâ åãî
ïðîòèâ ÷àñîâîé ñòðåëêè.
Âûòàùèòå èãëó èç çàæèìà
1 Âèíò çàæèìà èãëû
2.
Âñòàâüòå íîâóþ èãëó â çàæèì ïëîñêîé
ñòîðîíîé îò ñåáÿ.
Âñòàâëÿÿ èãëó â çàæèì, ïîäòîëêíèòå åå êàê
ìîæíî âûøå è çàòÿíèòå âèíò, ïîâåðíóâ åãî ïî
÷àñîâîé ñòðåëêå.
2 Ñòîïîð
3 Ïëîñêàÿ ñòîðîíà
×òîáû ïðîâåðèòü êà÷åñòâî èãëû, ïîëîæèòå åå
ïëîñêîé ñòîðîíîé íà ðîâíóþ ïîâåðõíîñòü
(èãîëüíóþ ïëàñòèíó, ñòåêëî è ò.ä.). Çàçîð ìåæäó
èãëîé è ïëîñêîé ïîâåðõíîñòüþ äîëæåí áûòü
îäèíàêîâûì. Íèêîãäà íå èñïîëüçóéòå ãíóòûå
èëè òóïûå èãëû. Ïîâðåæäåííûå èãëû ìîãóò
ðâàòü è çàòÿãèâàòü òðèêîòàæ, òîíêèé øåëê è
ëåãêèå òêàíè.
4 Çàçîð
1
2
Òàáëèöà ïîäáîðà íèòè è èãëû.
Òêàíü
Íèòêè
Ðàçìåð èãëû
Ëåãêèå
òêàíè
Áàòèñò
Æîðæåò
Òðèêî
Øåðñòü
Ïîëèýñòåð
Øåëê ¹80–100
Õëîïîê ¹80–100
Ñèíòåòè÷åñêàÿ
íèòü ¹80–100
¹9/65–11/75
Ñðåäíèå
òêàíè
Õëîïîê
Ïîëèýñòåð
Òîíêèé
òðèêîòàæ
Øåðñòü
Øåëê ¹50
Õëîïîê ¹60–80
Ñèíòåòèêà ¹50–80
Õëîïîê ¹50
¹11/75-¹14/90
¹14/90
Òÿæåëûå
òêàíè
Äæèíñà
Äæåðñè
Ïàëüòîâàÿ
Äðàïèðîâî÷íàÿ
Øåëê ¹50
Õëîïîê ¹40-50
Ñèíòåòèêà ¹40-50
Øåëê ¹30
Õëîïîê ¹50
¹14/90–16/100
¹16/100
Ïðè îáû÷íîì øèòüå èñïîëüçóþòñÿ èãëû ¹11/75 èëè ¹14/90. Òîíêèå íèòè è èãëû èñïîëüçóþòñÿ ïðè
ðàáîòå ñ òîíêèìè òêàíÿìè, ÷òîáû òêàíü íå ìîðùèëàñü; òîëñòûå òêàíè òðåáóþò òîëñòûõ èãë,
ñïîñîáíûõ ïðîéòè ñêâîçü òêàíü, íå èñïîðòèâ âîëîêíà. Ïåðåä íà÷àëîì ðàáîòû âñåãäà ïðîáóéòå èãëó è
íèòü íà îòäåëüíîì êóñî÷êå òêàíè. Âåðõíÿÿ è íèæíÿÿ íèòè äîëæíû áûòü îäèíàêîâûìè. Ïðè ðàáîòå ñ
î÷åíü òîíêèìè, ñèíòåòè÷åñêèìè è ðàñòÿãèâàþùèìèñÿ òêàíÿìè èñïîëüçóéòå èãëû BLUE TIPPED ñ
Ãîëóáûì Íàêîíå÷íèêîì. Èãëà ñ ãîëóáûì íàêîíå÷íèêîì ïðåäîòâðàùàåò ïðîïóñêè ñòåæêîâ.
Changing Needles
CAUTION:
Always make sure to turn the power switch off and
disconnect the machine from power supply before
changing the needle.
Raise the needle by turning the handwheel and lower the
presser foot.
Turn off the power switch.
z
Loosen the needle clamp screw by turning it
counterclockwise.
Remove the needle from the clamp.
q
Needle clamp screw
x
Insert a new needle into the needle clamp with
the flat side of the needle to the rear.
When inserting the needle into the needle clamp,
push it up against the stopper pin and tighten the
needle clamp screw firmly.
w
Stopper pin
e
Flat side
To check needle straightness, place the flat side of the
needle onto something flat (glass, etc.)
The gap between the needle and the flat surface should
be consistent.
Never use a blunt needle.
r
Gap
Fabric and Needle Chart
• For general sewing, use needle size 11/75 or 14/90.
• A fine thread and needle should be used for sewing
lightweight fabrics, so the fabric will not be marred.
• Heavy fabrics require a needle large enough to pierce
the fabric without fraying the needle thread.
• Always test the thread and needle size on a small scrap
of the fabric that will be used for actual sewing.
• In general, use the same thread for the needle and
bobbin.
NOTE:
When sewing stretch fabrics, very fine fabrics and
synthetics, use a blue tip needle (Part No. 990311000,
sold separately). The blue tip needle effectively
prevents skipped stitches.
Fine
Medium
Silk #80-100
Cotton #80-100
Synthetic #80-100
Heavy
weight
Denim
Tweed
Coating
Quilting
Lawn
Georgette
Tricot
Organza
Crepe
Sheeting
Jersey
Broadcloth
Fleece
#9/65-11/75
Thread
Needle
Silk #50
Cotton #50-80
Synthetic #50-80
#11/75-14/90
Silk #30-50
Cotton #40-50
Synthetic #40-50
#14/90-16/100
Fabric
NOTE:
3 x #14/90 needles are included in the envelop.
q
z
q
x
w
e
r


