background image

40

Troubleshooting

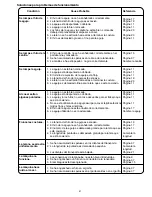
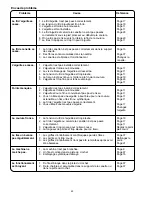
Condition

Cause

Reference

The needle thread
breaks.

The bobbin thread
breaks.

The needle breaks.

Skipped stitches

Seam puckering

The cloth is not
feeding smoothly.

The machine doesn’t
work.

Noisy operation

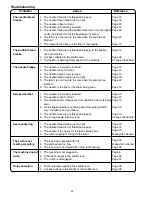
1. The needle thread is not threaded properly.
2. The needle thread tension is too tight.
3. The needle is bent or blunt.
4. The needle is incorrectly inserted.
5. The needle thread and the bobbin thread are not set properly

under the presser foot at the beginning of sewing.

6. The fabric is not drawn to the rear when the sewing has
     finished.
7. The thread is too heavy or too fine for the needle.

1. The bobbin thread is not threaded properly in the bobbin

case and shuttle.

2. Lint has collected in the shuttle area.
3. The bobbin is damaged and doesn't turn smoothly.

1. The needle is incorrectly inserted.
2. The needle is bent or blunt.
3. The needle clamp screw is loose.
4. The needle thread tension is too tight.
5. The fabric is not drawn to the rear when the sewing has
     finished.
6. The needle is too fine for the fabric being sewn.

1. The needle is incorrectly inserted.
2. The needle is bent or blunt.
3. The needle and/or threads are not suitable for the work being

sewn.

4. A blue tipped needle is not being used for sewing stretch,

very fine fabrics and synthetics.

5. The needle thread is not threaded properly.
6. The wrong needle is being used.

1. The needle thread tension is too tight.
2. The needle thread is not threaded properly.
3. The needle is too heavy for the fabric being sewn.
4. The stitch length is too long for the fabric.

1. The feed dog is packed with lint.
2. The stitches are too fine.
3. The feed dog is not raised after “drop feed” sewing.

1. The machine is not plugged in.
2. A thread is caught in the shuttle race.
3. The clutch is disengaged.

1. There is thread caught in the shuttle race.
2. Lint has built up in the shuttle or the shuttle race.

Page 16
Page 18
Page 10
Page 10
Page 22

Page 22

Page 10

Page 14

Page 36
Change the bobbin

Page 10
Page 10
Page 10
Page 18
Page 22

Page 10

Page 10
Page 10
Page 10

Page 10

Page 16
Change the needle

Page 18
Page 16
Page 10
Make stitch denser

Page 36
Make stitch coarser
Page 20

Page 8
Page 36
Page 14

Page 36
Page 36

Summary of Contents for G1206

Page 1: ...INSTRUCTION BOOK MANUAL DE INSTRUCCIONES MANUEL D INSTRUCTIONS...

Page 2: ...been dropped or damaged or dropped into water Return this sewing machine to the nearest authorized dealer or service center for examination repair electrical or mechanical adjustment 4 Never operate...

Page 3: ...es necesario examinarla repararla o someterla a ajustes el ctricos o mec nicos 4 No utilice nunca la m quina si tiene bloqueada alguna v a de ventilaci n Mantenga las v as de ventilaci n de esta m qui...

Page 4: ...r cette machine au distributeur autoris ou au service tech nique le plus proche afin de la faire examiner ou r parer ou de faire proc der certains r glages lectriques ou m caniques 4 Ne jamais faire f...

Page 5: ...Inserting the Bobbin Case 12 Winding the Bobbin 14 Threading Bobbin Case 14 Threading the Machine 16 Needle threader optional 16 Drawing Up Bobbin Thread 18 Thread Tension Dial 18 Stitch Selector Dia...

Page 6: ...llado de la bobina 15 Enhebrado el estuche de la bobina 15 Enhebrado de la m quina 17 Ensartador de agujas opci nal 17 Extracci n del hilo de la bobina 19 Regulador de tensi n del hilo 19 Selector de...

Page 7: ...te 15 Enfilage du bo tier de canette 15 Enfilage de la machine 17 Enfileur d aiguille int gr facultatif 17 Comment faire remonter le fil 19 Molette tension du fil 19 S lecteur des motifs 21 Bouton de...

Page 8: ...winder spindle t Spool pins y Bobbin winder thread guide u Thread guide i Thread take up lever o Thread tension dial 0 Face plate 1 Thread cutter 2 Needle threader optional 3 Needle plate 4 Extension...

Page 9: ...0 Volant 1 Interrupteur 2 Bo tier de contact 3 Bras libre 4 Levier d l vation du pied SECCI N 1 DESCRIPCI N DE LA M QUINA Nombre de las partes q Planca de retroceso w Selector de patrones e Tope de la...

Page 10: ...ng the table Pull the table away from the machine SECTION 2 GETTING READY TO SEW Accessories Storage Box Sewing accessories are conveniently located in the extension table q Accessories storage box Fr...

Page 11: ...ce que son taquet se place dans la machine Accesorios est ndar q Bobinas w Descosedor abridor de ojales e Agujas r Prensatelas para ojales t Prensatelas para puntada invisible y Prensatelas para crema...

Page 12: ...t a qualified electrician to install the proper outlet Do not modify the plug in any way Foot Controller Model YC 482J EC or TJC 150 is used with this machine Controlling Sewing Speed Sewing speed can...

Page 13: ...ctrique murale dans un seul sens Si elle ne rentre pas compl tement dans la prise retournez la Si elle ne se branche toujours pas faites appel un lectricien qualifi qui installera une prise appropri e...

Page 14: ...the back of the foot holder The presser foot will drop off q Lever To attach Place the presser foot so the pin on the foot lines up just under the groove of the foot holder Lower the foot holder to l...

Page 15: ...pied Abaissez le releveur de pied pour verrouiller le pied en position w chancrure e Charni re Montaje Coloque el pie de forma que el pasador quede bajo la ranura del prensatelas Baje el soporte del p...

Page 16: ...ize on a small piece of the fabric which will be used for actual sewing Use the same thread for needle and bobbin When sewing stretch very fine fabrics and synthetics use a BLUE TIPPED needle The blue...

Page 17: ...e est bonne placer le c t plat de l aiguille sur une surface plane la plaque d aiguille une surface en verre etc La distance entre l aiguille et la surface plane sur laquelle l aiguille repose doit tr...

Page 18: ...for holding the spool of thread in order to feed thread to the machine To use pull up the spool pin Push down for storage Setting Spool Pins Removing or Inserting the Bobbin Case Open the hook cover q...

Page 19: ...e Quand vous ins rez la navette bien placer l pine du bo tier de canette dans la fente de la cage de la navette e pine Ajuste de los postes para carretes Los pernos para carretes se usan para sostener...

Page 20: ...thread close to the hole in the bobbin n Depress the foot control again When the bobbin is fully wound stop the machine Return the bobbin winder spindle to its original position by moving the spindle...

Page 21: ...le volant vers l int rieur pour engager l embrayage REMARQUE Ne touchez pas la broche du d vidoir pendant le fonctionnement de la machine Enrollado de la bobina z Tire del volante hacia afuera x Saqu...

Page 22: ...thread guide on the left b Thread the needle eye from front to back Note You may want to cut the end of thread with sharp scissors for easier needle threading 1 2 3 Needle threader optional z Raise th...

Page 23: ...derri re le guide de l aiguille b Enfilez le fil dans l aiguille d avant vers l arri re NOTE Pour faciliter l enfilage du fil de l aiguille nous vous sugg rons de couper le fil avec des bons ciseaux...

Page 24: ...ppears on the right side top side of the fabric loosen the needle thread tension by moving the dial to a lower number c Needle thread tension is too loose When the needle thread top thread appears on...

Page 25: ...poco en el reverso de la tela q Hilo de la aguja hilo superior w Hilo de la bobina hilo inferior e Anverso de la tela lado superior r Reverso de la tela lado inferior t Regulador de tensi n del hilo y...

Page 26: ...o raise the feed dog pull down the drop lever and move it to the left as illustrated The feed dog must be up for normal sewing The feed dog will return to the up position when the machine starts runni...

Page 27: ...ntra nement tirez le levier d abaissement vers le bas et d placez le vers la droite comme le montre l illustration w Levier d abaissement c Pour remonter la griffe d entra nement tirez le levier d aba...

Page 28: ...ng the guide line letting the fabric feed by itself x For fastening the end of seams press the reverse stitch button and sew several reverse stitches Raise the presser foot and remove the fabric drawi...

Page 29: ...de biche et enlevez le tissu en tirant le fil vers l arri re SECCI N 3 COSTURA B SICA Puntada recta q Patr n de puntadas A1 B w Pie prensatelas Prensatelas para zigzag e Tensi n del hilo 2 6 z Levant...

Page 30: ...rner To turn a square corner 5 8 1 6 cm from the fabric edge Stop stitching and lower the needle by turning the handwheel counterclockwise Raise the presser foot and turn the fabric to line the edge w...

Page 31: ...centrale de l aiguille w Bord du tissu e Guides de couture Esquinas en ngulo La gu a de ngulos ayuda a mantener un margen de 1 6 cm al coser las esquinas Cuando el borde de la tela que queda hacia us...

Page 32: ...the feed dogs Match the holes in the button with the horizontal slot on the presser foot Choose a pattern width matching the distance of the holes in the button Lower the foot to hold the button in p...

Page 33: ...os en bot n con la ranura horizontal en el pie prensatelas Ajuste la anchura de las puntadas igual ndola a la distancia de los agujeros en el bot n Baje el pie prensatelas para sujetar el bot n en su...

Page 34: ...r dial at Sew until you reach the back marking of the buttonhole Stop sewing at a right stitch nSet the pattern selector dial at Sew a few bartacks and raise the needle from the fabric Set the pattern...

Page 35: ...l refuerzo A continuaci n corte la abertura con un cortaojales Tenga cuidado de no cortar las puntadas Faites une boutonni re d essai avec le m me tissu la m me surface de contact et les m mes points...

Page 36: ...move the fabric from the machine and cut the sewing threads m Pull the left end of the filler cord to tighten it Thread the end through a darning needle draw to the wrong side of the fabric and cut q...

Page 37: ...biche pour pouvoir le tenir fortement v Baissez l aiguille jusqu au tissu l endroit o vous allez commencer la boutonni re et baissez le pied de biche b Appuyez doucement sur la p dale et faites la bo...

Page 38: ...stitches q Pattern selector G w Presser foot Zigzag foot e Thread tension 6 8 Shell Tuck x Position the fabric so that the needle at its leftmost position just pierces the edge of the fold c Turn the...

Page 39: ...ja se mueva hacia la derecha deje que la aguja pase justo por encima del borde doblado de la tela Despu s de coser abra la tela y planche las alforzas hacia un lado para dejarlas planas z Haga el dobl...

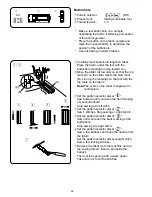
Page 40: ...und the applique making sure the needle falls along the outer edge of the applique When sewing corners lower the needle down into the fabric Raise the presser foot and pivot the fabric to the right or...

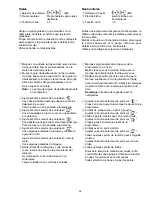
Page 41: ...le tissu gauche Levez le pied de biche et pivotez le tissu vers la droite ou la gauche Hilvane o fusione con un adhesivo t rmico para telas las piezas de la aplicaci n a la tela Cosa alrededor de la...

Page 42: ...huttle by the center pin and fit it carefully back into the shuttle race forming a perfect circle with the shuttle driver Attach the shuttle race ring making sure the bottom pin fits into the notch Lo...

Page 43: ...les dents de la griffe d entra nement Remettez la plaque aiguille en place Limpieza de las dientes de arrastre Saque la aguja y el prensatelas Saque el tornillo de la placa de agujas y saque la placa...

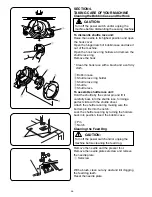
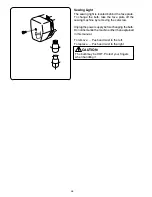
Page 44: ...off the sewing machine by removing the setscrew Unplug the power supply before changing the bulb Do not dismantle the machine other than explained in this manual To remove Push and twist to the left...

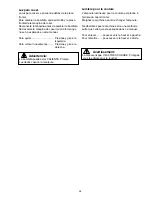
Page 45: ...ser de otra forma que no se ha explicado en este manual Para quitar Presione y gire a la izquierda Para colocar nuevamente Presione y gire a la derecha L ampoule lumineuse pour la couture est plac e l...

Page 46: ...shed 6 The needle is too fine for the fabric being sewn 1 The needle is incorrectly inserted 2 The needle is bent or blunt 3 The needle and or threads are not suitable for the work being sewn 4 A blue...

Page 47: ...lusas en la rea de la lanzadera 3 La canilla se ha estropeado o no gira correctamente 1 La aguja no est bien colocada 2 La aguja est despuntada o doblada 3 El tornillo de sujeci n de la aguja est floj...

Page 48: ...a canette est ab m e et fonctionne mal 1 L aiguille n est pas install e correctement 2 L aiguille est tordue ou mouss e 3 La vis de blocage de l aiguille est desserr e 4 La tension du fil de l aiguill...

Page 49: ......

Page 50: ......

Page 51: ......

Page 52: ...Printed in Thailand 743 801 829 E S F...

Reviews: