background image

JanomeFlyer.com

SECCIÓN 1.COMPONENTES PRINCIPALES

Nombres de las partes ............................................. 3

Accessorios estandares ........................................... 5

SECCIÓN 2.PREPARACION DE LA MAQUINA
  PARA COSER

Conexión de la máquina a la red eléctrica ............... 7
Cuando utilice por primera vez su máquina de coser .. 7
Para su seguridad ..................................................... 7
Clavija  polarizada .................................................... 7
Control de la velocidad de costura ........................... 7
Ajuste de los porte-carretes ..................................... 9
Palanca de elevación del prensatelas ...................... 9
Cortahilos .................................................................. 9
Estuche de accesorios ............................................. 9
Ampliación móvil de la superficie de costura ......... 11
Cómo quitar/poner el enmangue del prensatelas .. 11
Cómo bajar/subir los dientes del transportes ........ 11
Cambio de aguja .................................................... 13
Selección de hilo y tela ........................................... 13
Cambio de prensatelas ........................................... 15
Embobinado de la canilla ................................. 15~19
Enhebrado del hilo de la aguja ......................... 21~23
Ajuste de la tensión del hilo de la aguja para puntada
  recta ...................................................................... 25
Ajuste de la tensión del hilo de la aguja para puntada
  zig-zag .................................................................. 27
Perilla de selección de patrón ................................ 29
Perilla de longitud de puntada ................................ 29
Control de puntada reversa .................................... 29

SECCIÓN 3.OPERACIONES BÁSICAS DE
  COSTURA

Costura de puntada recta ....................................... 31
Cambio de dirección de costura ............................. 31
Uso de las guías de costura ................................... 31
Puntada de zig-zag ................................................. 33

SECCIÓN 4.COSTURA FUNCIONAL

Puntada de sobrehilado o remate .......................... 33
Puntada de múltiple zig-zag ................................... 35
Puntada de dobladillo ............................................. 35
Puntada recta triple ................................................ 37
Extensión de “Rick-rack” ......................................... 37
Puntada de múltiple zig-zag ................................... 39
Costura de botones ................................................ 41
Aplicación de cremalleras ...................................... 43
Dobladillo invisible .................................................. 45
Dobladillos enrollados ............................................ 47
Puntada en forma de concha ................................. 49
Puntada de caja ...................................................... 49
Puntada de pluma .................................................. 51
Puntada elástica de remate o sobrehilado ............. 51
Puntada elástica de extensión ............................... 53

INDICE

SECCIÓN 5.MANTENIMIENTO DE LA MAQUINA

Limpieza de los dientes del transporte .................. 55
Limpieza de la corredera de la lanzadera .............. 57
Luz para coser ........................................................ 59
Huilage de la machine ............................................ 59
Soluciones para problemas de funcionamiento ...... 61

Janome HD 1000 Sewing Machine Instruction Manual

www.janomeflyer.com

HD1000 Owners Manual/ User Guide

Summary of Contents for HD 1000

Page 1: ...J a n o m e F l y e r c o m Janome Heavy Duty 1000 Instruction Manual Janome HD 1000 Sewing Machine Instruction Manual www janomeflyer com HD1000 Owners Manual User Guide...

Page 2: ...into water Return this sewing machine to the nearest authorized dealer or service center for examination repair electrical or mechanical adjustment 4 Never operate the appliance with any air opening b...

Page 3: ...entro de mantenimiento m s pr ximo si es necesario examinarla repararla o someterla a ajustes el ctricos o mec nicos 4 No utilice nunca la m quina si tiene bloqueada alguna v a de ventilaci n Mantenga...

Page 4: ...n et la p dale de cette machine ne soient jamais encombr s de peluches poussi res et morceaux de tissus 5 Ne jamais laisser tomber ou ins rer des objets dans les ouvertures 6 Ne jamais utiliser la mac...

Page 5: ...4 Adjust the Needle Thread Tension for a Zigzag Stitch 26 Pattern Selector Dial 28 Stitch Length Dial 28 Reverse Stitch Control 28 SETION 3 BASIC SEWING Straight Stitch Sewing 30 To Change Sewing Dire...

Page 6: ...tada zig zag 27 Perilla de selecci n de patr n 29 Perilla de longitud de puntada 29 Control de puntada reversa 29 SECCI N 3 OPERACIONES B SICAS DE COSTURA Costura de puntada recta 31 Cambio de direcci...

Page 7: ...aiguille pour le point zig zag 27 Cadran de s lection du point 29 Cadran de r glage de la longueur du point 29 Bouton de marche arri re 29 PARTIE 3 COUTURE DE BASE Utilisation du point droit 31 Chang...

Page 8: ...ion table Accessory storage box 5 Lower thread guide 6 Reverse stitch cotrol 7 Stitch length dial 8 Pattern selector dial 9 Presser foot 0 Needle 1 Needle clamp screw 2 Foot holder 3 Lever 4 Thumb scr...

Page 9: ...9 Recept cule para cord n el ctrico 0 Elevador del prensatelas SECCI N 1 COMPONENTES PRINCIPALES PARTIE 1 PIECES MAITRESSES Identification des pi ces q Arr t du d vidoir w Broches du d vidir e Broche...

Page 10: ...Needle set r Large screwdriver t Small screwdriver y Seam ripper Buttonhole opener u Oil i Buttonhole foot o Zipper foot 0 Hemmer foot 1 Hem guide q w e r t y u i o 0 1 Janome HD 1000 Sewing Machine I...

Page 11: ...remalleras 0 Prensatela para dobladillo 1 Gu a de dobladillo q Canettes w Feutre e Jeu d aiguitles r Gros tournevis t Petit tournevis y D coud vite Ouvre boutonni re u Huile i Pied boutonni re o Pied...

Page 12: ...wer cord make sure the voltage and frequency shown on the ma chine conform to your electrical power 1 Turn off the power switch w 2 Insert the machine plug t into the machine socket r 3 Insert the pow...

Page 13: ...on el interruptor de corriente y desenchufe la clavija de toma de corriente cuando Deje la m quina desatendida Vaya a poner o quitar alguna pieza Limpie la m quina No ponga nada encima del pedal de co...

Page 14: ...e Highest position The presser foot lifter raises and lowers the presser foot You can raise it about 1 4 0 6 cm higher than the normal up position for easy removal of the presser foot or to help place...

Page 15: ...levaci n del prensatelas se emplea para subir y bajar el prensatelas Usted puede subirlo aproximadamente 0 6 cm 1 4 m s de la posici n elevada normal para que le resulte m s f cil colocar telas gruesa...

Page 16: ...nterclockwise with a screwdriver To attach Match the hole in the foot holder w with the threaded hole in the presser bar e Fit the thumb screw q into the hole Tighten the screw q by turning it clockwi...

Page 17: ...de pied q Vis de blocage w Support de pied e Barre du pied presseur Retrait Retirez la vis de blocage q en la tournant dans le sens antihoraire l aide du tournevis Installation Alignez le trou du sup...

Page 18: ...Coating Drapery and Uphol stery Fabric 9 or 11 11 or 14 14 or 16 Light weight Medium weight Heaavy weight Flat side Lado plano M plat Needle Aguja Aiguille z x q w c Changing Needle q Needle clamp sc...

Page 19: ...urelles ou artificielles En general para materiales finos aguja e hilo fino y para pesados aguja e hilo grueso Comprobar siempre sobre una peque a pieza del tejido a coser si el hilo y la aguja son lo...

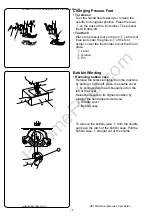
Page 20: ...shuttle pull open the latch of the bobbin case Pull the bobbin case w straight out of the shuttle Changing Presser Foot To remove Turn the handwheel toward you to raise the needle to its highest posi...

Reviews: