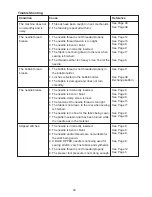
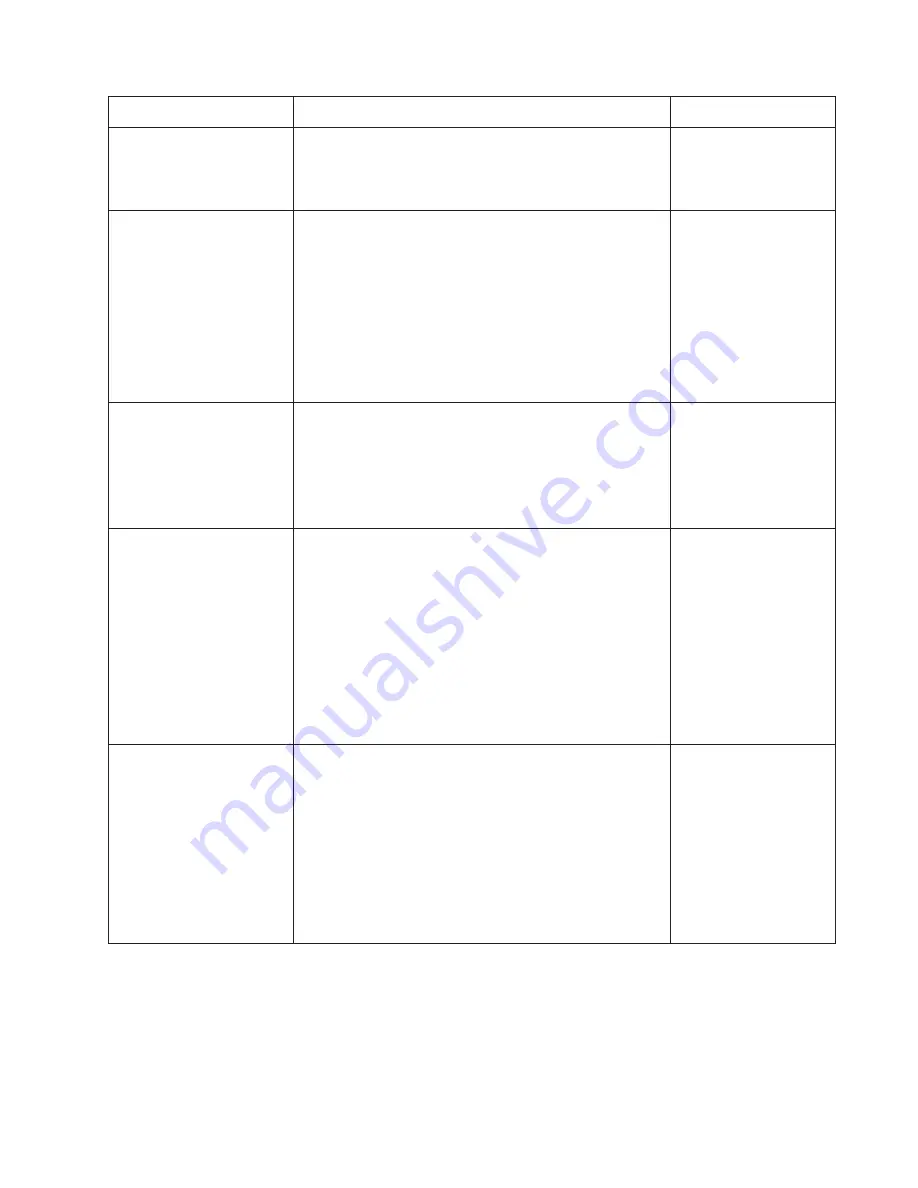
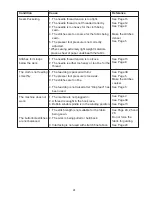
background image

40

Trouble Shooting

Condition
The machine does not 

run smoothly and is 

noisy.
The needle thread 

breaks.

The bobbin thread 

breaks.

The needle breaks.

Skipped stitches.

Cause
1. Threads have been caught in hook mechanism.

2. The feed dog is packed with lint.

1. The needle thread is not threaded properly.

2. The needle thread tension is too tight.

3. The needle is bent or blunt.

4. The needle is incorrectly inserted.

5. The fabric is not being drawn to the rear when 

    sewing is finished.

6. The thread is either too heavy or too fine for the 

    needle.
1. The bobbin thread is not threaded properly in 

    the bobbin holder.

2. Lint has collected in the bobbin holder.

3. The bobbin is damaged and does not turn 

    smoothly.
1. The needle is incorrectly inserted.

2. The needle is bent or blunt.

3. The needle clamp screw is loose.

4. The tension of the needle thread is too tight.

5. The fabric is not drawn to the rear when sewing 

    is finished.

6. The needle is too fine for the fabric being sewn.

7. The pattern selector dial has been turned while 

    the needle was in the material.
1. The needle is incorrectly inserted.

2. The needle is bent or blunt.

3. The needle and/or threads are not suitable for 

    the work being sewn.

4. A BLUE TIPPED needle is not being used for 

    sewing stretch, very fine fabrics and synthetics.

5. The needle thread is not threaded properly.

6. The presser foot pressure is not strong enough.

Reference
See Page 38
See Page 38

See Page 12

See Page 15

See Page 8

See Page 8

See Page 17

See Page 8

See Page 11

See Page 38

Exchange bobbin.

 
See Page 8

See Page 8

See Page 8

See Page 15

See Page 17

See Page 8

See Page 16

See Page 8

See Page 8

See Page 8

See Page 8

See Page 12

See Page 5

Summary of Contents for HD3000

Page 1: ...INSTRUCTION BOOK...

Page 2: ......

Page 3: ...t 9 Do not unplug by pulling on cord To unplug grasp the plug not the cord 10 Keep fingers away from all moving parts Special care is required around the sewing machine needle and or cutting blade 11...

Page 4: ...Thread Tension 15 Thread Tension for Zigzag Sewing 15 Pattern Selector Dial 16 Zigzag Width Control 16 Stitch Length Control 16 Variable Needle Position 16 SECCTION III BASIC SEWING Straight Stitch Se...

Page 5: ...le lever Thread cutter Needle threader Needle plate Hook cover plate Hook cover plate release button Extension table Accessory storage box Reverse stitch button Thread take up lever Carrying handle Ha...

Page 6: ...R Automatic buttonhole foot Bobbin X 5 1 set on the machine Extra spool pin Felt Each presser foot and pocket is lettered for easy identification and storage To achieve optimum sewing results use the...

Page 7: ...ng Lift out the extension table as illustrated For attaching the table Position the two pins of the storage box on the base slit and push down gently Removable Extension Table Free arm sewing The free...

Page 8: ...hen attaching or removing parts when cleaning the machine Do not place anything on the foot control otherwise the machine will run intermittently Operating Instructions The symbol O of a switch indica...

Page 9: ...o 1 when sewing chiffon lace organdy and other fine fabrics Velours and knits with a lot of stretch may also require a 1 setting Dropping the Feed Dogs Drop feed lever is located underneath of free ar...

Page 10: ...ition 3 Place the presser foot so the pin on the foot lies just under the groove of the foot holder Lower the foot holder to lock the foot in place CAUTION Turn the power switch off before replacing t...

Page 11: ...on depressed the machine sews backwards Seam Guide Line As loThe numbers on the needle plate indicate the distance between the left needle position and the line The numbers in the front indicate in mi...

Page 12: ...silk like fabrics Fine Medium Silk 80 100 Cotton 80 100 Synthetic 80 100 Heavy weight Denim Tweed Coating Quilting Lawn Georgette Tricot Sheeting Jersey Wool Knit 9 65 11 75 Blue tip needle Thread Ne...

Page 13: ...e thread spool The small spool holder is used with narrow or small thread spools Additional Spool Pin The additional spool pin is used to wind extra bobbins without unthreading the machine To use inse...

Page 14: ...h it to the right With the free end of the thread held in your hand depress the foot control Stop the machine when it has made a few turns and cut the thread close to the hole in the bobbin Depress th...

Page 15: ...clockwise Guide the thread into the notch A on the front side of the bobbin holder Draw the thread to the left sliding it between the tension spring blades Continue to draw the thread lightly until t...

Page 16: ...he thread from right to left over the take up lever and down into the take up lever eye r Then guide it down along the left slot t Slide the thread from the left behind the needle bar therad guide Thr...

Page 17: ...gh the needle eye from be hind Paying close attention to the needle point draw the thread around the guide and under the hook w Hook e Guide Turn the knob in the direction of the arrow in the illus tr...

Page 18: ...hand Turn the handwheel slowly towards you with your right hand until the needle goes down and continue turning handwheel until the take up lever is at its highest posi tion Lightly draw up the needle...

Page 19: ...tter zigzag stitches the needle thread tension should be slightly weaker than in the case of straight sewing The needle thread should appear slightly on the re verse side of the fabric Set the desired...

Page 20: ...machine will sew the maximum 6 5mm 0 25 wide zigzag Raise the needle above the fabrics when you set the stitch width Stitch Length Control The higher the number the longer the stitch length You can s...

Page 21: ...the back Depress the foot control Gently guide the fabric along the guide line letting the fabric feed naturally SECTION III BASIC SEWING For fastening the ends of seams press the reverse stitch butto...

Page 22: ...on as desired Lower the presser foot Straight Stitching on Heavy Fabrics Lower the needle info the fabric at the point where you wish to start sewing Press the small black button on the zigzag foot wi...

Page 23: ...g applique sewing on buttons etc Overcasting This type of stitch is used on the seam allowance to prevent fabrics from fraying at raw edges It can be used to finish a hem edge Place the edge of the fa...

Page 24: ...creating a ridge The black prong guides your sewing so the needle falls off the fabric wrapping the threads around the edge to stop raveling Tricot Stitch Place the fabric under the presser foot so th...

Page 25: ...The stitch is sewn with two stitches forward and one stitch backward forming a seam that does not rip easily Garments should be basted for fitting before seaming Outline Stretch Stitch Pattern 14 is a...

Page 26: ...t the stitch width if necessary Lower the foot Align the both holes of button with the needle swing lower the foot and depress the foot control To strengthen the shank cut the threads leaving a 20 cm...

Page 27: ...abric sample and mark the top and bottom to determine the position of buttonhole Use the interfacing on the stretch fabrics Turn the handwheel toward you to raise the needle to its highest position Ra...

Page 28: ...d bobbin threads leaving about 10 cm 4 thread ends Draw the needle thread to wrong side of fabric by pulling the bobbin thread Then knot the threads Cut the both needle and bobbin threads leaving abou...

Page 29: ...hole foot B Pull the buttonhole lever downward as far as it will go Lower the needle into the garment where the but tonhole is to start and lower the foot Sew the front bartack and left row then stop...

Page 30: ...il they clear the front end Hook the filler cord info the forks on the front of the R foot to hold them tight Lower the needle into the garment where the buttonhole will start and lower the foot Depre...

Page 31: ...of the zipper opening Reverse stitch to knot the stitches Sew the zipper opening with a basting stitch To sew the left side of the zipper attach the zipper foot to the pin on the right hand side To s...

Page 32: ...with the pin on the right hand side Lower the zipper foot Sew through fold and zipper tape Stop just before the zipper foot reaches the slider on the zipper tape Turn the handwheel by hand and lower t...

Page 33: ...er teeth and stitch through garment and zipper tape Stop about 5 cm 2 from the top of the zipper With the needle down in the fabric raise the foot remove the basting stitches and open the zipper Then...

Page 34: ...oot Sew 3 or 4 stitches while pulling the needle and bobbin threads Lower the needle into the fabric and lift the hemmer foot Insert the folded portion of the fabric into the curl of the hemmer foot L...

Page 35: ...the desired amount and pin in place Then fold the hem under the fabric as illustrated Position the fabric on the machine so that the needle just pierces the folded part of the fabric when the needle c...

Page 36: ...le thread should appear on the reverse side of the fabric Test the stitch on the actual fabric for the best results Stretch Stitch Patterns Stitch length of the automatic patterns No 14 to 18 are pres...

Page 37: ...th the stitch length control at 4 sew straight lines 1 cm 3 8 apart across the area to be smocked Knot the threads along the ege Pull the bobbin threads and distribute gathers evenly Sew pattern stitc...

Page 38: ...Quilting The quilting guide will help to keep the stitching lines straight Insert the quilter in the opening and slide it at the desired width Sew guiding the quilter over the previous row of stitchi...

Page 39: ...e Position the fabric so that the needle pierces 0 1 to 0 2 cm 1 16 inside of folded part and lower the presser foot Turn the guide screw and move the sliding guide next to the folded edge Sew guiding...

Page 40: ...he edge of the fabric on the right forming a tuck Fagoting Fold under 1 5cm 1 12 on each fabric edge and press Pin the two edges to paper 0 3cm 1 8 apart Sew slowly guiding the fabric so the needle ca...

Page 41: ...outer edge of the applique When sewing corners lower the needle down into the fabric Raise the presser foot and pivot the fabric to the right or left When applique sewing is finished return the pressu...

Page 42: ...holder Lift up the bobbin holder and remove it Clean the bobbin holder with a lint brush Clean the feed dogs hook race and bobbin holder with the lint brush and a soft dry cloth Inserting the Bobbin...

Page 43: ...39 Sewing Light The sewing light is located behind the face plate To remove Push and twist to the left To replace Push and twist to the right NOTE When replacing the bulb unplug the machine...

Page 44: ...ed 2 The needle is bent or blunt 3 The needle clamp screw is loose 4 The tension of the needle thread is too tight 5 The fabric is not drawn to the rear when sewing is finished 6 The needle is too fin...

Page 45: ...edle is either too heavy or too fine for the thread 1 The feed dog is packed with lint 2 The presser foot pressure is too weak 3 The stitches are too fine 4 The feed dog is not raised after Drop feed...

Page 46: ......

Page 47: ......

Page 48: ...753 800 379 q EN...

Reviews: