

25
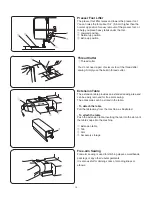
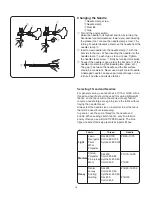
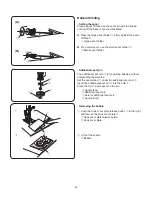
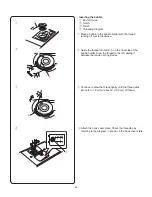
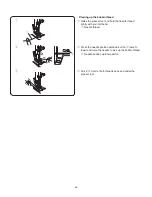
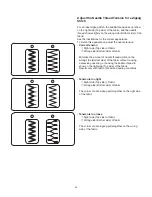
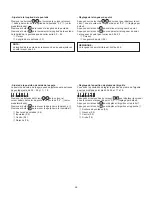
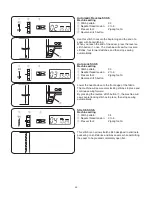
• Colocación de la canilla en el portacanillas
q
Extremo de hilo
w
Ranura
e
Ranura
r
Esquema de enhebrado
z
Ponga una canilla dentro del portacanillas de modo que el hilo
se suelte en el sentido contrario a las agujas del reloj.
x
Pase del hilo por la ranura
w
en la parte frontal de
portacanillas. Tire del hilo hacia la izquierda pasándolo entre
la chapa-muelle de tensión del portacanillas.
c
Continúe tirando del hilo ligeramente hacia atrás hasta que
pase por la ranura
e
. Deje sobresalir aproximadamente
15.0 cm (6˝) de hilo.
v
Coloque la tapa de acceso a canilla dejando el hilo hacia atrás
y por encima de la placa de aguja. Observe el esquema de
enhebrado
r
situado en la tapa de acceso a canilla y
compruebe si ha enhebrado correctamente.
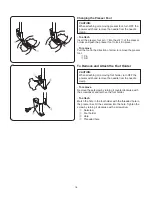
• Insertion de la canette
q
Extrémité du fil
w
Encoche
e
Encoche
r
Guide d’enfilage
z
Placez la canette dans son support, le fil se déroulant en sens
antihoraire.
x
Guidez le fil dans l’encoche
w
à l’avant du support de canette.
Tirez le fil vers la gauche en le glissant entre les lames du
ressort de tension.
c
Continuez à tirer doucement sur le fil jusqu’à ce qu’il glisse
dans l’encoche
e
. Tirez environ 15,0 cm(6˝) de fil.
v
Replacez en place le couvercle de navette. Placez les deux
languettes dans les fentes de la plaque de navette et
encliquetez-la en place. Vous trouverez un guide d’enfilage
r
de la canette sur le couvercle de navette.
Summary of Contents for Hello Kitty 18750
Page 1: ...Instruction Manual Manual De Instrucciones Livre D Instructions...
Page 98: ......
Page 99: ......


