JanomeFlyer.com
40
B1 Sensor (Square) buttonhole
z
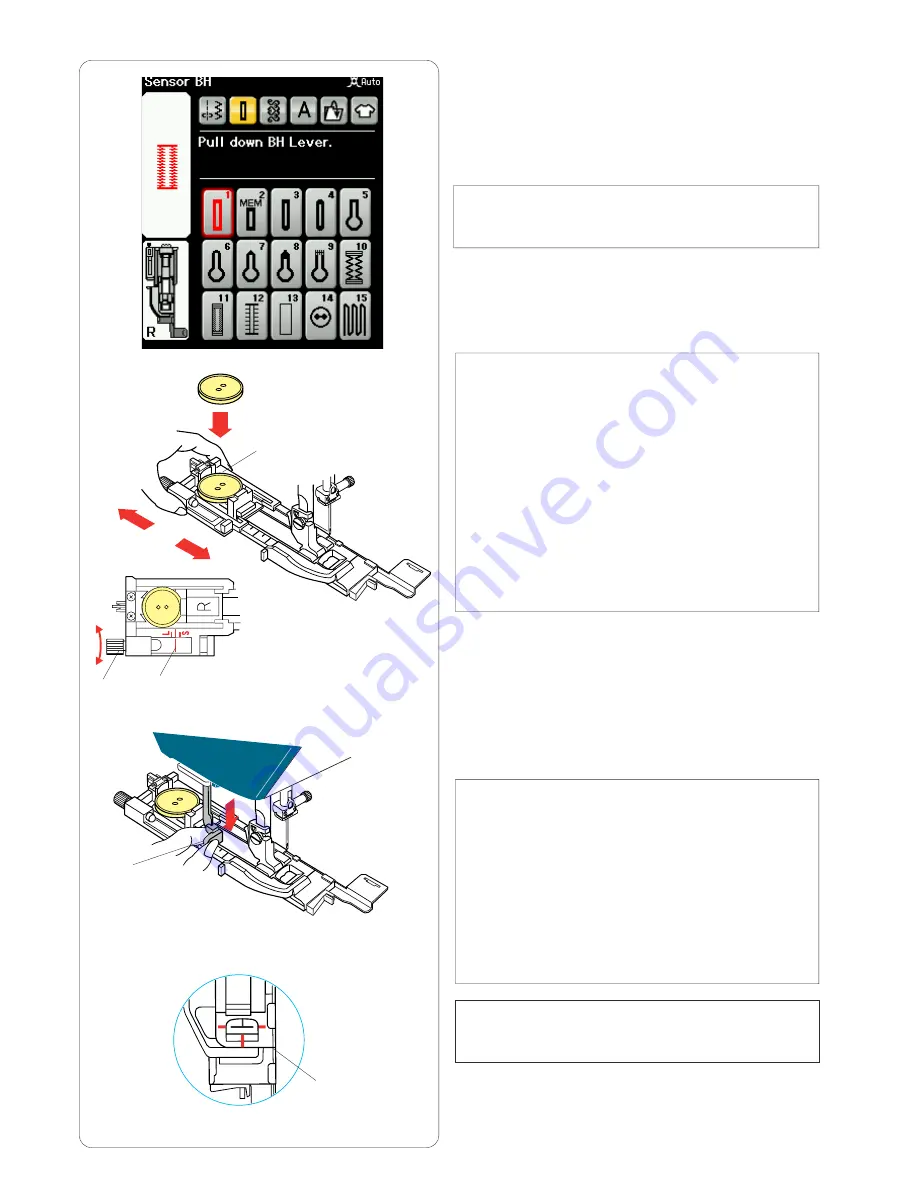
Pull open the button holder of the automatic
buttonhole foot R, and place the button in the button
holder. Push it tightly against the button.
q
Button holder
NOTE:
Use the blue needle for sewing buttonholes on fine to
medium fabrics.
x
Attach the buttonhole foot. Raise the presser foot.
Insert a corner of fabric under the foot. Press the
needle up/down button twice. Remove the fabric to the
left to draw the threads to the left under the foot.
NOTES:
The buttonhole size is automatically set by placing a
button into the button holder on the foot.
Make a test buttonhole on an extra piece of the fabric.
Check the length of the test buttonhole, and adjust the
buttonhole length if necessary by turning the adjusting
screw on the buttonhole foot.
To increase the buttonhole length, turn the adjusting
screw to move the marker toward “L”.
To decrease the buttonhole length, turn the adjusting
screw to move the marker toward “S”.
w
Adjusting screw
e
Marker
c
Place the fabric under the buttonhole foot. Lower the
needle at the starting point by turning the hand wheel.
Lower the buttonhole foot and pull down the
button hole lever as far as it will go.
r
Buttonhole lever
v
Press the start/stop button to sew the buttonhole.
NOTE:
A warning message will appear and the machine will stop
automatically if you start the machine without pulling
down the buttonhole lever.
Press the X key, pull down the buttonhole lever and start
again.
Make sure there is no gap between the slider and front
stopper, otherwise the buttonhole will be out of position or
the left and right lengths will be different.
t
No gap
NOTE:
Use the stabilizer plate when sewing knits, stretch fabrics
or other unstable fabrics (refer to page 43).
q
w
e
r
t
z
x
c
v
Janome 12000 Sewing Machine Instruction Manual
www.janomeflyer.com
12000 Owners Manual/ User Guide


