background image

PARTS LIST

22

MODEL : Jubilee 60507

1

2

4

4

4

3

13

14

15

5

6

4

4

7

8

9

10

11

6

12

Summary of Contents for Jubilee 60507

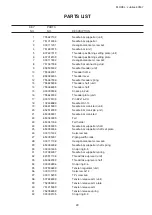
Page 1: ...SERVICE MANUAL PARTS LIST MODEL Jubilee 60507...

Page 2: ...Needle Swing 10 Adjusting Needle Drop Position 11 Adjusting Needle to Hook Timing 12 Adjusting Needle Bar Height 13 Adjusting Clearance between Needle and Hook Point 14 Adjusting Backlash between Hoo...

Page 3: ...ee mechanical adjustment P 13 bar height Needle Bar Height 8 Inappropriate needle See mechanical adjustment P 12 to hook timing Needle to Hook Timing 9 Inappropriate needle See mechanical adjustment P...

Page 4: ...bobbin correctly bobbin bobbin 2 Too much thread is Adjust the position of around on the bobbin bobbin winder stopper 3 Lint is stuck inside the Clean the shuttle bobbin holder 4 Thread quality is Ch...

Page 5: ...ustment Motor belt tension 4 Not enough oil Oil all moving parts 5 Upper shaft is loose Eliminate the looseness 7 Deformation 1 Inappropriate feed See mechanical P 17 pattern balance adjustment Stretc...

Page 6: ...4 Setscrew Face plate Service Access 1 Cap Face plate To remove Remove the cap and setscrew Remove the face plate To attach Attach the face plate with the setscrew Attach the cap...

Page 7: ...crews 6 pcs and remove the base cover To attach Shift the drop feed lever in the direction of the arrow Attach the base cover with setscrews Setscrew Setscrew Setscrew Base cover Service Access 2 Sets...

Page 8: ...d 5 Pull out the pattern selector dial and stitch length dial Remove the setscrews A B and C two off Remove the front cover unlocking all the hooks To attach Follow the above procedure in reverse Serv...

Page 9: ...ifter 1 2 3 Rear cover To remove Remove the face plate base cover and front cover see pages 4 and 6 Remove the setscrews A B C and D Lower the presser foot lifter and pull away the rear cover from the...

Page 10: ...ont cover see page 6 Set the tension dial at 4 If the tension is too tight turn the adjusting dial in the direction A If the tension is too loose turn the adjusting dial in the direction B Check the t...

Page 11: ...sser foot lifter Loosen the setscrew A Raise the presser foot lifter and tighten the setscrew A firmly Attach the needle and face plate Attach the face plate NOTE Make sure that the presser foot shoul...

Page 12: ...e needle bar swing so that the needle starts to swing 2 3 mm above the needle plate in the right outflow Tighten the setscrews on the worm securely Attach the front cover NOTE The upper shaft should t...

Page 13: ...d To adjust Remove the face plate see page 4 Select the straight stitch Loosen the setscrew Move the needle bar supporter so that the needle drops in the center of the needle hole Tighten the setscrew...

Page 14: ...the handwheel toward you to bring the needle to the right lowest position Then raise the needle 1 7mm from the lowest position While holding the handwheel as not to move the needle bar rotate the hoo...

Page 15: ...e the face plate see page 4 Remove the needle plate and bobbin holder Turn the handwheel toward you until the hook point meets the right side of the needle Loosen the setscrew and move the needle bar...

Page 16: ...o bring the hook point behind the test pin Adjust the clearance to 0 1 to 0 05 mm by moving the hook base plate up or down Tighten the setscrews A B and C securely Check the backlash of the hook drive...

Page 17: ...s If the backlash is too big turn the lower shaft bushing in the direction B If the gear engagement is too tight turn the lower shaft bushing in the direction A Tighten the setscrews and attach the ba...

Page 18: ...itch and set the stitch width at 4 Lower the presser foot Turn the handwheel to bring the feed dog to its highest position Remove the base cover see page 5 Loosen the setscrew A and nut Turn the adjus...

Page 19: ...dwheel to check the needle marks Remove the cap to access the adjusting screw If the forward feeding A is longer than backward feeding B turn the adjusting screw in the direction C If the forward feed...

Page 20: ...2 stitches in the right side row against 10 stitches in the left side row is considered acceptable To adjust Sew a test buttonhole and count the stitches on each side Remove the cap to access the adju...

Page 21: ...e to check if the fabric is fed while sewing the bartacks Remove the cap to access the adjusting screw If the fabric is fed forward A turn the adjusting screw in the direction C If the fabric is fed b...

Page 22: ...e setscrews A and machine socket Remove the setscrews B and machine socket lid Remove the nuts and disconnect the motor cords Remove the setscrews C and motor To attach the motor follow the above proc...

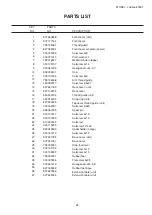
Page 23: ...PARTS LIST MODEL Jubilee 60507...

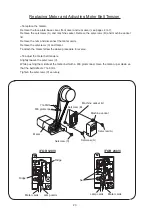
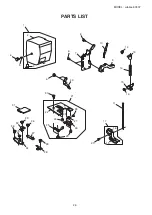
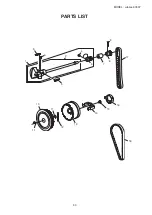
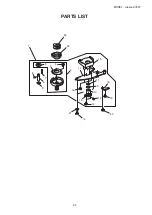
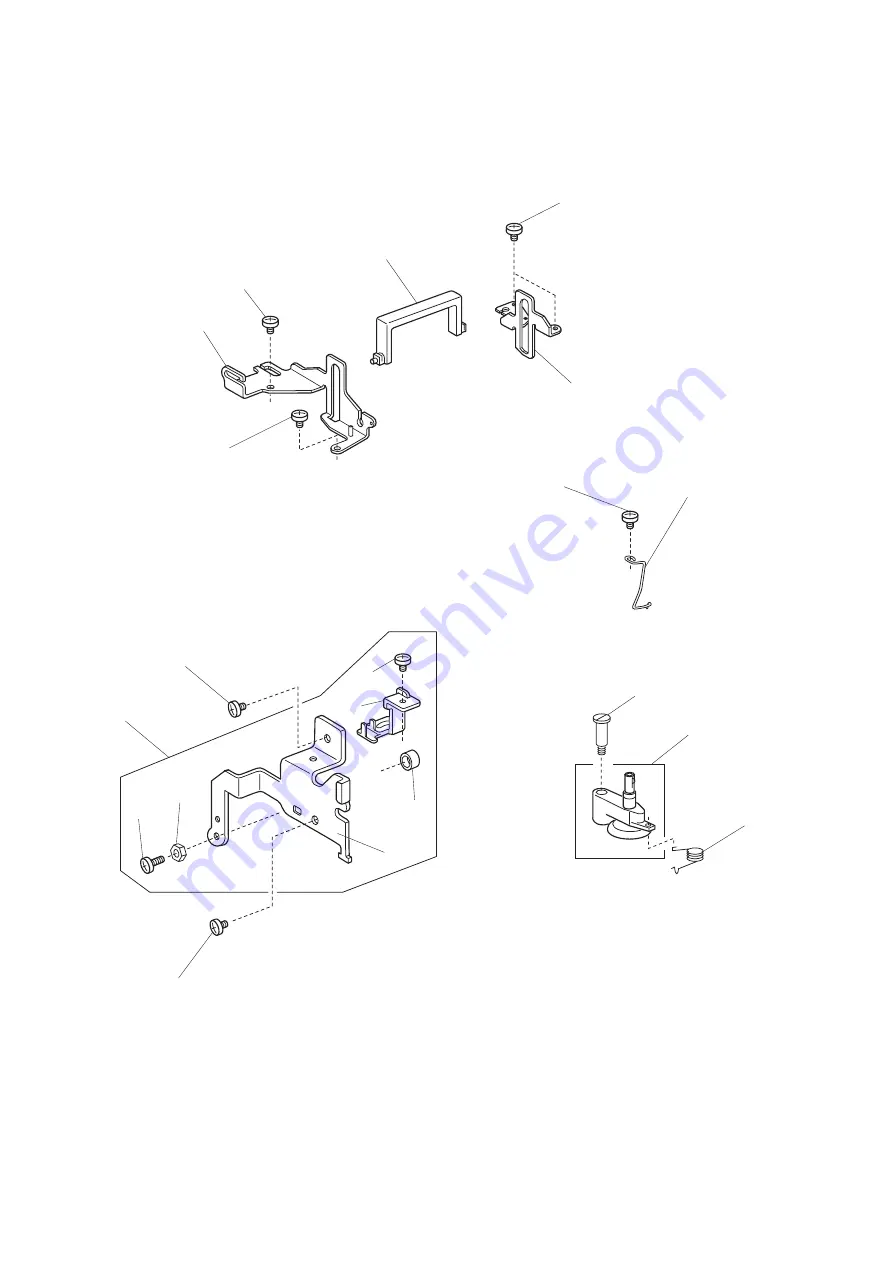
Page 24: ...PARTS LIST 22 MODEL Jubilee 60507 1 2 4 4 4 3 13 14 15 5 6 4 4 7 8 9 10 11 6 12...

Page 25: ...over bracket unit Face cover bracket Setscrew 4x20 Adjustable lock nut 4 Needle bar supporter stopper Needle thread shaft guide Bobbin winder unit Hinge screw Bobbin winder spring 1 2 3 4 5 6 7 8 9 10...

Page 26: ...PARTS LIST 24 MODEL Jubilee 60507 1 2 3 4 5 6 7 8 9 10 11 12 13 14 15 16 17 18 19 20 21 22 23 24 26 27 28 29 31 31 30 32 33 34 35 36 37 25 10...

Page 27: ...ew 3x12 Base cover unit Base cover Drop feed lever Setscrew 4x12 Setscrew 4x10 Rubber foot Flat screw 5x25 Hexagonal nut 5 3 8 Rubber foot base Extension table unit Extension table unit 1 2 3 4 5 6 7...

Page 28: ...PARTS LIST 26 MODEL Jubilee 60507 1 2 3 5 6 8 11 9 8 14 15 16 13 12 10 17 20 31 30 21 25 26 27 28 29 32 36 33 38 39 34 35 37 7 4 22 23 24 36 18 19 6 40...

Page 29: ...tton Hook cover release button spring Setscrew 2x2 3 Setscrew Hook cover plate Reverse stopper Setscrew 3x5 Needle plate adjusting plate Left Nut Setscrew 3x8 Needle plate adjusting plate Right Stoppe...

Page 30: ...PARTS LIST 28 MODEL Jubilee 60507 1 2 3 3 8 5 7 6 9 10 11 12 13 17 16 14 15 4 18 26 25 29 27 31 28 30 24 19 21 22 23 20 3 32 33 34 36 35 37 38 39 40 41 42...

Page 31: ...et screw 4x6 Needle bar supporter shaft spring Snap ring E 5 Needle bar supporter spring Thread take up lever unit Thread take up lever shaft Snap ring E 6 Tension regulator unit Setscrew 4x12 TP scre...

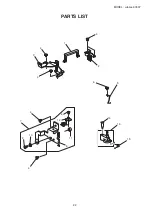
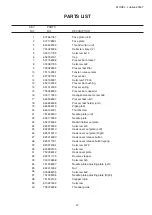
Page 32: ...PARTS LIST 30 MODEL Jubilee 60507 14 11 10 6 7 9 8 5 5 1 3 15 18 12 16 13 11 17 4 2...

Page 33: ...g Upper shaft timing gear Spring pin 3x22 Belt wheel Snap ring E 8 Spring pin 4x40 Handwheel Clutch spring Setscrew 4x8 Handwheel cap Timing belt Timing belt 1 2 3 4 5 6 7 8 9 10 11 12 13 14 15 16 17...

Page 34: ...PARTS LIST 32 MODEL Jubilee 60507 1 2 3 4 5 6 7 11 5 6 12 13 9 13 14 10 8 41 40 35 37 6 35 36 33 34 31 32 30 39 28 29 25 26 6 27 15 16 17 18 21 21 24 22 19 23 21 20 38...

Page 35: ...5143005 508020005 000111108 858177002 000002806 Feed rock shaft unit Feed dog Setscrew 3 5x8 Spring Straight pin Hexagonal socket screw 5x5 Feed regulator unit Ring Setscrew 4x8 Regulator spring Feed...

Page 36: ...PARTS LIST 34 MODEL Jubilee 60507 1 2 3 4 5 6 7 8 9 15 17 11 9 10 12 16 13 21 14 20 19 18 14 22 23...

Page 37: ...1005 827040009 000107204 823106002 650171006 000101404 650172007 000070506 627569106 102261402 Hook unit Hook body unit Hook race bottom plate Setscrew 2x2 3 Hook race magnet Hook driver shaft Hook sh...

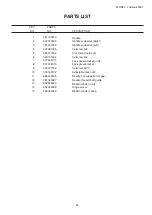
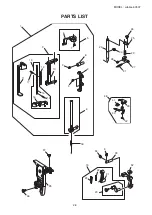
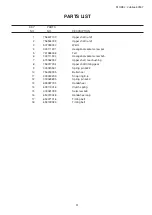
Page 38: ...PARTS LIST 36 MODEL Jubilee 60507 7 8 5 9 12 1 2 3 4 6 6 5 10 13 11 11...

Page 39: ...8 Snap ring E 3 Setscrew 4x8 Zigzag width rod Snap ring E 4 Pattern selector dial unit Pattern selector dial Cap Stitch length dial unit Stitch length dial 1 2 3 4 5 6 7 8 9 10 11 12 13 507633406 5070...

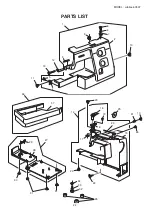
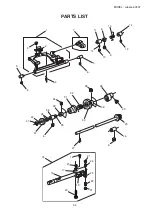
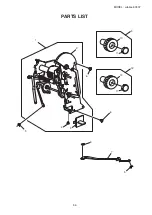
Page 40: ...PARTS LIST 38 MODEL Jubilee 60507 1 2 3 4 5 14 7 11 8 9 10 13 12 6 5 16 15 17 18...

Page 41: ...Hexagonal nut 3 1 5 5 Machine socket lid Setscrew 3x10 Motor unit Lamp socket unit Lamp 240V 15W Setscrew 4x10 Setscrew TP 5x10 Cord binder Setscrew 4x6 1 2 3 4 5 6 7 8 9 10 11 12 13 14 15 16 17 18 7...

Page 42: ...PARTS LIST 40 MODEL Jubilee 60507 2 3 4 5 6 8 9 11 10 12 1 13 14 15 7...

Page 43: ...ot Bobbin Needle set Spool holder Small Extra spool pin 2 Felt Seam ripper Screwdriver Lint brush Foot control Instruction book Cover 1 2 3 4 5 6 7 8 9 10 11 12 13 14 15 507870083 820817015 829801002...

Reviews: