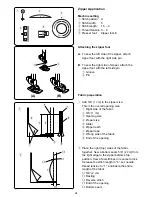
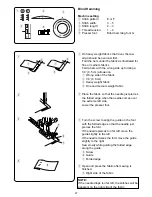
background image

34

Condition

Cause

Reference

The needle breaks.

Skipped stitches

Seam puckering

The cloth is not fed
smoothly.

The needle thread
breaks.

The bobbin thread
breaks.

1. The needle thread is not threaded properly.
2. The needle thread tension is too tight.
3. The needle is bent or blunt.
4. The needle is incorrectly inserted.
5. The needle thread and the bobbin thread are not drawn to

the rear and set properly under the presser foot when
starting sewing.

6. The fabric is not drawn to the rear when sewing is finished.
7. The thread is too heavy or too fine for the needle.

1. The bobbin thread is not threaded properly in the bobbin

holder.

2. Lint has collected in the bobbin holder.
3. The bobbin is damaged and does not turn smoothly.
4. The thread is wound loosely on the bobbin.

1. Needle is incorrectly inserted.
2. The needle is bent or blunt.
3. The needle clamp screw is loose.
4. A proper foot is not used.
5. The fabric is not drawn to the rear when sewing is finished.
6. The needle is too fine for the fabric being sewn.

1. The needle is incorrectly inserted.
2. The needle is bent or blunt.
3. The needle and/or thread are not suitable for the fabric

being sewn.

4. A blue tip needle is not used for sewing stretch, very fine

fabrics and synthetics.

5. The needle thread is not threaded properly.
6. A poor quality needle is used.

1. The needle thread tension is too tight.
2. The needle thread is not threaded properly.
3. The needle is too heavy for the fabric being sewn.
4. The stitch length is too long for the fabric.
* Use a stabilizer for very fine fabrics.

1. The feed dog is packed with lint.
2. The stitches are too fine.
3. The feed dog was not raised after being lowered.
4. The foot pressure is not adjusted properly.

Page 11
Page 15
Page 7
Page 7

Page 16
Page 16
Page 7

Page 10
Page 32
Replace the bobbin
Re-wind the bobbin.

Page 7
Page 7
Page 7
Use proper foot.
Page 16
Page 7

Page 7
Page 7

Page 7

Page 7
Page 11
Replace the needle

Page15
Page 11
Page 7
Make stitch shorter

Page 32
Make stitch longer
Page 5
Page 5

The buttonhole is
not sewn well.

The machine does
not work.

Patterns are distorted.

1. The machine is not plugged in.
2. Thread is caught in the hook race.
3. The handwheel is pulled for bobbin winding.

1. The stitch is not balanced.

1. The stitch density is not suitable for the fabric being sewn.
2. Interfacing is not being used with stretch fabrics.

Page 4
Page 32
Page 9

Page 14

Page 22
Page Use interfacing

Troubleshooting

The needle thread
loops.

1. The needle thread tension is too loose.
2. The needle size is not suitable for the thread.

Page 15
Page 7

Noisy operation

1. The feed dog is packed with lint.
2. Lint has collected in the bobbin holder.

Page 32
Page 32

Summary of Contents for Magnolia 7318

Page 1: ...INSTRUCTION MANUAL...

Page 2: ...maged cord or plug if it is not working properly if it has been dropped or damaged or dropped into water 4 Never operate the appliance with any air opening blocked Keep ventilation opening of this sew...

Page 3: ...ch stitch balance 14 Stitch Width Dial 14 Variable needle position 14 Balancing Needle Thread Tension 15 SECTION 3 BASIC SEWING Straight Stitch Sewing 16 Starting to sew 16 Changing the sewing direcit...

Page 4: ...e plate o Thread cutter 0 Needle plate 1 Extension table Accessory storage 2 Hook cover plate 3 Hook cover plate release button 4 Thread tension dial 5 Reverse stitch lever 6 Stitch length dial 7 Patt...

Page 5: ...rge 0 Spool holder small 1 Additional spool pin 2 Felt cushion q q w Accessory storage The standard accessories can be stored in the accessory storage box under the extension table Draw out the storag...

Page 6: ...nd do not touch any moving parts such as the thread take up lever handwheel or needle Always turn off the power switch and unplug from the power supply when leaving the machine unattended when attachi...

Page 7: ...on of the arrow as illustrated and turn the handwheel toward you The feed dog must be up for regular sewing q Drop feed lever w Raised position e Lowered position Controlling the Sewing Speed Foot con...

Page 8: ...foot Always use the proper foot for the selected pattern The wrong foot can cause the needle to break Do not push the lever down to prevent it from being broken To attach Place the desired presser foo...

Page 9: ...Tulle Batiste Voile Lawn Pure Silk Crepe de Chine Sheer Crepe Chambray Handkerchief Linen Gingham Challis Percale Wool Crepe Peau de Soie Taffeta Satin Silk Surah Satin backed Crepe Qiana Single Knits...

Page 10: ...small spool holder w Small spool holder Additional spool pin The additional spool pin is for bobbin winding without unthreading the machine Insert the additional spool pin into the hole Place the felt...

Page 11: ...g out at the top e Bobbin winder spindle v Push the bobbin to the right NOTE Do not move the bobbin winder spindle while the machine is running b With the free end of the thread held in your hand depr...

Page 12: ...of the bobbin holder Draw the thread to the left sliding it between the tension spring blades w Front notch e Tension spring blade c Continue to draw the thread lightly until the thread slips into th...

Page 13: ...l x Draw the thread up around the bottom of the thread guide plate Pull the thread up along the left channel e Thread guide plate r Left channel c Firmly draw the thread from right to left over the th...

Page 14: ...he needle thread lightly with your left hand q Needle thread x Turn the handwheel slowly toward you one complete turn Bring the bobbin thread up by pulling the needle thread as illustrated q Needle th...

Page 15: ...ot turn the pattern selector dial while the needle is in the fabric otherwise the needle may bend or break To select the stretch stitch patterns set the stitch length dial at S S e Stretch stitch patt...

Page 16: ...hem by setting the dial to the side Stitch Width Dial Turn the stitch width dial to set the desired stitch width number at the setting mark The higher the number the wider the stitch q Stitch width di...

Page 17: ...ide of the fabric and the needle thread shows slightly on the wrong side bottom side of the fabric w Needle thread Top thread e Bobbin thread Bottom thread r Right side Top side of fabric t Wrong side...

Page 18: ...eginning of the seam first sew several stitches in reverse then sew forward Changing the sewing direction Stop the machine and turn the handwheel toward you to bring the needle down into the fabric Ra...

Page 19: ...cm seam allowance when sewing a corner When the fabric edge facing you lines up with the cornering guide as illustrated stop stitching and lower the needle into the fabric by turning the handwheel to...

Page 20: ...ly used for overcasting sewing on buttons etc Adjust the stitch length to suit your sewing needs NOTE Use a stabilizer for stretch fabrics such as tricot and knits to prevent puckering Overcasting Mac...

Page 21: ...and finishes the fabric edges simultaneously Tricot Stitch Multiple Zigzag Stitch Machine setting q Stitch pattern D w Stitch width 3 5 e Stitch length 0 5 1 5 r Thread tension 3 6 t Presser foot Zig...

Page 22: ...ily Use it to reinforce areas such as crotch and armhole seams Also use it when constructing items such as backpacks for extra strength Carefully guide the fabric while sewing as the fabric moves back...

Page 23: ...gn with the slot of the foot A pin can be placed on the foot to form a shank Make sure to check if the needle enters into both holes in the button q Pin Re thread the needle and sew about 10 stitches...

Page 24: ...at a left stitch c Raise the needle to its highest position Set the pattern selector dial at Sew 5 stitches then stop sewing at a right stitch v Raise the needle to its highest position Set the patter...

Page 25: ...t of the foot to hold them tight q Spur w Forks x Draw both of needle and bobbin thread to the left Move the slider toward you so that the top mark r on the slider meets the start mark e e Start mark...

Page 26: ...Pin Fabric preparation z Add 3 8 1 cm to the zipper size This is the overall opening size q Right side of the fabric w 3 8 1 cm e Opening size r Zipper size t Slider y Zipper teeth u Zipper tape i Wr...

Page 27: ...teeth next to margin edge and baste the zipper tape to the lower fabric layer Align zipper foot with margin edge Return thread tension and stitch length to original settings Sew a seam the entire leng...

Page 28: ...and sew a seam the entire length of the zipper tape Before reaching the slider stop the machine with needle in fabric and raise the foot Use seam ripper to open a few inches of basting stitch 3 Unsti...

Page 29: ...medium weight fabric x Place the fabric so that the needle just pierces the folded edge when the needle comes over the extreme left side Lower the presser foot c Turn the screw to align the guide on...

Page 30: ...earance on fabric such as chiffon use a single layer with a tear away backing if necessary Reduce the needle thread tension slightly to achieve the better result Decorative Stretch Stitches Machine se...

Page 31: ...an the project width Increase the stitch length to 4 and loosen thread tension to 1 Sew rows of straight stitches 3 8 1 cm apart across the area to be smocked q 3 8 1 cm Step 2 Knot the threads along...

Page 32: ...ew slowly while guiding the folded edge along the guide Open the fabric and iron press the tucks q Screw w Guide e Folded edge Shell Tucking Machine setting q Stitch pattern G w Stitch width 5 e Stitc...

Page 33: ...Paper Sew slowly guiding the fabric so the needle catches the folded edge on each side Tear away the backing after sewing is finished Patchwork Machine setting q Stitch pattern D w Stitch width 5 e St...

Page 34: ...aning the Hook Race and Feed Dogs z Remove the presser foot and needle Remove screw on the needle plate with the screwdriver Remove the needle plate and take out the bobbin q Screw x Lift up the bobbi...

Page 35: ...clockwise to remove it Push and turn the bulb clockwise to replace it r Light bulb q w e r e w e r z x c q Replacing the Bobbin Holder z Insert the bobbin holder into the hook race x Make sure the kno...

Page 36: ...tics 5 The needle thread is not threaded properly 6 A poor quality needle is used 1 The needle thread tension is too tight 2 The needle thread is not threaded properly 3 The needle is too heavy for th...

Page 37: ...507 800 XXX EN Printed in Thailand...

Reviews: