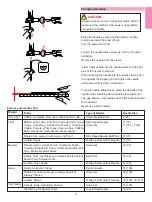
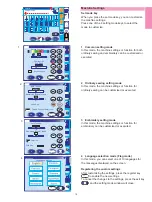
background image

23

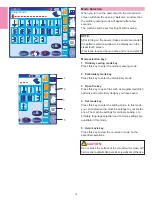
Embroidery mode settings

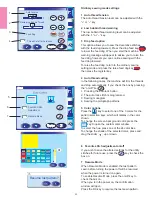
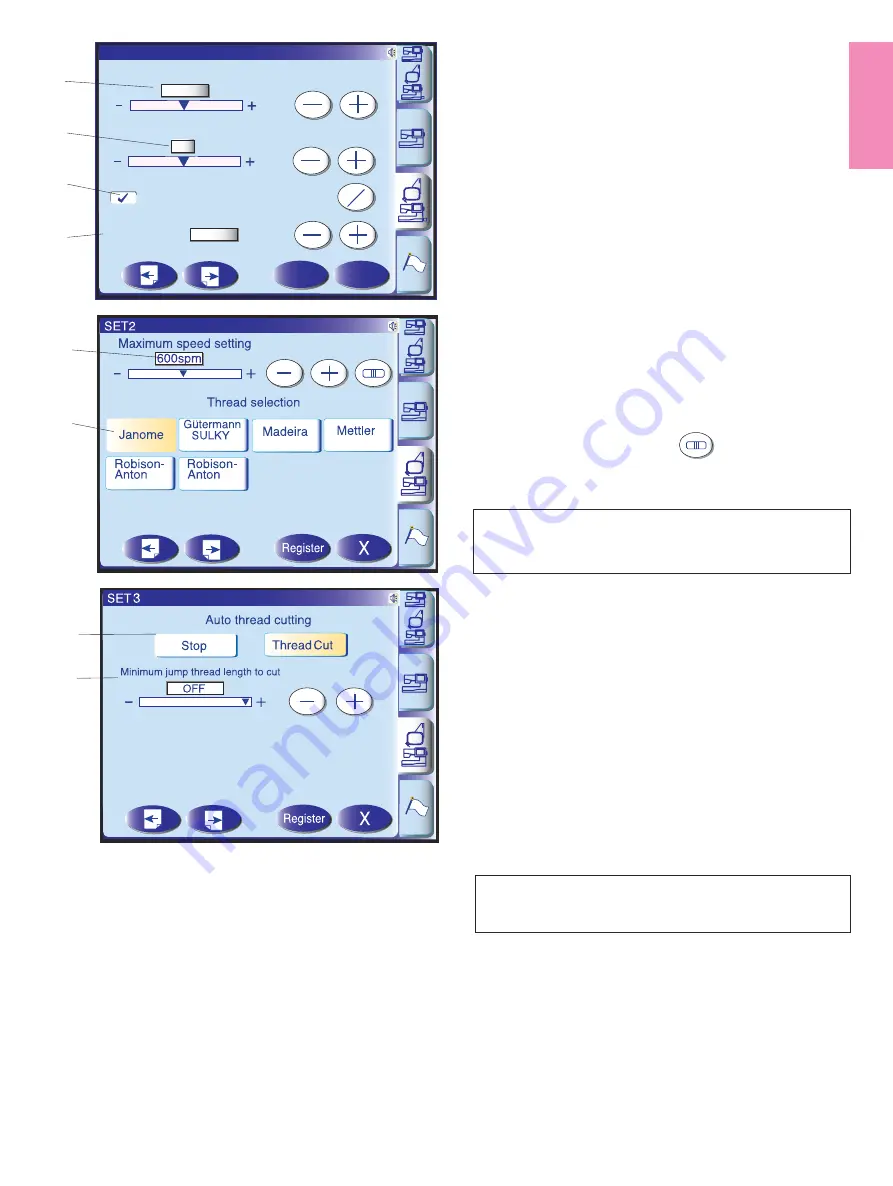
1 Auto thread tension
The auto thread tension level can be adjusted with
the “+” or “–“ key.

2 Low bobbin thread warning
The low bobbin thread warning level can be adjusted
with the “+” or “–“ key.

3 Grid on/off
To show the grid, press the on/off key to check the box.
To hide the grid, press the on/off key again to uncheck
the box.

4 Grid size
The grid size can be changed by pressing the “+” or
“–“ key.

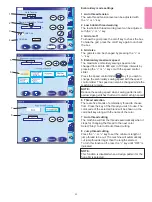
5 Embroidery maximum speed
The maximum embroidery sewing speed can be
changed from 400 to 800 spm in 100 spm intervals by
pressing the “+” or “–“ key or with the speed control
slider.
Press the speed control slider          key if you wish to
change the embroidery sewing speed with the speed
control slider. The speed can also be changed while the
machine is running.

NOTE:
Reduce the sewing speed when sewing patterns with
narrow zigzag stitches that tend to distort at high speed.

6 Thread selection
There are five brands of embroidery thread to choose
from. Press the key of the thread you wish to use. The
color code of the selected brand will be shown on the
color/part key along with the name of the color.

7 Auto thread cutting
The machine will trim the threads automatically when it
stops for changing the thread to the next color.
Select “Stop” to turn off auto thread cutting.

8 Jump thread cutting
Press the “–” or “+” key to set the minimum length of
jump thread to be cut. The machine will automatically
cut jump threads longer than the length selected.
To turn this function off, press the “+” key until “OFF” is
indicated.

NOTE:
This function is disabled when a design pattern for the
hoop FA is selected.

Rayon 40

Rayon 40

Polyneon 40

Polyester 40

Poly Sheen

SET1

X

Register

10mm

Auto Tension

Auto

Remaining Bobbin Thread

Grid Line

on

off

Grid Size

1

2

3

4

5

6

7

8

Summary of Contents for MC11000SE

Page 1: ...Instruction Manual Memory Craft 11000 Special Edition Please Note This version is only a partial manual Visit your local Janome Dealer for a full version...

Page 2: ...ader 13 Thread cutter holder 14 Face plate 15 Foot pressure dial 16 Bobbin winding thread guide 17 Stylus holder for the touch panel stylus 18 Spool pin 19 Spool holder 20 Needle clamp screw 21 Needle...

Page 3: ...elease lever 5 USB port for direct PC link 6 USB port for CD ROM drive USB memory key 7 Foot control jack 8 Card ejecting button 9 Card slot 10 Hand wheel 11 Buttonhole lever 12 Retractable carriage a...

Page 4: ...in embroidery designs 11 USB cable 12 Instruction book 13 Key icon reference chart 14 Instructional movie DVD 15 Handbook CD ROM 16 MC11K Tools CD ROM with instruction booklet 17 Cloth guide 18 Embroi...

Page 5: ...foot with quilting bar 14 Quilting guide bar 15 Spool holder large 16 Spool holder small 17 Extra spool pin 18 Spool supporter 19 Felt cushion 20 Bobbins 21 Set of needles 22 Screwdriver 23 Screwdrive...

Page 6: ...lso useful for darning socks or mending knees or elbows For free arm sewing 1 Return the carriage to the home position refer to page 67 2 Turn the power switch off 3 Remove the extension table 4 Hook...

Page 7: ...the power supply when leaving the machine unattended when attaching or removing parts when cleaning the machine Do not place anything on the Foot Control Operating Instructions The symbol O on a switc...

Page 8: ...op 3 Needle up down button Press this button to bring the needle bar up or down 4 Auto lock button When sewing stitch pattern U1 U2 U8 or U9 the machine will immediately sew locking stitches and autom...

Page 9: ...d with an automatic shutdown safety feature to prevent overheating whenever the machine is running overloaded Follow the safety instructions that appear on the visual touch screen Screen up down butto...

Page 10: ...motor for bobbin winding which allows you to wind the bobbin while stitching 1 Slide the hook cover release button to the right and remove the hook cover plate 2 Lift out the bobbin from the bobbin ho...

Page 11: ...the bobbin holder with the thread running off counterclockwise 2 Guide the thread into the front notch A on the bobbin holder 3 Draw the thread to the left sliding it between the tension spring blade...

Page 12: ...right channel and around the bottom of the guide plate 3 Pull the thread up along the left channel to the thread take up lever 4 Firmly draw the thread up to the take up lever and down into its eye f...

Page 13: ...r NOTES You may need to hold the thread end with your hand when threading certain kinds of threads When threading monofilament thread hang the thread end on the thread holder on the face plate CAUTION...

Page 14: ...ter 2 Hold the needle thread with your finger and press the up down needle button twice to pick up the bobbin thread 3 Draw up the needle thread to bring up a loop of the bobbin thread 4 Slide 10 cm 4...

Page 15: ...ffon Georgette Fine Lace Organdy Net Tulle Batiste Voile Lawn Pure Silk Crepe de Chine Sheer Crepe Chambray Handkerchief Linen Gingham Challis Percale Wool Crepe Peau de Soie Taffeta Satin Silk Surah...

Page 16: ...esser foot Attaching the knee lifter Match the ribs on the knee lifter with the notches in the knee lifter socket and insert the knee lifter 1 Knee lifter 2 Knee lifter socket Adjusting the knee lifte...

Page 17: ...foot with your fingers Darning foot P 2 Loosen the thumbscrew and remove the foot holder Attach the darning foot P 2 to the presser bar putting the pin on the needle clamp screw Tighten the thumbscrew...

Page 18: ...ss this key to enter the embroidery mode 3 Open file key Press this key to open files such as programmed stitch patterns and embroidery designs you have saved 4 Set mode key Press this key to enter th...

Page 19: ...Language selection mode Flag mode In this mode you can select one of 10 languages for the messages displayed on the screen Registering the custom settings After customizing the settings press the regi...

Page 20: ...g the or key 5 Screen saver Press the on off key to check the box so the screen will show the screen saver instead of entering the eco mode You can also create your original screen saver for the MC 11...

Page 21: ...close and go back to the original screen with the new setting being registered 3 Formatting the memory If the internal memory ATA PC card or USB memory key does not function due to damage to the memor...

Page 22: ...programmed 3 Sewing monogram 4 Sewing the pictograph patterns 5 Color options Press the key to select one of the 3 colors for the pattern selection keys which will display in the color shown To change...

Page 23: ...sewing speed when sewing patterns with narrow zigzag stitches that tend to distort at high speed 6 Thread selection There are five brands of embroidery thread to choose from Press the key of the threa...

Page 24: ...3 colors for the pattern selection keys which will display in the color shown To change the screen background color press the key to open the custom color window Refer to page 22 10 Resume Mode When R...

Page 25: ...direction by pressing the fast forward key or rewind key Pressing the full screen key enlarges the movie window to full screen Press the exit key to close the current window X Winding the bobbin Windi...

Reviews: