background image

48

* Regarded as good when all the results are correct.
* In case of defect, check again after adjustment or replacement of parts.

Results

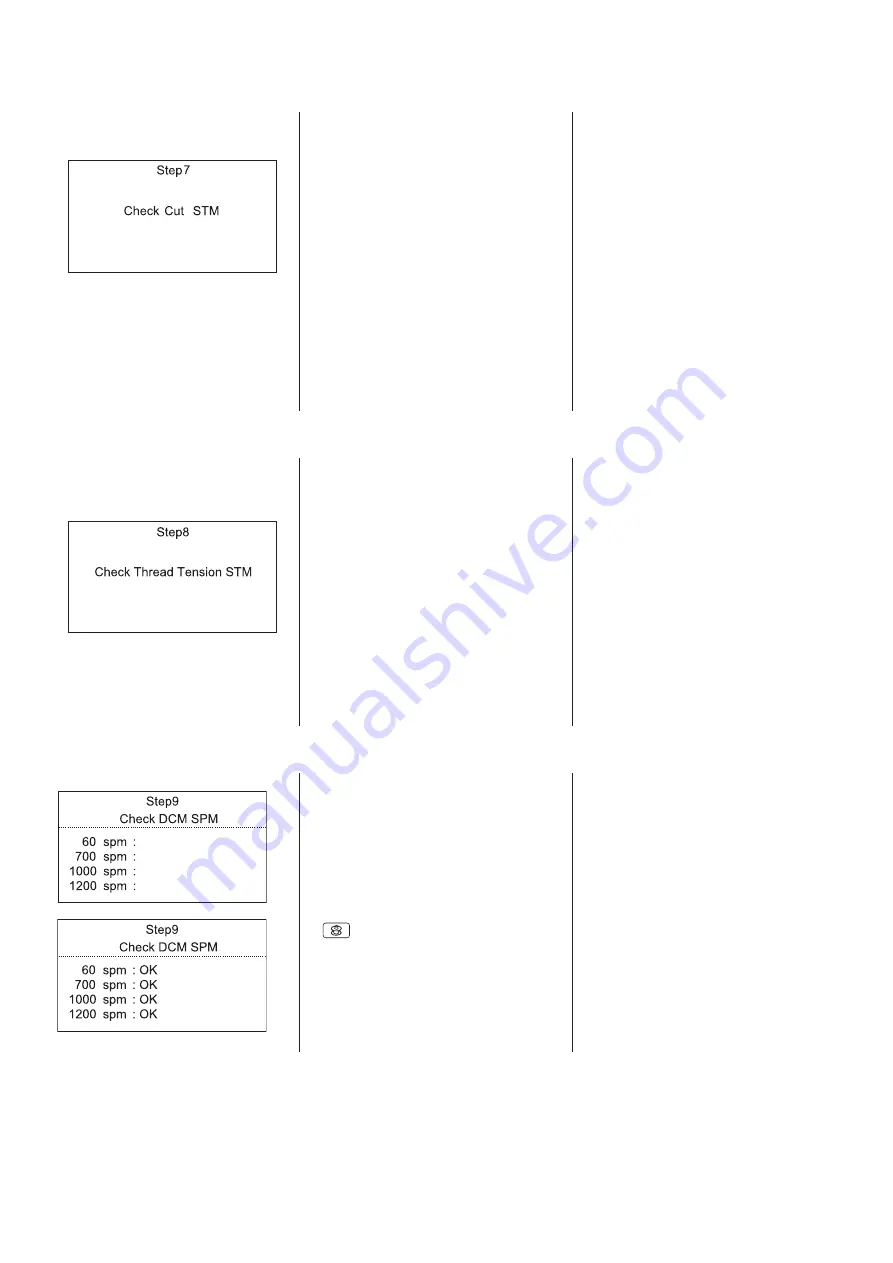
8. Thread tension release motor

9. Driving motor/bobbin winding motor.

7. Thread cutter motor

Correct condition
Turn the handwheel to move the 
needle bar to the zigzag phase (up 
position). When pressing the needle 
up/down key, the thread cutter 
motor is initialized and the buzzer 
sounds. 

Press the start/stop key to proceed 
to the next step.

Faulty condition
The thread cutter motor is not 
initialized.
“E4” is indicated.
The caution buzzer sounds when 
the thread cutting motor starts 
running.

To adjust or replace a part: 
Adjust the position of the 
sensor. 
Replace the thread cutting motor.
Change the board A.

Correct condition
When pressing the needle up/
down key, the motor starts running, 
increasing speed evenly. The motor 
stops at the needle up position.
The screen shows “OK”.

When pressing bobbin winding key  
(        ), the bobbin winding motor 
runs.

8. Turn the power switch off to finish.

Faulty condition
The motor does not run.
The screen shows “NG”.
The bobbin winder motor does not 
run.
The motor does not run smoothly.

To adjust or replace a part: 
Replace the driving motor.
Replace the bobbin winder motor
Change the board A.

Correct condition
When pressing the needle up/
down key, the thread cutter motor is 
initialized and the buzzer sounds. 

Press the start/stop key to proceed 
to the next step.

Faulty condition
The thread tension release motor is 
not initialized.
“E3” is indicated.
The caution buzzer sounds when 
the thread tension release motor 
starts running.
To adjust or replace a part: 
Adjust the position of the 
sensor. 
Replace the thread tension release 
motor.
Change the board A.

Summary of Contents for MC6700P

Page 1: ...SERVICE MANUAL MC6700P PFirst Edition 05 September 2017...

Page 2: ...eedle and tip of the rotary hook 17 Adjustment of height and direction of presser bar 18 To adjust the feed dog height 19 To replace needle thread tension unit 20 To adjust the upper thread tension re...

Page 3: ...p cover To remove 1 Remove the setscrews B 2 pcs 2 Remove the bobbin winder connector and remove the top cover To attach 3 Insert the bobbin winder connector and fix the cop cover with setscrews B 2 p...

Page 4: ...nd setscrew D Setscrew C Base Changing external parts 2 Belt cover To remove 1 Remove the top cover Remove the caps and setscrews A 2 pcs 2 Loosen the setscrew B and remove the belt cover To attach 3...

Page 5: ...utter cover To attach 2 Fix the thread cutter cover with the setscrew B Setscrew B Thread cutter cover Power supply cover To remove 1 Remove the setscrews A 3 pcs and remove the power supply cover To...

Page 6: ...rinted circuit board K connectors 2 pcs from the printed circuit board A and remove the front cover To attach 4 Follow the steps of removal procedure in reverse Setscrew B Setscrew D Changing external...

Page 7: ...he face plate and top cover 2 Loosen the setscrews A and B and remove the thread guide cover To attach 3 Follow the steps of removal procedure in reverse Setscrew A Setscrew B Thread guide cover Threa...

Page 8: ...the face plate top cover and thread guide cover 2 Loosen the setscrews A and B and remove the arm thread guide unit To attach 3 Follow the steps of removal procedure in reverse Setscrew A Setscrew B...

Page 9: ...4 pcs and disconnect all the connectors from the printed circuit board A and remove the printed circuit board A To attach 3 Follow the steps of removal procedure in reverse See page 11 for disconnect...

Page 10: ...nnect the connector for printed circuit board F 3 Remove the setscrews A 6 pcs and printed circuit board K 4 Disconnect the relay cable To attach 5 Follow the steps of removal procedure in reverse Rel...

Page 11: ...ed circuit board F Snap ring CS 3 Slide volume To remove 1 Remove the front cover 2 Disconnect the slide volume connector from the printed circuit board F 3 Remove the snap rings CS 3 2 pcs and remove...

Page 12: ...10 Changing LCD Setscrew A LCD Setscrew A To remove 1 Remove the front cover 2 Remove the setscrews A 4 pcs and remove the LCD To attach 3 Follow the steps of removal procedure in reverse...

Page 13: ...otor white 5P Bobbin winder motor black 4P Buttonhole sensor black 3P Printed circuit board K white 28P Presser foot lifter switch white 4P Thread tension release motor black 7P Switching power supply...

Page 14: ...e in the upper part Remove the arm thread guide unit see page 6 3 Tighten the setscrew 4 Attach the face plate When the straight stitch is selected the needle should be positioned in the center of the...

Page 15: ...just the backlash following the adjustment procedure in step 5 Turn the lower shaft bushings front and rear in the same direction simultaneously and evenly 5 If the backlash is too much turn the lower...

Page 16: ...Turn the lower shaft gear until the tip of the hook meets the right side of the needle and tighten the setscrews 2 pcs After adjusting the hook timing check the needle bar height 9 Attach the bobbin...

Page 17: ...t needle bar height as 1 8 mm 7 Tighten the setscrew with the needle setting groove to the front 8 Attach the arm thread guide unit and face plate 9 Attach the bobbin holder needle plate and presser f...

Page 18: ...itch 5 and set the stitch width to the maximum 9 0 5 Loosen the setscrew and adjust the clearance between the needle and the tip of the rotary hook as 0 10 0 05 mm by moving the needle bar supporter i...

Page 19: ...n the setscrews A B and C firmly After adjusting the clearance by the procedure of clearance adjustment 2 check the backlash between hook drive gear and lower shaft gear hook timing and needle bar hig...

Page 20: ...g foot A 3 Set the foot pressure at 3 4 Drop the feed dog 5 Remove the face plate 6 Loosen the setscrew on the presser bar supporter to adjust the presser foot direction so that the slot for the feed...

Page 21: ...rn the handwheel toward you to raise the feed dog to its highest position 5 Loosen the setscrew A 6 Loosen the nut Adjust the feed dog height by turning the setscrew B 7 Tighten the nut 8 Tighten the...

Page 22: ...hread guide 2 Lower the presser foot lifter 3 Loosen the hexagonal socket screw A 4 Remove the thread release plate from the thread release arm Remove the thread tension To attach 5 Follow the steps o...

Page 23: ...foot is raised Approximately 0 8 mm 1 Remove the top cover face plate thread guide cover and arm thread guide 2 Remove the front cover 3 Loosen the setscrew 4 Adjust the clearance by turning the ecce...

Page 24: ...en the setscrew B lightly Remove setscrew C and slide the base to the front Tighten the setscrew A and B securely Tighten the setscrew C If the clearance is larger than 8 0 mm Loosen the setscrews A a...

Page 25: ...dial at 4 1 Set the thread tension dial at 4 2 Pull the tension dial to remove it 3 Lower the presser foot 4 Turn the dial to adjust the tension To loosen the tension turn the dial counterclockwise T...

Page 26: ...in loosen the setscrew and turn the bobbin winder stopper Turn the bobbin winder stopper in the direction of A when the thread amount for bobbin is too large Turn the bobbin winder stopper in the dire...

Page 27: ...eye 2 If the threader hook is not aligned vertically with the needle eye loosen the setscrew A Adjust the stopper position so that the hook enters into the needle eye 3 Tighten the setscrew A 4 If the...

Page 28: ...ng cutter moves to its home position automatically 4 The distance between the end of moving cutter and the end of thread cutter plate slit should be 0 4 to 1 2 mm If not adjust as follows To adjust 1...

Page 29: ...gonal socket screw When the thread drawing lever is at the highest position adjust the drawing lever so that the distance between bobbin holder and the drawing lever is 5 5 5 7 mm 3 Tighten the hexago...

Page 30: ...earance between the upper feed link shaft and upper feed lower shaft should be 2 5 mm Loosen the setscrew of the upper feed adjusting arm 1 to adjust the clearance 7 Attach the base The clearance betw...

Page 31: ...lifter check the clearance The clearance between the dual feed foot and upper feed dog should be 4 mm To adjust If the clearance is not 4 mm adjust as follows 6 Remove the top cover 7 Loosen the setsc...

Page 32: ...raise the needle 5 Lower the presser foot lifter 6 Raise the toe of the dual feed foot and leave it as it is 7 Turn the handwheel toward you to lower the needle until the needle tip comes 1 mm or less...

Page 33: ...ith the surface of the needle plate If necessary lower the buttonhole lever slightly or insert a screwdriver between the front bracket and presser bar spring release plate 5 Tighten the hexagonal sock...

Page 34: ...pin into the take up lever crank as illustrated The setscrew A long must hold the needle bar crank pin cut surface Thread take up lever phase Needle bar crank pin cut surface Take up lever crank Setsc...

Page 35: ...t of the spring pin C The phase of D is shown below Lower shaft gear Feed cam Thread drawing lever cam Lower shaft gear Feed lifting pin D Feed lifting cam A B C Spring pin 3x18 X View from X Lower sh...

Page 36: ...the timing belt when the alignment mark A on the belt wheel and the alignment mark B on the lower shaft gear are positioned as illustrated Alignment mark A Belt wheel Alignment mark B Lower shaft gear...

Page 37: ...motor To attach 5 Fix the motor by tightening the setscrew 2 pcs lightly 6 Adjust the belt tension and tighten the setscrew 2 pcs securely 7 Connect the motor connector to the printed circuit board A...

Page 38: ...of the needle plate If not adjust as follows To adjust 1 Remove the top cover 2 Turn the handwheel toward you slowly to bring the needle up from its lowest position to 7 7 mm above the surface of the...

Page 39: ...uide to the front or to the rear until until the indication beside BH Sen changes to L Tighten the setscrew 5 Attach the buttonhole foot R and lower the buttonhole lever 6 Lower the buttonhole R Adjus...

Page 40: ...he seventh of 8 The length 5 of 8 should be 33 mm to 39mm Stretch stitch balance dial position 1 Press the right arrow key to lower the needle the key does not work if the needle is lowered to move th...

Page 41: ...resser foot lifter switch Switch setting plate Auto lock key Needle up down key ON Numeral key To adjust 1 Remove the face plate 2 Place a 5mm block between the presser foot and the needle plate and l...

Page 42: ...w tighten the setscrew B securely To adjust and check 1 Prepare the standard needle plate and the needle plate for straight stitch 2 Turn the power switch on while pressing the auto lock key and needl...

Page 43: ...ng power supply 3 Disconnect the connector for foot control connected to the switching power supply from the printed circuit board A 4 Remove the setscrews 3 pcs and switching power supply To attach F...

Page 44: ...mode To adjust and check 1 Turn the power switch on while pressing the auto lock key and needle up doun key to enter the factory setting mode 2 Press the numeral key 4 to select the sensor adjusting...

Page 45: ...m and coil spring When the feed lifting cam is pushed to the left the coil spring should covered with the feed lifting cam completely If the feed lifting cam does not move smoothly adjust as follows 1...

Page 46: ...left to raise the feed dog 3 Slide the speed control slider to the left 4 Raise the presser foot lifter and remove the presser foot 5 Bring the needle bar at the highest position Before using the diag...

Page 47: ...ge To replace a part Change the board F Change the board K Change the board A Faulty condition Buzzer does not sound The step 1 screen does not appear LED of the start stop key does not blink LCD back...

Page 48: ...sensor switch Zigzag Attach the standard needle plate Needle plate attached H Needle plate removed L 6 Buttonhole sensor BH Sen Pull the buttonhole lever toward you H Release the buttonhole lever L P...

Page 49: ...r from H to L Press the start stop key to proceed to the next step Faulty condition TBuzzer does not sound when the screen changes The screen does not change To adjust or replace a part Adjust the pos...

Page 50: ...on When pressing the needle up down key the motor starts running increasing speed evenly The motor stops at the needle up position The screen shows OK When pressing bobbin winding key the bobbin windi...

Reviews: