background image

Instruction Book

Memory Craft 350e

           www.SewingSupplyWarehouse.com

Summary of Contents for Memory Craft 350e

Page 1: ...Instruction Book Memory Craft 350e www SewingSupplyWarehouse com...

Page 2: ...service center for examination repair electrical or mechanical adjustment 4 Never operate the appliance with any air opening blocked Keep ventilation openings of this sewing machine and foot controll...

Page 3: ...6 Usage 16 Setting the Fabric in an Embroidery Hoop 17 Attaching the Embroidery Hoop to the Machine 18 KEY OPERATIONS 19 25 Pattern Selection Window 19 Mode Setting 20 Macine Settings 21 Language Sele...

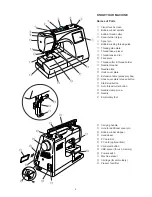
Page 4: ...late 4 Hook cover plate 5 Extension table accessory box 6 Hook cover plate release button 7 Start stop button 8 Auto thread cutter button 9 Needle clamp screw 0 Needle 1 Embroidery foot 2 Carrying han...

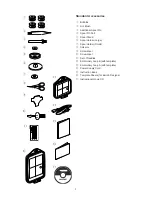
Page 5: ...r Spool Pin Felt t Spool Stand y Spool Holder Large u Spool Holder Small i Scissors o Screwdriver 0 Screwdriver 1 Set of Needles 2 Embroidery hoop B with template 3 Embroidery hoop A with template 4 P...

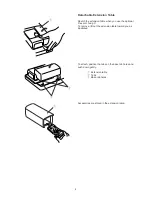
Page 6: ...hen you use the optional Free arm hoop C To remove lift out the extension table toward you as illustrated To attach position the tabs on the base tab holes and push down gently q Extension table w Tab...

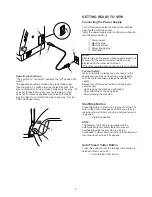
Page 7: ...Button Press this button to start or to stop the machine The color of the button changes each time you press it red when the machine is running and green when it is stopped q Start stop bbutton NOTE...

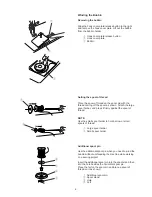
Page 8: ...tach the large spool holder and press it firmly against the spool of thread NOTE Use the small spool holder to hold narrow or small spools of thread q Large spool holder w Small spool holder Additiona...

Page 9: ...he end of the thread Stop the machine after the bobbin has made a few turns Cut the thread close to the hole in the bobbin v Press the Start Stop button again When the bobbin is fully wound it will st...

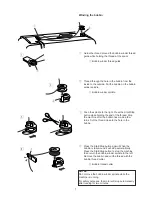
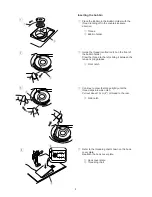
Page 10: ...ront notch on the front of the bobbin holder Draw the thread to the left sliding it between the tension spring blades e Front notch c Continue to draw the thread lightly until the thread slips into si...

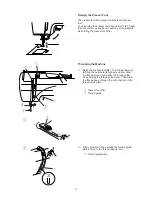
Page 11: ...ifter Threading the Machine z Raise the presser foot lifter Turn the handwheel to bring the needle to its highest position Draw the thread around and under the thread guide while holding the thread at...

Page 12: ...r Slit t Eye of the take up lever v Slip the thread behind the lower thread guide from the right y Lower thread guide b Slip the thread in the needle bar thread guide from the left u Needle bar thread...

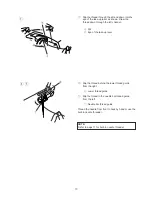
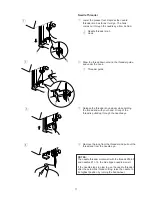
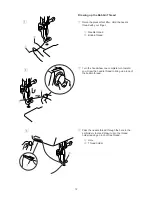
Page 13: ...eader knob slowly while holding the thread end with your hand A loop of the thread is pulled up through the needle eye v Remove the loop from the threader and pull out the thread end from the needle e...

Page 14: ...r finger q Needle thread w Bobbin thread x Turn the handwheel one complete turn toward you Draw the needle thread to bring up a loop of the bobbin thread c Pass the needle thread through the hole in t...

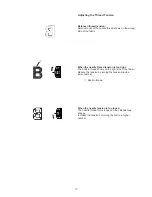
Page 15: ...the needle thread tension is too tight The bobbin thread shows on the right side of the fabric Reduce the tension by turning the tension dial to a lower number q Bobbin thread When the needle tension...

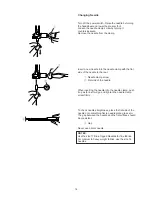
Page 16: ...edle clamp screw w Flat side of the needle When inserting the needle into the needle clamp push it up as far as it will go and tighten the needle clamp screw firmly To check needle straightness place...

Page 17: ...nes on the fabric with the center of the hoop First mark the centerlines on the fabric and place the fabric on the outer hoop Place the inner hoop and template over the fabric and adjust the fabric pl...

Page 18: ...ic that does not tear Cut the excess portion after stitching Use cutaway stabilizers for knits and all kinds of unstable fabrics Water Soluble Stabilizer will dissolve in water Use this stabilizer for...

Page 19: ...oop tightening screw r Inner hoop t Template c Set the inner hoop into the outer hoop and tighten the hoop tightening screw y Outer hooop v Remove the template NOTES When placing the fabric on the emb...

Page 20: ...he carriage holes q Attaching knob w Carriage holes e Pins Turn the attaching knob clockwise CAUTION Always provide sufficient clearance for the embroidery carriage behind your machine before starting...

Page 21: ...nal memory w w w w w Monogramming You can sew three styles of lettering Gothic Script and Cheltenham as well as 3 letter and 2 letter monogramming e e e e e PC card You can sew embroidery designs from...

Page 22: ...rriage centering key Press this key to move the carriage to the center position starting point for embroidery r r r r r Return carriage key Press this key to bring the carriage back to its stored posi...

Page 23: ...used the machine after a while the machine will enter Eco Mode The visual touch screen will go dark and the sewing light will turn off Whenever you touch the screen while the machine is in Eco mode th...

Page 24: ...mum speed The maximum sewing speed can be changed from 400 to 650 spm for embroidery sewing The default setting is 650 spm Press the Minus key to reduce the maximum sewing speed Press the Plus key to...

Page 25: ...e memory location NOTE Formatting will erase all data stored in the memory Press the next page key to view the next page 4 Reset all to default Pressing the Yes key will return all settings except for...

Page 26: ...On screen Help You can view on screen help for the basic operations of the machine Press the Help key and the help index window will open Press the key next to the help topic you wish to view The ill...

Page 27: ...n Saved key To select the embroidery design press the desired pattern selection key w Pattern selection keys Press the Next page key to display the designs on the following pages There are 14 pages of...

Page 28: ...tion e e e e e Color list key Press this key to display a list of thread colors employed in the selected design Sewing the specific color section by skipping You can sew only the specific section of t...

Page 29: ...Design size 4 Hoop 5 5 5 5 5 Stitch Back Forward keys When embroidery sewing has started the screen will indicate the current stitch counts The Jog keys will disappear and the Stitch back forward keys...

Page 30: ...thread cutting command NOTE If you disabled auto thread cutting press the Auto thread cutter button or trim the threads manually b After finishing embroidery press the auto thread cutter button to cu...

Page 31: ...indow will open qFont key Pressing one of the following keys to select the desired font wGothic font eScript font rCheltenham font t2 Letters y3 Letters To cancel your selection press the Return key u...

Page 32: ...ombination is confirmed by pressing the OK key After the key is pressed the screen will change to the Ready to Sew screen t t t t t Letter Size key You can choose 3 different sizes of letters large me...

Page 33: ...ti color monogramming You can sew a multi color monogram by changing the thread color of each letter if you press the Color change key before sewing The machine will stop automatically when each lette...

Page 34: ...to stop the machine Raise the presser foot cut off the thread tail close to the beginning of the starting point and lower the presser foot Press the Start Stop button to start sewing again and the mac...

Page 35: ...n in the same way as the 2 Letters monogram The starting position for the 2 Letters and 3 Letters is in the center of the hoop G H I J K L M N O P Q R S T U V W X Y Z A B C D E F 2 Letters AB A Z A F...

Page 36: ...ted Inserting a letter Example To insert O to BAT z Press the key to shift the cursor under the next letter where you wish to insert a letter x Select the letter O The letter O will be inserted betwee...

Page 37: ...PC card Take out the PC card from the machine NOTE When the power is turned on with a PC card inserted in the machine it will take a few moments to get the machine booted up Selecting the PC card des...

Page 38: ...tional item e USB socket CAUTION Do not turn the power off or disconnect the USB memory while the warning sign or hourglass is displayed Opening the designs on USB memory Press the USB memory tab The...

Page 39: ...y 200 mm Free arm Hoop C 50 mm by 50 mm Optional item q Hoop selection dialog box w Hoop selection key Press the OK key and the Editing window for the selected hoop will open Press the Cancel key to c...

Page 40: ...pattern to edit press the image of the desired pattern on the Editing window The pattern will be framed when it is selected Moving the selected pattern To move the embroidery pattern on the Editing w...

Page 41: ...ny changes that have been made press the Cancel key w Cancel key Changing the hoop size You can change the hoop size by pressing the Hoop selection key e Hoop selection key Select one of the following...

Page 42: ...mirror key to flip from top to bottom r Vertical mirror key t Horizontal mirror key Rotating the selected pattern Each time you press the Rotation key the embroidery pattern will rotate 45 degrees cl...

Page 43: ...ete key the selected pattern will be deleted q Delete key Magnifying the pattern image Press the Magnifier key to show a magnified image of the selected pattern Press the Return key to return to the p...

Page 44: ...vious and next pages u Page keys Select the desired folder and the file list of the selected folder will open Press the OK key to save the file and the screen will return to the original screen If you...

Page 45: ...the File name key if you wish to assign a new name to the file t File name key The keyboard window will open Enter the file name and press the OK key The file will be saved with the new name If you a...

Page 46: ...he open file window then delete the file that you do not need Press the Built in design PC card or USB memory tab to select the location of the file to delete Press the Delete key and the File delete...

Page 47: ...n image c Press the Monogram tab v Select A Upper case letter in Gothic style b Press the Letter case key to select lower case letters 17 18 19 20 21 22 23 24 Mode Designs A Z Edit A F 126x110mm Mode...

Page 48: ...he Layout keys Press the OK key and the display will change to the Ready to Sew screen Start the machine to sew q Sewing result B Font AB OK M L S AB Mode Gothic A Z Apple AB B A Z Edit A F 126x110mm...

Page 49: ...obbin holder with a lint brush r Bobbin holder t Lint brush v Clean the Auto thread cutter mechanism and hook race with the lint brush y Auto thread cutter mechanism u Hook race b Clean the hook race...

Page 50: ...NGS Turn off the power before replacing the light bulb The bulb could be HOT wait until it has cooled down before touching it To remove Remove the cap and setscrew Remove the faceplate Pull out the bu...

Page 51: ...urred needle eye is used Replace the needle 5 The embroidery hoop is not set properly See page 18 6 The fabric is not tightly pulled on the embroidery hoop See page 17 7 A stabilizer is not being used...

Page 52: ...852 850 008 E Printed in Japan...

Reviews: