background image

19

Threading the Machine

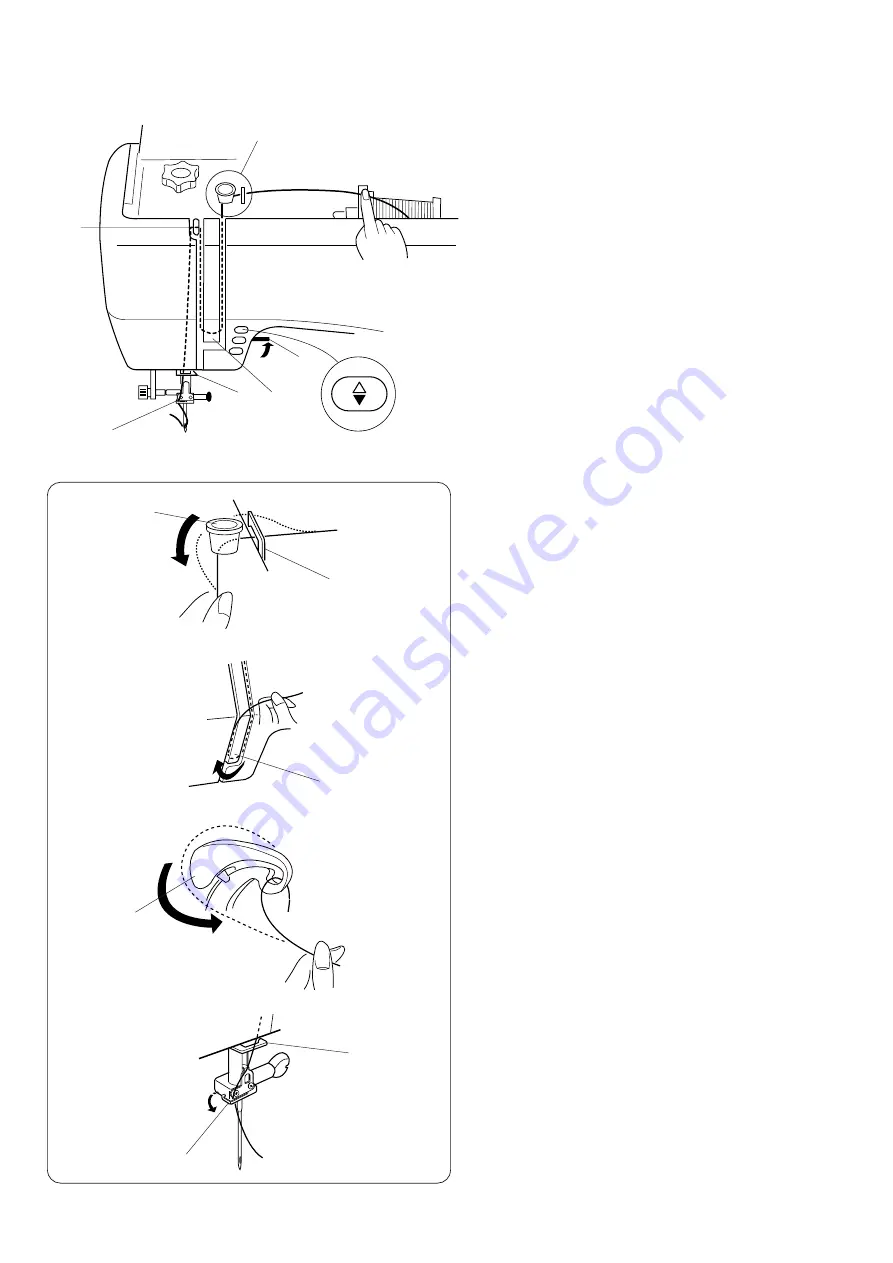
 Threading the machine

 * Raise the presser foot lever.

 * Turn the power switch “ON”,  press the needle

Up/down button twice to raise the needle, then turn

the power switch “OFF”.

1

Presser bar lifter

2

Needle Up/down button

[1]

Raise the presser foot lifter.

Draw the thread from the spool and thread around

the upper thread guide “A” and “B”.

3

Thread guide “A”.

4

Thread guide “B”

[2]

Then, down around the check spring holder.

5

Thread guide plate

[3]

Turn the handwheel toward you to raise the thread

take-up lever.

Firmly draw the thread from right to left over the

take-up lever and down into the take-up lever eye.

6

Thread take-up lever

[4]

Then, down through the lower thread guide.

7

Thread guide “D”

[5]

Slide the thread behind the needle bar thread guide

on the left.

8

Needle bar thread guide

 * Use the automatic needle threader (see page 20).

[1]

[3]

[5]

[2]

[4]

[1]

[2]

[3]

[4] [5]

1

2

4

3

5

6

7

8

“A”

“B”

“D”

Summary of Contents for MEMORY CRAFT 4800

Page 1: ...INSTRUCTION BOOK INSTRUCTION BOOK...

Page 2: ...ing up the bobbin thread 21 Balanced Thread Tension 22 Auto thread tension 22 Manual thread tension adjustment 22 SECTION III BASIC SEWING Straight Stitch Sewing 23 Starting to sew 23 Changing sewing...

Page 3: ...7 Quilting 47 Shell Tack 48 Applique 48 Smocking 49 Fagoting 49 Scallop Stitch A B 50 Patchwork 51 Satin Stitch Sewing 51 Cross Stitch 52 Decorative Stitch 52 Cording 53 Twin Needle Stitching 54 Adjus...

Page 4: ...rse button 15 Auto lock button 16 Up down needle button 17 Speed setting lever 18 Keyboard 19 Screen sharpness adjustment dial 20 LCD screen 21 Needle clamp 22 Needle 23 Presser foot 24 Foot holder 25...

Page 5: ...l Extension Table The extension table provides added sewing surface and can be easily removed for free arm sewing Detaching the table Pull the table away from the machine as illustrated Free arm sewin...

Page 6: ...Satin stitch foot o Screwdriver 0 R Automatic buttonhole foot 1 Lint brush 2 Bobbins 3 Seam ripper 4 Spool holder Large It is attached on the machine 5 Spool holder Small 6 Additional spool pin 7 Fel...

Page 7: ...ces with a polarized plug one blade wider than the other to reduce the risk of electric shock this plug is intended to fit in a polarized outlet only one way If it does not fit fully in the outlet rev...

Page 8: ...ock button When stitches are selected the machine will immediately sew locking stitches when the auto lock button is pressed then automatically stop When sewing all other stitches the machine will sew...

Page 9: ...button again for single needle sewing Editing key This button can be used for adding deleting and chang ing combinations and monograms before sewing while programming stitch patterns or monograms For...

Page 10: ...r actual size when you press the TOM key Elongation key For A Mode Stitches 45 to 60 can be elongated up to five times their normal length by pressing this key Stock call key When you press the Stock...

Page 11: ...memorized pattern The maximum number of memory patterns is 50 The following patterns cannot be memorized The Direct mode patterns and buttonholes cannot be memorized Direct pattern selection and numbe...

Page 12: ...attern 05 as shown 3 The display screens shows from left to right 1 Stitch pattern 05 2 Thread tension AUTO 3 Presser foot A 4 Stitch width 5 0 5 Stitch length 2 0 6 Buzzer sound on see page 12 to mut...

Page 13: ...4 Press the Memory key Buzzer 1 Turn on the power switch while pressing the memory key 1 Memory key 1 2 3 4 5 6 7 1 2 3 4 1 2 2 3 2 Power switch 2 Select 2 by pressing the number key to access the Buz...

Page 14: ...and embroidery Set the pressure to 1 when sewing chiffon lace organdy and other fine fabrics Velour and knit with a lot of stretch may also require a 1 setting Align the number on the dial with the s...

Page 15: ...gap between the needle and the flat surface should be consistent Never use a bent or blunt needle 1 Needle clamp screw 2 Pin 3 Needle clamp To Attach and Remove the Presser Foot 1 Press the red button...

Page 16: ...thicker threads and needles are used for sewing heavy fabrics Always test thread and needle size on a small piece of fabric which will be used for actual sewing Use the same thread for needle and bobb...

Page 17: ...older firmly against the spool of thread The small spool holder is used with a small or narrow spool of thread 1 Spool pin 2 Ordinary spool 3 Large spool holder 4 Small spool holder 5 Small spool Remo...

Page 18: ...Hold the free end of the thread in your hand and depress the foot control Stop the machine when it has made a few turns and cut the thread close to the hole in the bobbin Depress the foot control aga...

Page 19: ...de the thread into the notch on the front side of the bobbin holder 2 Notch 3 Continue to draw the thread lightly The thread slips into notch Pull out about 15 cm 6 of thread 3 Notch 4 Attach the hook...

Page 20: ...e A and B 3 Thread guide A 4 Thread guide B 2 Then down around the check spring holder 5 Thread guide plate 3 Turn the handwheel toward you to raise the thread take up lever Firmly draw the thread fro...

Page 21: ...e thread around guide w and under the hook 1 Hook 2 Guide 3 Holding on to the thread firmly with your right hand pull the needle threader knob in the direction of the arrow in the illustration and the...

Page 22: ...dle position button twice to pick up the bobbin thread Draw up the needle thread together with a loop of bobbin thread 1 Up down needle position button 3 Pull both threads under the presser foot and t...

Page 23: ...thread tension doesn t balance set the thread tension dial at 0 to 9 and green light will disappear and you can adjust the desired thread tension setting manu ally The screen shows the recommended ten...

Page 24: ...esser foot Pivot the fabric around the needle to change sewing direction as desired Lower the presser foot 1 Up down needle position button 2 Presser foot lifter Finishing sewing To fasten the ends of...

Page 25: ...uffs and collars It is also popular for table fashions In addition to straight stitch quilting you can quilt with deco rative stitches or stitch pattern combinations To do quilting successfully follow...

Page 26: ...e a desired effect Hold down or until you reach the desired setting The reverse stitch length cannot be set longer than 2 5 mm 1 8 Variable needle position These setting apply only to straight stitch...

Page 27: ...n 4 Needle clamp How to sew 1 Put some fabric under the foot and press the Up down needle button twice to bring the needle thread down through the hole in the foot Pull the fabric and thread to the re...

Page 28: ...itch immediately and stop automatically Triple stretch stitch 1 Stitch pattern 04 2 Presser foot Foot A This strong durable stitch is recommended where both elasticity and strength are needed for comf...

Page 29: ...h Saddle stitch 1 Stitch pattern 29 2 Presser foot Foot A This saddle stitch is formed with one stitch forward two stitches backward and a fourth stitch forward You can achieve a lovely hand worked lo...

Page 30: ...etc When you change the stitch width make sure the needle position is above the fabric 1 Pre programmed stitch settings will be displayed 2 Press the stitch width key or stitch length key to change t...

Page 31: ...guide wires come to the edge The machine will stitch over these wires The black ridge and brush will keep the loose threads in so that the needle can stitch over them 3 As you sew be sure your fabric...

Page 32: ...tch to provide elasticity for knits and extra strength for woven fabrics Use this stitch when you want a narrow seam that you do not have to press open flat It is ideal for 6 mm 1 4 seams on knits whe...

Page 33: ...Adjust the thread tension so both needle thread and bobbin thread meet at the edge of the fabric Overedge Sewing 3 1 Stitch pattern 14 2 Presser foot Overcasting foot M 3 Thread tension 6 8 This stitc...

Page 34: ...ill enter the left hole of the button Turn the handwheel so the needle will enter the right hole of the button Readjust the stitch width if necessary 2 Place a pin on the foot and stitch ten times Aft...

Page 35: ...ual garment make several practice buttonholes on a scrap of the same fabric Use interfacing on stretch fabrics and set the pres sure dial at 1 or 2 and sew 08 Square buttonhole stitch This buttonhole...

Page 36: ...hes the pin on the foot when lowering the presser foot 1 Groove 2 Pin 2 Pull the button holder to the back and place the button in it Push it together tightly on the button 3 Button holder If the butt...

Page 37: ...ven buttonhole stitch length as shown 6 Mark 7 Starting point 8 Foot holder 9 No gap 10 Spring holder 11 Uneven stitch results Starting sewing 5 After sewing the buttonhole stitch the machine stops au...

Page 38: ...widths are square buttonhole 5 0 rounded buttonhole 4 0 keyhole buttonhole 7 0 Press or to adjust the stitch width of the entire buttonhole ranging between 2 5 to 7 0 depending on the selected button...

Page 39: ...Adjustment of the stitch width on buttonhole 09 When you press the zigzag width key the pre set buttonhole width is set for the rounded buttonhole at 4 0 Press or to adjust the stitch width of the en...

Page 40: ...nhole foot until they clear the front end Hook the filler cord into the forks on the front of foot R to hold them tight 3 Spur 4 Filler cord 5 Forks 2 Lower the needle into the garment where the butto...

Page 41: ...verse button 5 Depress the foot control The machine will automatically bartack and sew up the right side of the buttonhole Stop the machine when you are directly opposite the first stitch on the left...

Page 42: ...together and sew to the end of the zipper opening Reverse stitch to lock the stitches Manually increase the stitch length to 4 5 and sew the zipper opening 9 4 5 stitch length 12 2 2 stitch length 10...

Page 43: ...and spread the fabric flat with the right side facing up Baste the opened fabric and zipper tape together 3 Wrong side of upper fabric 4 Basting stitch 5 Right side of fabric 6 Zipper tape 4 Move the...

Page 44: ...point 3 2 cm 3 4 4 0 7 cm 9 32 For darning less than 2 cm Switch to Low speed setting 4 lock stitches will be sewn first Then sew to the desired length and press the reverse button The desired length...

Page 45: ...ength required then press the reverse button The length is memorized Depress the foot control until the machine stops automatically Memorizing bartacking When repeatedly sewing the same size bartack p...

Page 46: ...roximately 0 6 cm 1 4 7 Trimming part 3 Lower the needle into the fabric at the point where sewing is to begin Then lower the hemmer foot Sew 3 to 4 stitches while holding the needle and bobbin thread...

Page 47: ...sewing For a professional looking hem try not to let the needle piece more than 0 2 cm 1 8 into the fold If the folded edge is pierced too far to left side you can not expect a good seam on the right...

Page 48: ...against the sliding guide 2 After sewing is finished use an iron to make pleats Quilting 1 Stitch pattern 01 2 Presser foot Foot A 3 Quilting bar L Loosen the set screw on the back of the presser foo...

Page 49: ...echnique for stitching fabric shapes onto another fabric opens limitless design possibilities Dimension and texture can be added by lightly stuffing all or part of a design This machine has several di...

Page 50: ...gathering easier Decorative sewing Knot the threads along one edge Pull the bobbin threads and distribute the gathers evenly Secure the threads at the other end Reduce the tension and pressure if nece...

Page 51: ...3 cm 1 8 seam allowance Clip seams as shown or trim with pinking shears Turn the hem to right side and press Scallop Stitch B 1 Stitch pattern 34 2 Presser foot Foot A Stitch pattern 47 can also be u...

Page 52: ...entering over the seam line 1 Right side of fabric Satin Stitch Sewing 1 Stitch pattern 52 2 Presser foot Satin stitch foot F Stitch patterns 45 to 64 can also be used To get fine sewing results inter...

Page 53: ...cts A plain close weave such as linen or wool flannel make the best background fabric Support lightweight fabrics with a stabilizer backing The size of cross stitch can be adjusted by pressing the sti...

Page 54: ...lide the sewing threads to the left and insert three strands of cording into the slots of foot H with 10 cm 4 extending behind the foot 2 The slot on foot H will hold the lengths of cording in place w...

Page 55: ...ing sure you separate the threads placing one in each thread guide on the sides of the bar 1 4 Threading steps from 1 to 4 are the same as for single thread The additional spool thread should roll out...

Page 56: ...e direction of B Correct setting C When patterns are too drawn out correct by turning the dial in the direction of Adjusting distorted letters or numbers in B or C Mode If letters are uneven when sewn...

Page 57: ...ry key 4 Select stitch pattern 58 5 Press memory key A programmed stitch sewing pattern finishing with auto lock stitches 61 58 98 Stitch patterns 61 58 98 The memorized patterns will be sewn and stop...

Page 58: ...stopping in the middle of your sewing press memory key to return to the starting position of your programmed stitch pattern 1 Contents of program 2 The position where machine is stopped 3 Press memor...

Page 59: ...iety of patterns are available Stitch patterns 45 to 60 can also be used 1 Elongated stitch patterns Drawings Sewing sample stitch pattern 51 1 A Mode 2 LCD screen 3 Stitch patterns 1 Press the Mode k...

Page 60: ...ode 2 Select stitch pattern 29 3 Press memory key 4 Select stitch pattern 57 5 Press memory key 6 Select stitch pattern 50 7 Press memory key Select stitch pattern 40 Press memory key 8 Select stitch...

Page 61: ...Mode 2 Select stitch pattern 11 3 Press memory key 4 Select stitch pattern 63 5 Press memory key 6 Select stitch pattern 12 7 Press memory key Select stitch pattern 63 Press memory key 8 Select stitc...

Page 62: ...ft the cursor by pressing the stitch width key or The arrow to the right means there are some more letters after G the arrow to the left means there are some letters before B 3 Press EDIT key to retur...

Page 63: ...D screen 1 Press EDIT key 2 Press the stitch width key and shift the cursor past the last letter where you would like to add letters orspace 3 Input the stitch pattern 67 space key 4 Press memory key...

Page 64: ...tterns 53 51 53 3 Press stitch width key 4 Press key to set the stitch width at 5 Editing Function 3 Custom stitch sizing 1 Editing key 2 LCD screen 3 Stitch patterns Adjust the stitch width and lengt...

Page 65: ...ver supplied with the machine 2 Remove the needle plate and take out the bobbin Lift up the bobbin holder and remove it 3 Brush out dust and lint inside the bobbin holder 4 Clean the feed dogs and the...

Page 66: ...e touching it Removing the light bulb 1 Open face cover plate 2 Remove the black rubber lamp socket from the lamp holder and pull out the light bulb Attaching the light bulb 3 To insert the lamp in th...

Page 67: ...of the liquid crystal display is not adjusted prop erly 1 The needle is incorrectly inserted 2 The needle is bent or blunt 3 The needle and or threads are not suitable for the work being sewn 4 A blu...

Page 68: ...t is not used 2 The needle thread tension is too tight 3 The stitch length is not suitable for the fabric being sewn 4 Feed balancing dial is not set properly 5 Interfacing is not being used for sewin...

Reviews: