background image

90

SET

A   Z

Edit

1

2

3

4

5

6

7

8

Designs

Hoop Size  A(F): 126

X

110mm

1

2

3

Card Reader 10000

 (optional item)

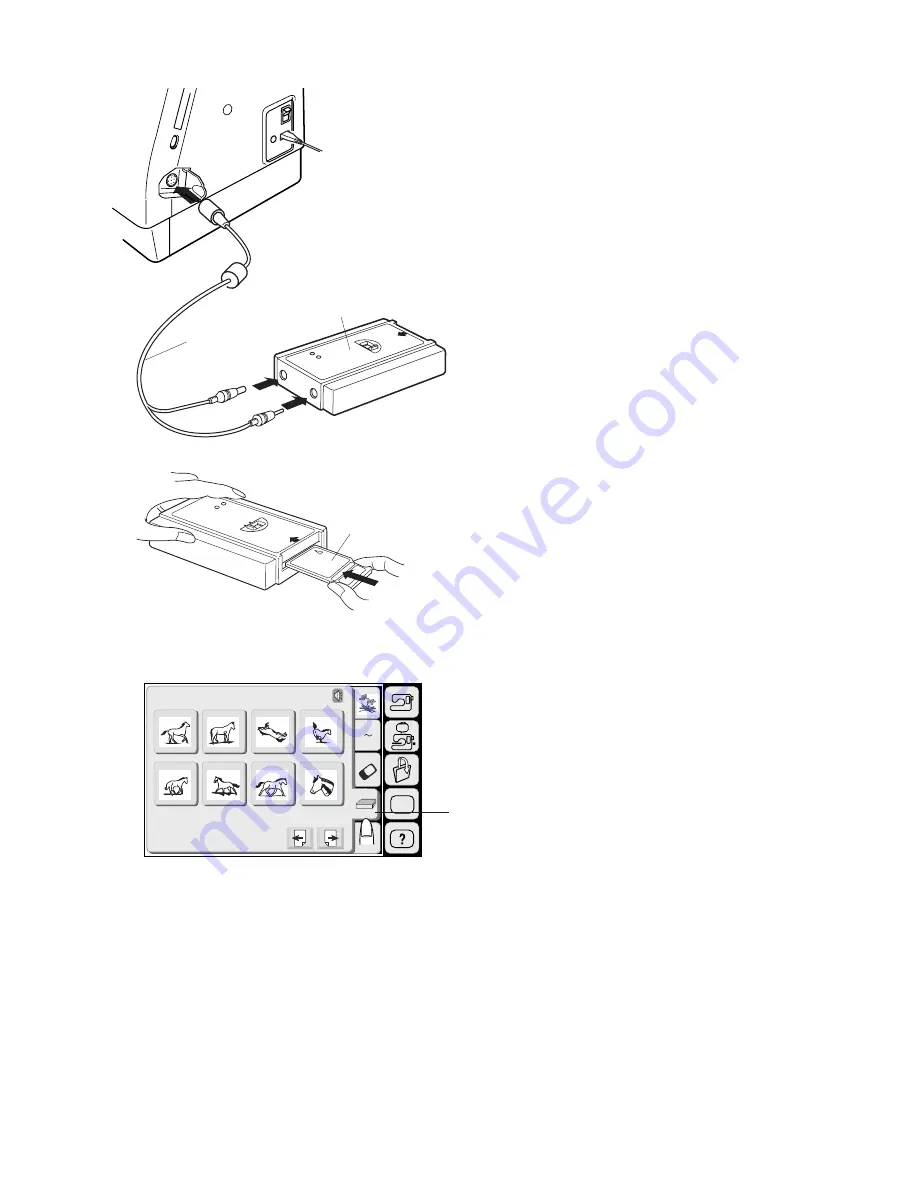
You can download designs from the Memory Cards for
Model MC9000 via the Card Reader 10000.

Connecting Card Reader 10000

Insert the round connector of the special RS-2332C
cable into the machine.

Insert the 2 plugs into the Card Reader 10000.

1 RS-232C Cable
2 Card Reader 10000

Insert the Memory card into the Card Reader 10000.
Push the card until it clicks.

3 Memory Card

Selecting a pattern

Press the Card Reader Key.

The Pattern Selection Screen will appear.

4 Card Reader Key

NOTE:
The key operation is the same as for built-in designs.
See pages 80-82.

4

Summary of Contents for MEMORY CRAFT 9500

Page 1: ......

Page 2: ...Single pattern with locking stitch 58 Programming a pattern combination 58 Elongation sewing 59 Programming a pattern combination with a mirror image 60 Decorative Stitches 61 Shell Tuck Stitch 61 Ap...

Page 3: ...ension Table Accessory Box 15 Hook Cover Plate Release Button 16 Hook Cover Plate 17 Needle Plate 18 Built in Needle Threader 19 Thread Cutter Thread Holder 20 Face Plate 21 Thread Take up Lever 22 Pr...

Page 4: ...op B with Template 3 Foot Control 4 Instruction Book 5 Template Sheets for Built in Designs 6 Power Supply Cord 7 Hard Cover Carrying Case 8 Zipper Foot E 9 Satin Stitch Foot F 10 Embroidery Foot P 11...

Page 5: ...iver 6 Screwdriver 7 Scissors 8 Set of Needles 9 Spool Pin Felt 10 Lint Brush 11 Additional Spool Pin 12 Seam Ripper 13 Spool Holder Large 14 Spool Holder Small 15 Bobbins 16 Spool Stand 17 Quilting B...

Page 6: ...s illustrated 1 Extension Table Free Arm sewing is suitable for stitching sleeves waistbands pants legs or any circular garment area darning socks or mending knees elbows or children s wear For flat b...

Page 7: ...t on again The Foot Control cannot be used in the Embroidery Mode For Your Safety While in operation always keep your eyes on the sewing area and do not touch any moving parts such as the thread take...

Page 8: ...cted the machine will sew in reverse while the Reverse Button is being pressed If you press the Reverse Button when sewing all other stitches the machine will immediately sew locking stitches and auto...

Page 9: ...ry sewing speed The harder you press the Foot Control the faster the machine runs NOTE The machine runs at the maximum speed set by the Speed Control Lever when the foot control is fully depressed Ope...

Page 10: ...Presser Foot Lifter 2 Presser Foot Removing and Attaching the Presser Foot Removing the presser foot Press the Up Down Needle Button to raise the needle to its highest position and raise the Presser F...

Page 11: ...rew and remove the Foot Holder Attach the Darning Foot P 2 to the presser bar putting the Pin on the Needle Clamp Screw Tighten the thumb screw firmly with the screwdriver 3 Darning Foot P 2 4 Pin 5 N...

Page 12: ...esigned for blind hemming The guide on the foot helps feed the fabric and sew a straight and nearly invisible blind hem 6 Overcasting Foot M This foot is specially designed to simulate professional st...

Page 13: ...ol as shown Attach the Large Spool Holder and press it firmly against the spool of thread NOTE Use the Small Spool Holder to hold narrow or small spools of thread Additional Spool Pin Use the Addition...

Page 14: ...ade several turns and cut the thread close to the hole in the bobbin 6 Depress the Foot Control again When the Bobbin is fully wound it will stop automatically Release the Foot Control and return the...

Page 15: ...he front of the Bobbin Holder 3 Draw the thread to the left sliding it between the tension spring blades 4 Continue to draw the thread lightly until the thread slips into the Side Notch B 5 Pull out a...

Page 16: ...the Thread Guide following the dashed line as shown in the diagram 3 Then draw the thread down around the Check Spring Holder 4 Firmly draw the thread up to the Take up Lever and down into its eye fro...

Page 17: ...Needle Button 2 Needle Threader Knob 3 Hook 5 Draw the thread down around the Threader Guide and under the hook 4 Threader Guide 6 Release the threader knob slowly while holding the thread end with y...

Page 18: ...h your fingers and press the Up Down Needle Button twice to pick up the bobbin thread Draw up the needle thread to bring up a loop of the Bobbin Thread 1 Needle Thread 2 Up Down Needle Button 3 Bobbin...

Page 19: ...ine Lace Organdy Net Tulle Batiste Voile Lawn Pure Silk Crepe de Chine Sheer Crepe Chambray Handkerchief Linen Gingham Challis Percale Wool Crepe Peau de Soie Taffeta Satin Silk Surah Satin backed Cre...

Page 20: ...right side of the fabric and the needle thread shows slightly on the wrong side of the fabric 2 Needle Thread 3 Right Side of the Fabric 4 Wrong Side of the Fabric 5 Bobbin Thread Manual tension adjus...

Page 21: ...ted The feed dog can also be lowered by the drop feed lever for sewing on buttons manual embroidery Push the drop feed lever to the left to lower the feed dog Push the lever to the right to raise the...

Page 22: ...s this key to open files such as programmed stitch patterns or embroidery designs you have saved 4 Mode setting key See page 22 Press this key to enter the My Setting Mode In this mode you can change...

Page 23: ...he Minus key to decrease the buzzer volume When you select 0 the buzzer turns off 5 Eco mode After turning on the power switch if you have not used the machine after a while the machine will enter Eco...

Page 24: ...in millimeter regardless of the inch mm setting 7 Page keys You can turn the pages by pressing the page keys Press the page forward key to view the next page Press the page back key to view the previ...

Page 25: ...or off by pressing the sewing light key 14 Thread selection There are four brands of embroidery thread to choose from Press the key of the thread you wish to use The color code of the selected brand w...

Page 26: ...n You can select one of the following 11 languages by pressing the corresponding key 1 English 2 French 3 Spanish 4 Italian 5 Dutch 6 German 7 Portuguese 8 Swedish 9 Russian 10 Finnish 11 Japanese 1 2...

Page 27: ...nhole variations Button Sewing Stitch Darning and Eyelet 3 Satin Stitch Key This key opens the window for Satin Stitches The stitch combination can be stored in the memory bank 4 Decorative Stitch Key...

Page 28: ...n the horizontal position This is helpful when starting sewing from extreme edge of thick fabrics or sewing across a hem Lower the needle into the fabric at the point where you wish to start sewing Lo...

Page 29: ...ter finishing sewing raise the presser foot and pull the fabric to the rear Draw both needle and bobbin threads up and into the Thread Cutter The threads will be cut at the proper length for starting...

Page 30: ...ange the needle drop position or stitch length 1 Needle Drop Position Adjusting Keys 2 Stitch Length Adjusting Keys 3 Default Key Resumes the default settings 4 Cancel Key Cancels the last changes to...

Page 31: ...eedle moves to the right When you press the key the needle moves to the left Changing stitch length Press the key to decrease the stitch length Press the key to increase the stitch length 1 0 5 0 7 0...

Page 32: ...will sew several locking stitches in place and continue sewing forward When you press the Reverse Button at the end of the seam the machine will sew several locking stitches in place then stop sewing...

Page 33: ...key the screen shows Stitch Width and Stitch Length Plus and Minus keys 1 When you press the Adjust key the screen shows the manual setting window Press the or key to change the stitch width or stitch...

Page 34: ...ncrease the Stitch Width 1 Stitch Width Changing stitch length Press the key to decrease the Stitch Length Press the key to increase the Stitch Length 2 Stitch Length After adjusting the settings pres...

Page 35: ...edge next to the Guide of the foot and then sew 1 Guide CAUTION When you use the Overedge Foot C or the Overcasting Foot M you must set the zigzag width at 5 0 or wider to prevent the needle from hitt...

Page 36: ...e seam allowance After sewing trim off the seam allowance closer to the stitches 1 Pattern 09 2 Zigzag foot A Double Overedge Stitch This stitch is an excellent stitch for fabrics that tend to fray ex...

Page 37: ...ace the fabric so that the folded edge comes to the left side of the guide Lower the Presser Foot Adjust the needle drop position so that the needle just pierces the edge of the fold when the needle s...

Page 38: ...the left Press the OK key to register the settings The needle should just pierce the folded edge when it comes over to the left side 1 Stitch Width Adjusting Keys 2 Default Key Resumes the default se...

Page 39: ...Place the right sides of the fabric together and sew to the End of the Zipper Opening Fasten the seam with reverse stitching Press the Adjust key and manually increase the stitch length to 5 mm 3 16...

Page 40: ...ening Size 7 Fold 8 Basting Line Set the stitch length back to 2 2 and thread tension to AUTO Attach Zipper Foot E with the Pin on the Right hand Side Sew through the fold and zipper tape guiding the...

Page 41: ...attach Zipper Foot E with the Left Pin Stitch through the fabric and zipper tape Stop about 5 cm 2 from the top of the zipper 13 End of the Opening 14 Basting Stitches 15 0 7 to 1 cm 3 8 Lower the nee...

Page 42: ...Foot Loosen the Screw on the back of the Foot Holder and insert the Quilting Bar into the Hole of the Foot Holder Set the Quilting Bar to the desired position then retighten the screw 1 Quilting Bar...

Page 43: ...Buttonhole This buttonhole is used on fine to medium weight fabrics especially for blouses and children s clothes 16 Keyhole Buttonhole The Keyhole Buttonhole is widely used on medium to heavy weight...

Page 44: ...napping the Pin into the Groove of the foot holder Raise the Presser Foot 1 Pin 2 Groove Pull the Button Holder to the rear and place the button in it Push it tightly against the button 3 Button Holde...

Page 45: ...under the foot Press the Up Down Needle button twice Remove the fabric to the left to draw both threads under the foot Place the garment under the foot and lower the needle at the Starting Point of th...

Page 46: ...automatically when the buttonhole is completed When buttonhole sewing is finished push the buttonhole lever up as far as it will go Remove the fabric and place a pin just below the bartack at each en...

Page 47: ...le into the garment where the buttonhole will start and lower the foot Press the Start Stop Button and sew the buttonhole Each side of the buttonhole and the bartacks will be sewn over the cord The ma...

Page 48: ...ess the OK key to register the settings NOTE Default setting is 5 0 Changing buttonhole stitch density Press the key to make the buttonhole stitches coarser Press the key to make the buttonhole stitch...

Page 49: ...rment under the foot and lower the needle at the starting point Then lower the Automatic Buttonhole Foot R 1 Button Holder 2 Hole 3 Needle Thread 4 Bobbin Thread NOTES You do not need to pull down the...

Page 50: ...ck lock the stitches and automatically stop when the buttonhole is completed To make the next buttonhole position the fabric and step down on the Foot Control To sew the next button hole in a differen...

Page 51: ...itch width so that the zigzag width matches the span of the holes in the button Press the Start Stop Button to sew and the machine will stop automatically Trim the Needle Thread at the Beginning 1 Nee...

Page 52: ...e way out 1 Button Holder Depress the Foot Control to sew rows of darning and a locking stitch The machine stops automatically when completed NOTE The maximum length of darning is 2 cm 3 4 and the max...

Page 53: ...ing Point 2 Required Length 3 Reverse Button To sew the same size darning Simply restart the machine to sew another darning in the same size To sew the next darn in a different size press the Cancel k...

Page 54: ...ess than 1 5 cm 9 16 in length sew to the Required Length and press the Reverse Button and the machine will memorize the Tack Length 2 Required Length 3 Reverse Button 4 Tack Length To sew the same si...

Page 55: ...The machine will stop automatically when completed Open the eyelet with an awl puncher or pointed scissors To adjust the shape of an eyelet If the eyelet opens press the key If the eyelet overlaps pre...

Page 56: ...dog will automatically drop Attach the Satin Stitch foot F or Darning Foot P 2 NOTE Refer to page 10 for how to attach the Darning Foot P 2 To sew Hold the fabric taut and depress the Foot Control or...

Page 57: ...key The Elongation key is used to change the elongation of decorative stitch patterns 6 Default key When you press the Default key all function values on the screen will return to the default setting...

Page 58: ...ress the Delete key to delete the selected pattern 12 Vertical Mirror key Press this key to memorize the mirror image pattern 13 Save File key Press this key to save the programmed pattern combination...

Page 59: ...n be memorized after pressing the L S key The machine will sew a single pattern only and lock the stitch at the end then stop automatically 1 Locking Stitches Programming a pattern combination Press t...

Page 60: ...he original pattern length Press the OK key The setting will be registered and the screen returns to the previous window Start to sew NOTE If you press the Auto Lock Button in the middle of a programm...

Page 61: ...key Select the Pattern 30 Press the Mirror Image key Select the Pattern 30 Start to sew NOTE If you press the Auto Lock Button in the middle of a programmed pattern the machine will stop automaticall...

Page 62: ...bias Attach Satin Stitch Foot F Increase the needle thread tension to 6 8 Place the folded edge of the fabric along the slit of the foot so that the right swing of the needle falls off the edge of the...

Page 63: ...he fabric and baste it in place Sew guiding the edge of the applique along the Slit on the foot so that the needle falls off the Edge of the Applique when it swings to the right 1 Applique 2 Edge of t...

Page 64: ...the previous page key to show page 2 7 Select the pattern 45 Two counts of straight stitch will be memorized Press the next page key to show page 3 7 Select the pattern 55 Press the previous page key...

Page 65: ...n of the patterns 65 66 and 72 Start sewing Stop the machine in the middle of sewing the pattern 66 The screen shows the patterns 66 and 72 Press the key The screen shows the pattern combination with...

Page 66: ...ation with the patterns 65 and 32 Press the Left Arrow key to move the cursor below the pattern 31 Press the Adjust key Change the elongation ratio by pressing the Plus or Minus key Press the OK key t...

Page 67: ...65 will be deleted Inserting the pattern 66 Press the Cursor key to move the cursor under the pattern 32 Select the pattern 66 The pattern 66 will be inserted before the pattern 32 A Z 26 27 28 29 30...

Page 68: ...If the pattern combination is too long to show press the Next Page key to view the remaining patterns in combination Press the Return Key to go back to the original window 1 Next Page Key 2 Return Key...

Page 69: ...t before you sew Use the Zigzag Foot A or Satin Stitch Foot F for Twin Needle Sewing Turn the power switch off before changing the needle Select the pattern then press the Twin Needle key 1 Twin Needl...

Page 70: ...NOTES Make sure each threads wind off from the spools as shown Threading from points 1 to 5 is the same as for a single needle Slip one of the threads through the needle bar thread guide on the left...

Page 71: ...cursor under it 5 Cursor key This key is for editing your monogram Press the Left arrow key to move the cursor to the left Press the Right arrow key to move the cursor to the Right 6 File Save key You...

Page 72: ...rsor shifts to the right and is automatically memorized Press the Letter Number key to select the Letters Press the Letter Size key to select Large Size Press B the cursor shifts to the right and B is...

Page 73: ...age key to view the complete list 3 Page Keys Press the OK key to save the file and the screen will return to the previous screen 4 OK Key Press the Cancel key to return to the previous screen without...

Page 74: ...ow 8 Back Space Key 9 Cancel Key NOTES When the memory is full a warning message will appear Press the OK key and go to the open file window then delete the files that you do not need When you save th...

Page 75: ...eed Balancing Dial with a coin 1 Feed Balancing Dial 2 Standard Setting Mark 3 Groove on the Dial Decorative stretch stitch patterns If the pattern is compressed turn the dial toward If the pattern is...

Page 76: ...and monograms 9 Starting Point for the designs from Memory Card Nos 102 and up 10 Starting Point for Monogramming in Horizontal orientation Embroidery Hoop B This is the large size hoop with a 20 cm...

Page 77: ...en fabrics After stitching tear away the stabilizer so that the small portion left in the back of the stitching will not affect the wear Iron on Stabilizer is an adhesive type stabilizer for knits and...

Page 78: ...hoop Tighten the screw on the outer hoop to stretch the fabric Make sure that the fabric is stretched drum tight in the hoop Remove the template 1 Fabric 2 Centerlines 3 Hoop Tightening Screw 4 Inner...

Page 79: ...rance for the embroidery carriage behind your machine before starting embroidery Never try to move the carriage by hand or touch the carriage while it is moving Make sure to return the carriage to the...

Page 80: ...ems 4 Card Reader 10000 The Memory Craft 9500 can read and sew embroidery designs available from the Memory Cards for Memory Craft 9000 5700 via the Card Reader 10000 optional accessory NOTE To connec...

Page 81: ...he thread and start sewing again The color of the key will darken after you finish sewing that part of the embroidery design Sewing the specific color part by skipping You can sew only the specific pa...

Page 82: ...me this key is pressed Press the key to move the hoop ahead The hoop will move forward 10 stitches each time this key is pressed 4 Jog ST key Press this key to switch the jog keys to the stitch back f...

Page 83: ...the presser foot cut off the Loose Thread close to the beginning of the starting point and lower the presser foot 1 Loose Thread Press the Start Stop button to start sewing again The machine will sto...

Page 84: ...or Font Selection You can change the type of font for monogramming by pressing the Font key The font selection window will open 3 Font key To select the desired font press one of the following options...

Page 85: ...essing either of the arrow keys To add letters numbers symbols character into a monogram move the cursor under a character Press the new character key and it will be inserted before the underlined cha...

Page 86: ...thic AB A F A Z B 1 Monogram in Gothic style Press the Font key and select Gothic style letters Select B Press the Upper Lower Case key to select lowercase letters Select e a and r Press the OK key Th...

Page 87: ...p button and sew 5 to 6 stitches Press the Start stop button again to stop the machine Raise the presser foot cut off the loose thread close to the beginning of the starting point and lower the presse...

Page 88: ...be sewn in the same way as the 2 Letters monogram The starting position for the 2 letters and 3 letters is in the center of the hoop SET Edit A Z Ready to Sew Size 2 P A F 126x110mm 53x62mm 1 color 7...

Page 89: ...e key The letter E will be deleted Inserting a letter Example To insert E to BAT Press the Cursor key to shift the cursor under the letter before where you wish to insert a letter Select the letter E...

Page 90: ...achine NOTE When the power is turned on with a PC card inserted in the machine it will take sometime to get the machine booted up Selecting the PC card designs Press the PC card key The designs contai...

Page 91: ...the round connector of the special RS 2332C cable into the machine Insert the 2 plugs into the Card Reader 10000 1 RS 232C Cable 2 Card Reader 10000 Insert the Memory card into the Card Reader 10000...

Page 92: ...following hoops Standard Hoop A 126 mm by 110 mm Round Hoop F 126 mm by 110 mm Optional item Large Hoop B 140 mm by 200 mm 2 Hoop Selection Window 3 Hoop Selection Keys Press the OK key and the editi...

Page 93: ...SET Cancel OK Edit B 140x200mm Size A Z Edit Selecting the pattern to edit The Patterns from the built in designs monograms PC cards and Memory Cards can be edited To select the pattern to edit press...

Page 94: ...e 1 Layout Key Selecting the hoop In the editing window you need to select the appropriate size of the embroidery hoop by pressing the hoop selection key There are two hoop size selections Embroidery...

Page 95: ...rn When you press the Mirror Image keys you may embroider a mirror image of the pattern 4 Mirror Image Keys Press the key to flip the pattern horizontally Press the key to flip the pattern vertically...

Page 96: ...wish to assign a new name to the file 3 File Name key When you press the keys you will be able to see the saved files on the previous and next pages 4 Page keys Press the OK key to save the file and t...

Page 97: ...new name 7 B S key 8 Cancel key 9 OK key NOTES When the memory is full a warning message will appear Press the key and go to the open file window then delete the file that you do not need When you sav...

Page 98: ...6 colors 9 min Jog Blond Toast Tangerine Brown 238 255 224 274 ST 41 2 SET A Z Edit 41 42 43 44 45 46 47 48 Designs HoopSize A F 126X110mm Combining a built in design and monogram Example To combine b...

Page 99: ...126x110mm SET Edit A Z Font AB OK M L S AB Gothic AB A F A Z Bear Select e a and r Press the OK key The word Bear will appear in the editing window Move the word under the pattern by dragging it or wi...

Page 100: ...1 Built in Card Key 2 Arrow Keys 3 OK Key Pressing the keys will show the saved files in the next or previous page 4 Page Keys Deleting a saved file When you need to delete the saved file select the...

Page 101: ...essing one of the keys The illustrated help of the selected topic will be displayed on the screen NOTE Press the Return key to go back to the previous screen SET A Z Edit 1 2 3 4 5 6 7 8 Designs HoopS...

Page 102: ...move the Needle Plate 2 Take out the bobbin Lift up the Bobbin Holder and remove it 3 Clean the Bobbin Holder with a Lint Brush 4 Clean the Feed Dog and Hook Race with the Lint Brush 5 Clean the Hook...

Page 103: ...OT wait until it has cooled down before touching it To remove Remove the cap and setscrew Remove the faceplate 1 Cap 2 Setscrew 3 Faceplate Pull out the bulb from the socket 4 Lamp Socket 5 Light bulb...

Page 104: ...2 Lint has collected in the bobbin holder 3 The bobbin is damaged and doesn t turn smoothly 1 The needle is inserted incorrectly 2 The needle is bent or blunt 3 The needle clamp screw is loose 4 The...

Page 105: ...he machine 8 The fabric is not pulled tightly enough on the embroidery hoop 9 The fabric is caught or pulled for some reason when sewing embroidery 1 The stitch length is not suitable for the fabric b...

Page 106: ...27 28 26 33 32 44 34 39 38 36 37 43 35 40 41 42 L S 48 50 49 52 51 53 54 46 45 47 55 56 57 2 3 58 59 60 61 62 63 64 68 66 67 65 69 70 00 L S 214 74 78 76 77 79 81 82 83 75 80 71 72 73 214 00 L S 84 95...

Page 107: ...24 23 22 21 13 14 15 16 26 25 27 28 44 43 42 41 33 34 35 36 30 29 31 32 48 47 46 45 52 51 50 49 56 55 54 53 60 59 58 57 64 63 62 61 68 67 66 65 72 71 70 69 76 75 74 73 80 79 78 77 37 38 39 40 81 DESIG...

Page 108: ...107 Gothic Script Cheltenham 3 letters 2 letters DESIGN CHART...

Page 109: ......

Reviews: