background image

www.toews.com

16

q

r

e

w

r

e

w

q

w

q

1, 2

1

2

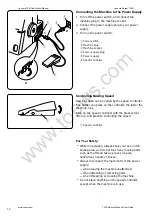
The Position of Thread Guide Bar

1. Pull the thread guide bar up as far as it will go.

2. Turn the thread guide bar so that the thread

guides are right above the spool pins.

q

Thread guide bar

w

Thread guide

e

Stoppers

r

Spool pin

 *

Make sure the two stoppers on the thread guide
shaft, as shown, are set in at the correct position.

Attaching the Spool Holder Cap and Net

1. When you use a small thread spool, pull out the

spool holder from the spool pin. Then place the
spool with its slit side up, and put the spool
holder cap on top of it.

q

Spool holder

w

Spool pin

e

Spool holder cap

r

Slit

2. If the thread slips down from the spool

during threading and/or sewing, put a net on the
spool as illustrated to prevent jamming.

q

Net

w

Spool pin

Janome 734D Instruction Manual

Janome Serger 734D

www.toews.com

734D Owners Manual/ User Guide

Summary of Contents for MY LOCK 734D

Page 1: ... o e w s c o m MODEL MODÉLE MODELO Janome 734D Instruction Manual MANUEL D INSTRUCTIONS LIBRO DE INSTRUCCIONES 734D Janome 734D Instruction Manual Janome Serger 734D www toews com 734D Owners Manual User Guide ...

Page 2: ...encaja bien en el tomacorriente invierta el enchufe Si aun no encaja llame a un electricista calificado para que instale el tomacorriente apropiado No modifique el enchufe de ninguna forma Pedal de Control YC 482J o TJC 150 para usar en la Máquina de Coser MyLock 734D para el mercado de los EE UU solamente NOTICE TECHNIQUE Pour les appareils avec fiche polarisée une lame plus large que l autre pou...

Page 3: ...he nearest authorized dealer or service center for examination repair electrical or mechanical adjustment 4 Never operate the appliance with any air opening blocked Keep ventilation openings of the sewing machine and foot controller free from accumulation of lint dust and loose cloth 5 Never drop or insert any object into any opening 6 Do not use outdoors 7 Do not operate where aerosol spray produ...

Page 4: ...au Retourner la machine à coudre au commerçant autorisé ou au centre de réparations le plus près à des fins d examen de réparations ou d ajustement électrique ou mécanique 4 Ne jamais faire fonctionner cette machine à coudre si une ouverture à air est bloquée Garder les ouvertures d aération de la machine à coudre et du contrôleur de pied exempts d accumulation de charpie poussière et tissu épars ...

Page 5: ...ntro de servicio para que lo examinen reparen o le hagan ajustes eléctricos o mecánicos 4 Nunca haga funcionar esta máquina cuando alguna entrada de aire esté tapada Mantenga las aperturas de ventilación de la máquina de coser y del pedal libres de acumulación de pelusa polvo y tela suelta 5 Nunca deje caer o introduzca ningún objeto dentro de cualquier apertura 6 No la use en la intemperie 7 No l...

Page 6: ...l enchufe del tomacorriente 4 No coloque ningún objeto en el pedal de control pues la máquina podría comenzar a funcionar inadvertidamente o el control o el motor podrán quemarse 5 La intensidad máxima permitida de la bombilla de luz es 15 vatios 6 Cuando use su máquina de coser por la primera vez coloque un retazo de tela debajo del pie prensatela y haga funcionar la máquina sin el hilo por unos ...

Page 7: ...g the Lower Looper 38 Threading the Upper Looper 44 How to Thread only the Upper Looper 46 Threading the Needle on the Right 48 How to Use the Needle Threader 50 Threading the Needle on the Left 52 TEST STITCHING Starting Sewing 56 Finishing Sewing 56 Sewing Continuously 56 How to Use Guide Lines 56 Securing Ends 58 Thread Tension 4 threads 60 62 Threading the Machine 3 threads 64 Thread Tension 3...

Page 8: ...e la machine 31 55 Enfiler le boucleur inférieur 39 Enfiler le boucleur supérieur 45 Common enfiler seulement le boucleur supérieur 47 Enfiler l aiguille de droite 49 Emploi de l enfile aiguille 51 Enfiler l aiguille de gauche 53 POINTS D ESSAI Commencer à coudre 57 Finir de coudre 57 Coudre continuellement 57 Comment utiliser les lignes guides 57 Retenir les extrémités 59 Tension des fils 4 fils ...

Page 9: ...ar el lazador inferior 39 Enhebrar el lazador superior 45 Cómo enhebrar el lazador superior solamente 47 Enhebrar la aguja derecha 49 Cómo usar el enhebrador de la aguja 51 Enhebrar la aguja izquierda 53 COSTURA DE PRUEBA Comenzar la costura 57 Terminar la costura 57 Costura continua 57 Cómo usar las líneas guía 57 Cómo asegurar los cabos 59 Tensión del hilo 4 hilos 61 63 Enhebrar la máquina 3 hil...

Page 10: ...ool pin 1 Spool holder 2 Stitch length dial 3 Differential feed dial 4 Machine socket 5 Power switch 6 Handwheel 7 Lower looper pre tension setting slider 8 Looper cover 9 Side cover 0 Needle clamp 1 Presser foot 2 Needle plate 3 Needle plate setting knob 4 Tab 5 Cutting width adjusting dial 6 Free arm 7 Thread cutter 8 Lower knife 9 Upper knife 0 Upper looper 1 Spreader holder 2 Lower looper 3 Ch...

Page 11: ... cambiante 4 Palanca de enhebrador 5 Perilla para soltar la cuchilla superior PREPARACÓN Noms des pièces q Cadran de tension du fil d aiguille gauche w Cadran de tension du fil d aiguille droite e Cadran de tension du fil du boucleur supérieur r Cadran de tension du fil du boucleur inférieur t Vis de réglage de pression y Barre de guide fil u Guide fil i Poignée de transport o Support de bobine 0 ...

Page 12: ...s No 11 No 14 t Nets y Spool holder caps u Lint brush i Needle threader o Oil 0 Spreader 1 Spanner 2 Upper knife 3 Attachment mounting plate Storing the Needle Threader You can store the attached needle threader inside of the looper cover in the holder The holder is very convenient You can use the needle threader whenever you desired if it is stored in the holder after using the needle threader Pu...

Page 13: ...nherador en el sostenedor para almacenarlo q Cubierta del lazador w Sujetador e Ensartador de aguja Pose de la boîte de rebut Insérer le crochet dans l encoche du couvercle du boucleur q Encoche w Couvercle du boucleur e Boîte de rebut r Crochet Rangement de la boîte d accessoires Insérer la boîte d accessoires dans la boîte de rebut q Boîte de rebut w Boîte d accessoires Accessoires standard q To...

Page 14: ...actice controlling the speed For Your Safety While in operation always keep your eye on the sewing area and do not touch any moving parts such as the thread take up lever loopers handwheel needle or knives Always disconnect the machine from the power supply when leaving the machine unattended when attaching or removing parts when threading or cleaning the machine Do not place anything on the speed...

Page 15: ...na No coloque nada en el controlador de velocidad excepto cuando se está usando la máquina Raccordement de la machine à la source d alimentation 1 Éteindre l interrupteur et brancher la prise de la machine à la douille de la machine 2 Brancher la prise à la source d alimentation 3 Allumer l interrupteur q Interrupteur w Prise de la machine e Douille de la machine r Prise t Source d alimentation y ...

Page 16: ...naps into the machine Opening and Closing the Looper Cover To open A While pushing with the thumb to the right as far as it will go pull the looper cover toward you To close B Lift the looper cover and push it against the machine The looper cover snaps into its position automatically q Looper cover Note Always close looper cover when the machine is in use Free arm sewing The free arm is useful for...

Page 17: ... para coser la ropa tubular tal como las mangas y las piernas de las bragas Comment tourner le volant Toujours tourner le volant vers soi mouvement anti horaire q Volant Table d extension La table d extension ajoute de la surface pour coudre et peut être facilement enlevée pour la couture de bras libre Pour retirer la table Èloignez la de la machine Pour fixer la table Poussez la table jusqu à ce ...

Page 18: ...hown are set in at the correct position Attaching the Spool Holder Cap and Net 1 When you use a small thread spool pull out the spool holder from the spool pin Then place the spool with its slit side up and put the spool holder cap on top of it q Spool holder w Spool pin e Spool holder cap r Slit 2 If the thread slips down from the spool during threading and or sewing put a net on the spool as ill...

Page 19: ...se muestra en la figura para impedir que se enrede q Red w Espiga del carrete Position de la barre du guide fil 1 Tirer la barre du guide fil aussi loin que possible 2 Tourner la barre du guide fil pour que les guide fils se trouvent juste au dessus des broches à bobine q Barre du guide fil w Guide fil e Butées r Broche à bobine S assurer que les deux butées de l arbre du guide fil soient réglées ...

Page 20: ...he needle bar then tighten the needle clamp screw on the left When the needles are set correctly the left needle is higher than the right one Use HA 1SP No 14 Needle or No 11 q Needle clamp w Needle e Needle stopper pin r Edge of needle bar t Needle clamp screws y Flat side to the back Do not use any needle which is bent or blunt How to use the Needle Holder To attach the needle easily use the oth...

Reviews: