background image

AAASewing.com

16

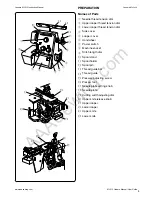
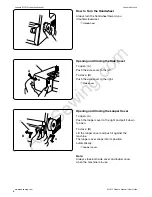
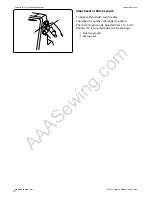
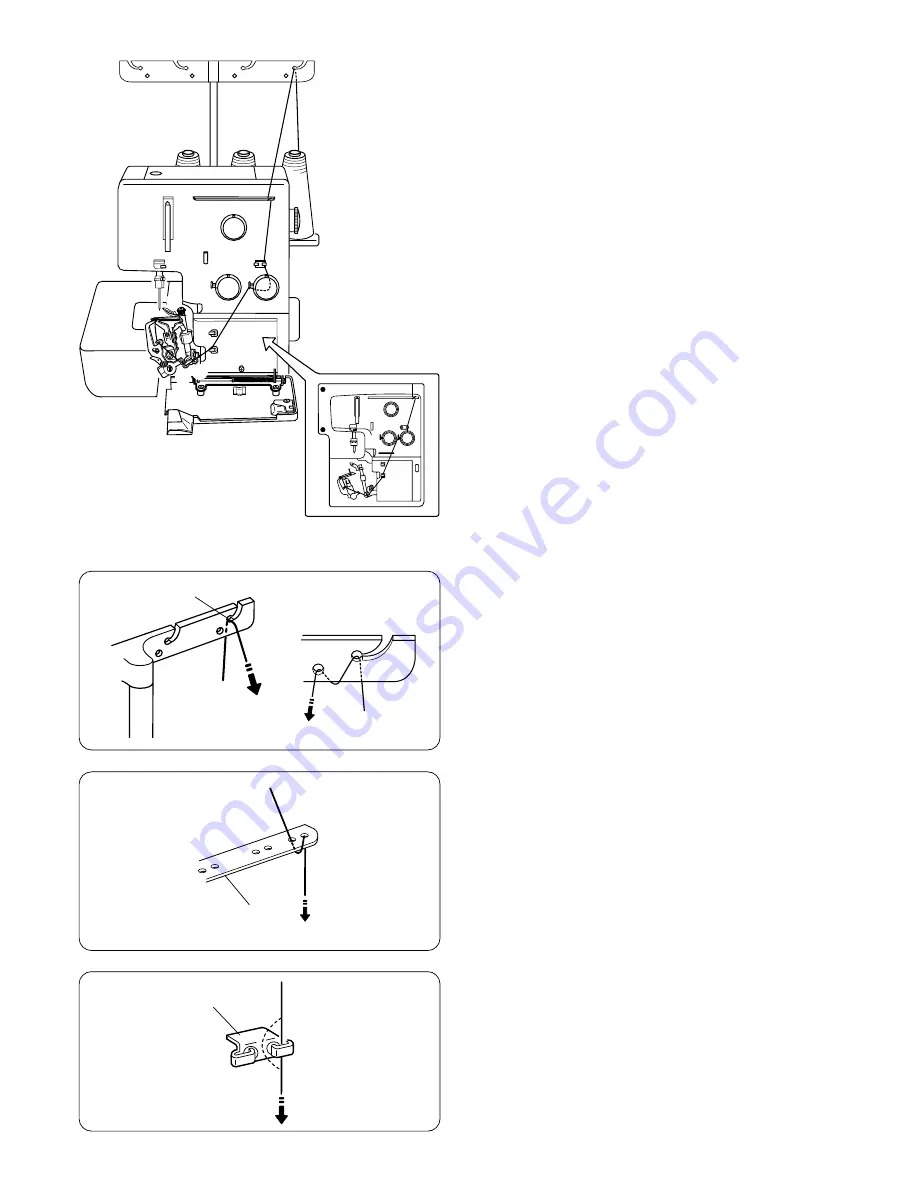
• Threading the Lower Looper

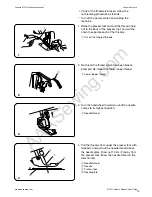
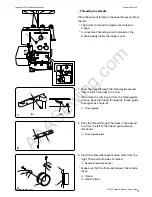
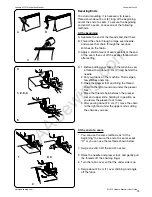
Open the looper cover and side cover.

Place the spool of thread on the right side spool pin.


*

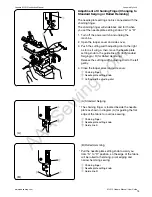
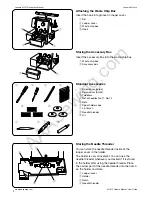
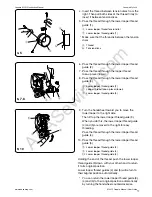
The points to thread for lower looper are marked
in green.


*

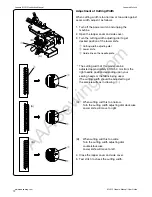
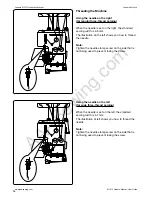
A convenient threading chart is placed on the
machine body inside the looper cover.

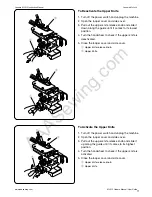
1. Draw the thread through the right side thread

guide from back to front: 

A


*

If the thread is coming out from the thread guide
groove, pass the thread through the thread guide
hole again as shown: 

B

q

Thread guide

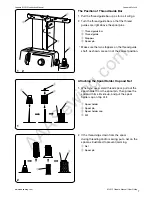
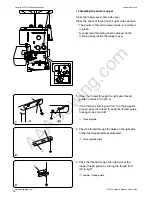
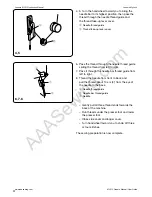
2. Pass the thread through the holes on the right side

of the thread guide plate as illustrated.

w

Thread guide plate

3. Pass the thread through the right side of the

looper thread guide, by sliding the thread from
left to right.

e

Looper thread guide

1

2

3

(A)

(B)

3

2

1

q

w

e

q

w

e

r

t

y

o

!0

u

!1

i

Janome ML213 Instruction Manual 

Janome My Lock

www.aaasewing.com 

ML213 Owners Manual/ User Guide

Summary of Contents for MyLock 213

Page 1: ...A A A S e w i n g c o m Janome MyLock 213 Instruction Manual Janome ML213 Instruction Manual Janome My Lock www aaasewing com ML213 Owners Manual User Guide...

Page 2: ...repair electrical or mechanical adjustment 4 Never operate the appliance with any air opening blocked Keep ventilation openings of this sewing machine and foot controller free from accumulation of lin...

Page 3: ...reading the Lower Looper 16 Threading the Upper Looper 19 How to Thread Only the Upper Looper 20 Threading the Needle 21 How to Use the Needle Threader 23 TEST STITCHING Starting Sewing 24 Finishing S...

Page 4: ...in Thread guide bar Thread guide Pressure adjusting screw Presser foot Needle plate setting knob Needle plate Cutting width adjusting dial Upper knife release knob Upper looper Lower looper Upper knif...

Page 5: ...l holder caps u Lint brush i Needle threader o Oil Storing the Needle Threader You can store the needle threader inside of the looper cover in the holder The holder is very convenient You can use the...

Page 6: ...he speed For Your Safety While in operation always keep your eye on the sewing area and do not touch any moving parts such as the thread take up lever loopers handwheel needle or knives Always disconn...

Page 7: ...Side cover Opening and Closing the Looper Cover To open A Push the looper cover to the right and pull it down to open To close B Lift the looper cover and push it against the machine The looper cover...

Page 8: ...spool holder from the spool pin Then place the spool with its slit side up and put the spool holder cap on top of it 2 If the thread slips down from the spool during threading and or sewing put a net...

Page 9: ...he top of the needle touches the bottom edge of the needle bar then tighten the needle clamp screw on the left Note Tighten the needle clamp screw on the side that is not being used to prevent from lo...

Page 10: ...t of Foot Pressure It is not necessary to adjust the presser foot s pressure for normal sewing When you sew heavy or lightweight fabrics turn the adjusting screw clockwise for heavyweight fabric count...

Page 11: ...the dial The larger the number the longer the stitch The stitch length can be adjusted from 1 to 5 mm Position R is for rolled and narrow hemmings q Stitch length dial w Setting mark q w Janome ML213...

Page 12: ...cover and side cover q Upper knife release knob w Upper Knife To Activate the Upper Knife 1 Turn off the power switch and unplug the machine 2 Open the looper cover and side cover 3 Pull out the upper...

Page 13: ...usted approximately 3 0 to 5 0 mm from the right needle position depending upon your sewing needs or the fabric being used The cutting width should be adjusted to get the same results as in drawing r...

Page 14: ...ease the cutting width adjusting dial to the left gently 4 Close the looper cover and side cover q Chaining finger w Needle plate setting knob e Cutting width adjusting dial A Standard Serging The cha...

Page 15: ...ot draw the threads until the knots are coming out from under the back of the presser foot 3 However stop drawing the needle thread when the knot reach just before the needle eye Cut the knot and thre...

Page 16: ...ad been broken Example Re thread the lower looper thread w Lower looper thread 3 Turn the handwheel toward you until the needle comes to its highest position e Needle thread 4 Pull the threads from un...

Page 17: ...rom back to front A If the thread is coming out from the thread guide groove pass the thread through the thread guide hole again as shown B q Thread guide 2 Pass the thread through the holes on the ri...

Page 18: ...move the lower looper to the right side Then lift up the lower looper thread guide 3 When you do this the lower looper thread guide 4 and 5 are moved to the right for easy threading Pass the thread th...

Page 19: ...er looper 1 Lower looper a Needle thread b Lower looper thread Note How to thread woolly nylon polyester thread The illustration at left shows one of the easiest ways to pass woolly nylon polyester th...

Page 20: ...to front A If the thread is coming out from the thread guide groove pass the thread through the thread guide hole again as shown B q Thread guide 2 Pass the thread through the holes in the second row...

Page 21: ...pper looper thread guide 1 r Upper looper thread tension dial t Upper looper thread guide 1 Make sure that the thread is between the tension discs a thread b tension discs 6 Pass the thread through th...

Page 22: ...the thread guide groove pass the thread through the thread guide hole again as shown B q Thread guide 2 Pass the thread through the holes in the second row from the left of the thread guide plate as i...

Page 23: ...d guide from left to right 8 Thread the needle from front to back and pull the thread about 10 cm 4 from the eye of the needle to the back y Needle thread guide u Needle bar thread guide i Needle Gent...

Page 24: ...ure the thread does not slip out from the Y groove 3 Slide the threader down along the needle while pushing it gently until the threader pin goes into the needle eye 4 Push the stem so that the thread...

Page 25: ...the foot then start sewing It is not necessary to raise the presser foot for ordinary fabric For heavyweight fabric raise the presser foot and insert the fabric in front of the knife Then lower the f...

Page 26: ...a few stitches and stop 3 Raise the presser foot and bring the thread chain to the left around and under the presser foot 4 Place the thread chain between the presser foot and upper knife holding it...

Page 27: ...eedle clamp screw on the side that is not being used to prevent losing the screw Using the needle on the left for wide three thread serging When the needle is set on the left the standard sewing width...

Page 28: ...en o Tighten Needle thread tension is too loose The illustration shows sewing results when the needle thread tension is too loose Remedy Tighten needle thread tension 0 Needle thread tension dial Loop...

Page 29: ...ynthetic No 60 90 Woolly nylon For looper thread Woolly polyester For looper thread Type of fabric Type of thread Refer to page 10 for adjusting the stitch length NOTE Your overlock uses standard sewi...

Page 30: ...edle on the right HA 1 SP No 11 Synthetic No 80 100 Synthetic No 60 100 Silk No 50 100 Lightweight fabric such as Organdy Crepe de chine Lawn and Georgette Woolly nylon Woolly polyester Synthetic No 8...

Page 31: ...ust the thread tension with thread tension dial Needle thread tension is too loose The illustration shows the sewing results when the needle thread tension is too loose Remedy Tighten the needle threa...

Page 32: ...to the back while sewing q Fabric For narrow hemming Correct tension The illustration at left shows sewing results with correct tension settings q Wrong side of fabric w Right side of fabric e Right...

Page 33: ...arn Synthetic No 60 80 Silk No 50 80 Thread Machine Setting q Needle on the right or left HA 1 SP No 14 w Needle plate setting knob GATHERING Refer to pages 27 for thread tension balance adjustment q...

Page 34: ...Turn off the power switch Use the needle on the right hand side Deactivate the upper knife Turn on the power switch then sew the folded edge while guiding along the guide line q Folded edge w Guide l...

Page 35: ...at its blade overlaps the edge of lower knife 0 8 mm to 1 5 mm 3 64 as shown Then tighten the hexagonal bolt firmly 3 Close the looper cover and side cover q Upper knife w Hexagonal bolt e Stopper pin...

Page 36: ...bulb will be HOT Protect your fingers when you handle it Cleaning the Feed Dog 1 Turn off the power switch and unplug the machine 2 Open the looper cover and side cover 3 Remove the needles and presse...

Page 37: ...is recommended to apply oil once a week in normal use once in ten hours in frequent use Open the side cover and apply oil Open the looper cover and apply oil Carrying the Machine Put your fingers into...

Page 38: ...rectly adjusted 2 The machine is not correctly threaded 3 The needle and or the thread are not suitable for the fabric being sewn 4 The thread is not between the tension discs 1 The needle or looper t...

Page 39: ...Use to sew decorative cording Use to sew decorative cording Use for decorating cloth wide cord decoration cording etc Use for elastic taping decorative taping etc Use to help you create a constant wid...

Page 40: ...A A A S e w i n g c o m INSTRUCTION BOOK My Lock 213 Janome ML213 Instruction Manual Janome My Lock www aaasewing com ML213 Owners Manual User Guide...

Page 41: ...A A A S e w i n g c o m Printed in Taiwan 790 800 019 E Janome ML213 Instruction Manual Janome My Lock www aaasewing com ML213 Owners Manual User Guide...

Reviews: