background image

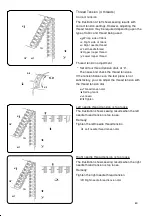
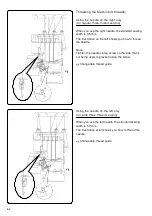
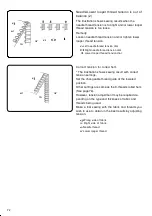
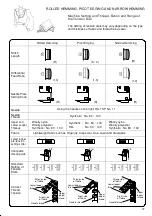
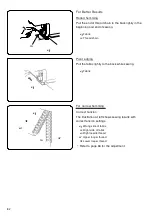
Enfilage  de  la  machine(2fils) 


Utilisation  de   l’aiguille(côté  droit) 
(pour le surjet á trois fois large ou pour le surjet á 
deux fils réglier): 3,5 mm de large 


Lorsque l’aiguille droite est utilisée,la largeur de 
couture standard est de 3,5 mm. 

L’illustration á gauche montre comment enfiler 
l’aiguille. 


Note : 
Resserrer la vis de pince-aiguille sur le côté qui n’est 
pas utilisé pour empêcher de perdre la vis. 


q Épandeuse 
w Guide-fil chandeant: 2 


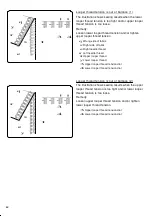
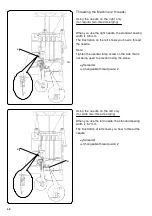
Utilisation  de  l’aiguille(côté  gauche) 


Lorsque l’aiguille gauche est utilisée, la largeur de 
couture standard est de 5,7 mm. 

L’illustration á gauche montre comment enfiler 
l’aiguille. 


q Épandeuse 
w Guide-fil chandeant: 2 

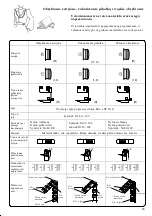
Nawlekanie maszyny (dla dwóch nici) 

 
U

ż

ywaj

ą

c tylko prawej igły 

(dla regularnego szycia trzema ni

ć

mi) 

 
Kiedy u

ż

ywasz prawej igły, standardowa szeroko

ść


szycia to 3.5mm 
Rysunek pokazuje, jak nawlec igł

ę


Uwaga: 
Przykr

ęć


ś

ruby przy igle tak, by mie

ć

 pewno

ść

ż

podczas pracy maszyny si

ę

 one nie poluzuj

ą


q Rozprowadzacz 
w Wymienna prowadnica nici 2 


U

ż

ywaj

ą

c tylko lewej igły 

(dla szerokiego szycia trzema ni

ć

mi) 

 
Kiedy u

ż

ywasz lewej igły, standardowa szeroko

ść


szycia to 5.7mm 
Rysunek pokazuje, jak nawlec igł

ę


q Rozprowadzacz 
w Wymienna prowadnica nici: 2 


69 

Summary of Contents for MyLock 744D

Page 1: ...INSTRUCTION BOOK MANUEL D INSTRUCTIONS INSTRUKCJA OBS UGI MODEL MOD LE MODEL 744D...

Page 2: ...seule mani re Si la fiche ne s ins re pas compl tement dans la prise inverser la prise Si elle ne convient toujours pas contacter un lectricien qualifi pour poser une prise appropri e Ne pas modifier...

Page 3: ...o water Return the appliance to the nearest authorized dealer or service center for examination repair electrical or mechanical adjustment 4 Never operate the appliance with any air opening blocked Ke...

Page 4: ...ag e ou si elle est tomb e dans l eau Retourner la machine coudre au commer ant autoris ou au centre de r parations le plus pr s des fins d examen de r parations ou d ajustement lectrique ou m canique...

Page 5: ...rzegl du naprawy lub elektrycznej lub mechanicznej regulacji 4 Nie wolno u ywa maszyny gdy zatkane s wloty powietrza Nale y zwr ci szczeg ln uwag by w otworach wentylacyjnych maszyny oraz przy pedale...

Page 6: ...e de la source d alimentation en retirant la fiche de la douille prise 4 Ne rien placer sur la p dale de contr le sinon la machine d marrera par inadvertance ou la p dale ou le moteur pourront s endom...

Page 7: ...read Guide 30 Changing toTwo Thread Serging 32 Threading the Machine 34 54 Threading the Lower Looper 38 Threading the Upper Looper 44 How to Thread only the Upper Looper 46 Threading the Needle on th...

Page 8: ...entra nement diff rentiel 23 Comment le r gler 23 D sactiver le couteau sup rieur 25 Activer le couteau sup rieur 25 R glage de la largeur de coupe 27 R glage du bouton de r glage de la plaque aiguil...

Page 9: ...RONCIS Fil et tissu 85 R glage de la machine 85 NERVURE Fil et tissu 87 R glage de la machine 87 Couture 87 ENTRETIEN DE LA MACHINE Remplacement du couteau sup rieur 89 Nettoyage de la zone du couteau...

Page 10: ...ie dwiema ni mi 33 Nawlekanie maszyny 35 55 Nawlekanie dolnego mechanizmu p tluj cego 39 Nawlekanie g rnego mechanizmu p tluj cego 45 Nawlekanie ig y po prawej stronie 49 Nawlekanie ig y po lewej stro...

Page 11: ...Spool pin 1 Spool holder 2 Stitch length dial 3 Differential feed dial 4 Machine socket 5 Power switch 6 Handwheel 7 Lower looper pre tension setting slider 8 Looper cover 9 Side cover 10 Needle clam...

Page 12: ...22 Boucleur inf rieur 23 Guide fil changeant 24 Levier de enfileur 25 Bouton de d gagement de couteau sup rieur PRZYGOTOWANIE Nazwy cz ci q Regulator napr enia lewej nici od ig y w Regulator napr enia...

Page 13: ...m r Set of needles No 11 No 14 t Nets y Spool holder caps u Lint brush i Needle threader 0 1 2 3 q e w m Oil 0 Spreader 1 Spanner 2 Upper knife 3 Attachment mounting plate Storing the Needle Threader...

Page 14: ...ssez le enfile aiguille dans le support pour stocker q Couvercle du boucleur w Support e Enfile aiguille Przymocowywanie pojemnika na strz pki Wstaw haczyk w rowek na pokrywie mechanizmu p tluj cego q...

Page 15: ...harder you press on the controller the faster the machine runs Step on the speed controller with the presser foot lifter up and practice controlling the speed q q Speed controller For Your Safety Whi...

Page 16: ...es lors de l enfilage ou du nettoyage de la machine Ne rien placer sur le contr leur de vitesse sauf lorsque la machine fonctionne Pod czenie maszyny do r d a zasilania 1 Wy cz przycisk zasilania po c...

Page 17: ...the extension table until it snaps into the machine Opening and Closing the Looper Cover q To open A While pushing with the thumb to the right as far as it will go pull the looper cover toward you To...

Page 18: ...libre Le bras libre est utile pour coudre des v tements tubulaires tels que des douilles et des jambes de culotte Aby obr ci ko o nap dowe Zawsze obracaj ko em do siebie zgodnie z ruchem wskaz wek zeg...

Page 19: ...r shaft as shown are set in at the correct position 1 2 Attaching the Spool Holder Cap and Net e 1 When you use a small thread spool pull out the q r spool holder from the spool pin Then place the spo...

Page 20: ...se de la bobine lors de l enfilage et ou de la coutur placer un filet sur la bobine comme illustr pour emp cher tout blocage q Filet w Broche bobine Pozycja pr tu prowadnicy nici 1 Podnie pr t prowadn...

Page 21: ...edle touches the edge of the needle bar then tighten the needle clamp screw on the left When the needles are set correctly the left needle is higher than the right one Use HA 1SP No 14 Needle or No 11...

Page 22: ...e en orientant le c t plat vers l arri re comme montr 3 Tenir la tige et ins rer l aiguille dans le pince aiguille la pousser le plus loin possible Resserrer la vis de pince aiguille fermement en sout...

Page 23: ...holder r Lever e q w r 2 8 mm w Attaching the Presser Foot 1 Turn off the power switch and unplug the machine 2 Place the presser foot so that the pin on the foot lies just under the groove of the fo...

Page 24: ...vis de r glage pour qu elle soit 2 mm sous le haut de la machine Voir l illustration q Pour diminuer w Pour augmenter e Vis de r glage r Haut de la machine Podnoszenie i opuszczanie stopki dociskowej...

Page 25: ...indicates the ratio between the main and the sub feed motion q 1 0 indicates the neutral position w q Differential feed dial w Setting mark e Differential feed ratio indicating window e How to Adjust...

Page 26: ...nement diff rentiel efficace maximal est de 2 2 Lorsque le cadran de longueur des points est r gl entre 4 et 5 le rapport d entra nement diff rentiel maximal sera automatiquement r gl entre 2 2 et 1 8...

Page 27: ...nife is disengaged 1 4 1 Setting mark on the handwheel 5 2 Setting mark on the machine 3 Upper knife release lever 4 Setting mark for down position 5 Upper knife 3 To Activate the Upper Knife 7 6 3 Tu...

Page 28: ...rieur est automatiquement activ Tourner le volant contre le sens des aiguilles d une montre pour v rifier que le couteau sup rieur est activ 6 Marquage pour couteau sup rieur activ 7 Marquage positio...

Page 29: ...e plate The cutting width of this model can be adjusted approximately 3 0 to 5 0 mm from the right needle position depending upon your sewing needs or the fabric being used The cutting width should be...

Page 30: ...le couvercle du boucleur et le couvercle lat ral 5 Faire des points d essai pour v rifier la largeur de coupe 6 Attachez la table d extension Regulacja szeroko ci przycinania Kiedy szeroko przycinani...

Page 31: ...oper cover and attach the extension r table q Chaining finger w Needle plate setting knob e Standard position r Cutting width adjusting knob WARNING To avoid accidental injury pay special attention to...

Page 32: ...eaut un revers picot ou une couture d ourlet troit q Doigt de la semelle du pied presseur w Bouton de r glage de la plaque aiguille e Ligne guide R Regulacja ustawienia ga ki przy p ytce ciegowej zmia...

Page 33: ...serging with 2 3 or 4 threads q Lower looper pre tension setting slider Rolled hemming R H Rolled hemming with 2 or 3 threads 3 4 thread serging Serging with 3 or 4 threads w Changeable thread guide 2...

Page 34: ...r glage selon qu il s agit d un surjet 3 4 ou 2 fils Ustawienia napr enia dolnego mechanizmu p tluj cego Suwak oraz Prowadnica nici zmienna Standardowe szycie materia w we nianych STD Szycie standardo...

Page 35: ...holder q Spreader w Upper looper e Holder To remove the spreader Pull tab A on the holder toward you lightly Push the bottom of the spreader up and pull it out For standard two thread serging set the...

Page 36: ...eur inf rieur W przypadku szycia za pomoc dw ch nici u yj jednej nici od ig y oraz nici dolnego mechanizmu p tluj cego Zdejmij inne nici Aby za o y urz dzenie rozprowadzaj ce Po czubek urz dzenia w ot...

Page 37: ...s until the knots are coming out from under the back of the presser foot 3 However stop drawing the needle threads when the knots reach just before the needle eye Cut the knots and thread the needle e...

Page 38: ...boucleur sup rieur de l aiguille droite et de l aiguille gauche S assurer de d gager les fils d aiguille sous la plaque aiguille et les faire passer vers l arri re et sous le pied presseur sur environ...

Page 39: ...ads q 1 q 2 Re thread the thread which had been broken Example Re thread the lower looper thread w Lower looper thread 2 e 3 Turn the handwheel toward you until the needle comes to its highest positio...

Page 40: ...du pied presseur Faire passer le fil d aiguille vers A e Fil d aiguille r Aiguille t Pied presseur y Plaque aiguille Je eli jedna z nici p knie post puj w nast puj cy spos b aby nawlec j ponownie Wy c...

Page 41: ...m back to front A If the thread is coming out from the thread guide groove pass the thread through the thread guide hole again as shown B 1 A B w 2 e 3 q Thread guide 2 Pass the thread through the hol...

Page 42: ...est soulev le fil s ins re facilement entre les disques de tension e Cadran de tension du fil du boucleur inf rieur Nawlekanie dolnego mechanizmu p tluj cego Otw rz pokryw mechanizmu p tluj cego Po s...

Page 43: ...lift up the lower looper thread guide 1 When you do this the lower looper thread guide 2 and 3 are moved to the right for easy threading Pass the thread through the lower looper thread guide 2 9 Pass...

Page 44: ...iquement en tournant le volant dans le sens anti horaire 4 Zahacz ni o naro nik A po czym przeprowad nici poprzez prowadnic nici dolnego mechanizmu p tluj cego 5 Przeprowad ni przez prowadnic nici wym...

Page 45: ...the needle threads are not tangled on the lower looper 10 0 Lower looper Needle thread Lower looper thread 1 2 3 NOTE How to thread woolly nylon polyester thread The illustration at left shows one of...

Page 46: ...ode avec le boucleur sup rieur Boucleur inf rieur Fil ordinaire Fil laineux de nylon polyester 10 Przesu dolny mechanizm p tluj cy do jego najbardziej prawej pozycji obracaj c ko em nap dowym Nast pni...

Page 47: ...ough the thread guide second from the right from back to front A q Thread guide q 1 A B 2 Pass the thread through the holes in the second row from the right of thread guide plate as w illustrated w Th...

Page 48: ...e releveur de pied presseur est soulev le fil s ins re facilement entre les disques de tension e Cadran de tension du fil du boucleur sup rieur Nawlekanie g rnego mechanizmu p tluj cego Po szpulk z ni...

Page 49: ...uide u 7 Holding the end of the thread with a pair of tweezers pass it through the hole on the upper looper Pull 10 cm 4 or more of thread through the hole y Upper looper thread guide u Upper looper y...

Page 50: ...eulement pour viter l enchev trement des fils faire sortir les deux fils sur la plaque aiguille et sous le pied presseur q Fil de boucleur inf rieur w Boucleur sup rieur 4 Zahacz ni o naro nik B po cz...

Page 51: ...the thread through the thread guide second from the left from back to front A q Thread guide 1 A B 2 Pass the thread through the holes in the second w row from the left of thread guide plate as illust...

Page 52: ...i le releveur de pied presseur est soulev le fil s ins re facilement entre les disques de tension e Cadran de tension du fil d aiguille droite Nawlekanie ig y po prawej stronie Po szpulk z nici na bol...

Page 53: ...dle thread guide plate o Needle bar thread guide 0 Right needle How to use the Needle Threader Turn off the power switch when you use the Needle Threader Do not use other than for the threading or rep...

Page 54: ...e boucle de fil 5 Retirer l enfile aiguille de l aiguille lentement en laissant la boucle de fil derri re le chas de l aiguille Prendre ensuite la boucle avec le crochet pour faire sortir l extr mit d...

Page 55: ...q 1 Draw the thread through the thread guide on the left from back to front A q Thread guide 1 A B 2 Pass the thread through the holes on the left of thread guide plate as illustrated w w Thread guide...

Page 56: ...l s ins re facilement entre les disques de tension e Cadran de tension du fil d aiguille gauche Nawlekanie ig y po lewej stronie Po szpulk z nici na bolcu pierwszy od lewej Punkty dla nici od g rnego...

Page 57: ...d pass the thread through the needle bar thread guide from left to right 9 Thread the left needle from front to back and pull the thread about 10 cm 4 from the eye of the o needle to the back under th...

Page 58: ...barre aiguille o Aiguille gauche Il est facile d enfiler la machine en utilisant l enfile aiguille inclus dans les accessoires standard voir la page 51 4 5 Przeprowad ni z prawej strony do lewej z ty...

Page 59: ...he thread chain slightly to the back 2 Cut the threads with the thread cutter as illustrated leaving about 5 cm 2 thread chain from the end of the fabric q Thread cutter Sewing Continuously Insert the...

Page 60: ...e couture La marque L indique la distance partir de l aiguille gauche La marque R indique la distance partir de l aiguille droite La distance entre le centre de la ligne guide et la position de l aigu...

Page 61: ...g behind the needle 2 Put your fabric on the machine Then serge a few stitches and stop 3 Raise the presser foot and bring the thread chain to the left around and under the presser foot 4 Place the th...

Page 62: ...aiguille 2 Placer le tissu sur la machine Puis surfiler quelques points et arr ter 3 Soulever le pied presseur et amener la cha ne de fils vers la gauche autour du pied presseur et sous ce dernier 4...

Page 63: ...ew and check the thread tensions If the tension balance on the test piece is not satisfactory you can adjust the thread tension with the thread tension dial u Thread tension dial i Setting mark o Loos...

Page 64: ...te est trop l che Solution Resserrer la tension du fil d aiguille droite 2 Cadran de tension du fil d aiguille droite Napr enie nici dla czterech nici W a ciwe napr enie Rysunek po lewej stronie wskaz...

Page 65: ...abric e Right needle thread e r Left needle thread t Upper looper thread y Lower looper thread 3 Upper looper thread tension dial 4 Lower looper thread tension dial q r 3 4 w t e Looper thread tension...

Page 66: ...ran de tension du fil de boucleur sup rieur 4 Cadran de tension du fil de boucleur inf rieur Napr enie nici mechanizmu p tluj cego jest rozregulowane 1 Rysunek pokazuje rezultaty szycia gdy napr enie...

Page 67: ...e left shows you how to thread the needle Note Tighten the needle clamp screw on the side that is not being used to prevent losing the screw q Changeable thread guide q Using the needle on the left on...

Page 68: ...l aiguille gauche est utilis e la largeur de couture standard est de 5 7 mm L illustration gauche montre comment enfiler l aiguille q Guide fil du boucleur Nawlekanie maszyny dla trzech nici U ywaj c...

Page 69: ...s too loose The illustration shows sewing results when the needle thread tension is too loose Remedy Tighten needle thread tension 0 Left needle thread tension dial 1 Right needle thread tension dial...

Page 70: ...u resserrer la tension du fil du boucleur inf rieur 2 Cadran de tension du fil du boucleur sup rieur 3 Cadran de tension du fil du boucleur inf rieur Napr enie nici dla trzech nici W a ciwe napr enie...

Page 71: ...u how to thread the needle q Note Tighten the needle clamp screw on the side that is not being used to prevent losing the screw w q Spreader w Changeable thread guide 2 Using the needle on the left on...

Page 72: ...e gauche est utilis e la largeur de couture standard est de 5 7 mm L illustration gauche montre comment enfiler l aiguille q pandeuse w Guide fil chandeant 2 Nawlekanie maszyny dla dw ch nici U ywaj c...

Page 73: ...w and check the thread tensions y i If the tension balance on the test piece is not satis factory you can adjust the thread tension with u thread tension dial t Thread tension dial y Setting mark u Lo...

Page 74: ...fil d aiguille droite 1 Cadran de tension du fil du boucleur inf rieur Napr enie nici dla dw ch nici W a ciwe napr enie Rysunek po lewej stronie wskazuje rezultat szycia przy pracy z w a ciwym ustawi...

Page 75: ...r looper thread tension dial Correct tension for rolled hem The illustration shows sewing result with correct tension settings Set the changeable thread guide at the lowered position Other settings ar...

Page 76: ...urs r sultats en r glant la tension q Envers w Endroit e Fil d aiguille r Fil du boucleur inf rieur Napr enie nici od ig y lub nici od dolnego mechanizmu jest rozregulowane 2 Rysunek pokazuje rezultat...

Page 77: ...100 Silk No 50 100 Synthetic No 60 100 HA 1 SP No 11 14 2 5 3 5 1 0 Heavyweight Tweed Coating Denim Doeskin Thick fabric Cotton No 50 60 Silk No 50 60 Synthetic No 50 60 HA 1 SP No 14 3 0 5 0 1 0 Knit...

Page 78: ...80 100 Synth tique n 80 100 HA 1 SP N 11 14 2 5 3 5 1 0 pais tweed toffe pour paletot denim peau de daim tissu pais Coton n 50 60 Soie n 50 60 Synth tique n 50 60 HA 1 SP N 14 3 0 5 0 1 0 Tricots tric...

Page 79: ...Nr 60 100 Jedwab Nr 50 100 Syntetyk Nr 60 100 HA 1 SP Nr 11 14 2 5 3 5 1 0 Ci kie Tweed flausz denim g adka tkanina we niana grube materia y Bawe na Nr 50 60 Jedwab Nr 50 60 Syntetyk Nr 50 60 HA 1 SP...

Page 80: ...oper Threads Woolly nylon Woolly polyester Synthetic No 80 100 Synthetic No 60 100 Silk No 50 100 Woolly nylon Woolly polyester Synthetic No 80 100 Fabric Lightweight fabric such as Organdy Crepe de c...

Page 81: ...r Nylon laineux polyester laineux n 80 100 synth tique n 80 100 Synth_tique n 60 100 Soie n 50 100 Nylon laineux polyester laineux synth tique n 80 100 Tissu Tissu l ger comme organdi cr pe de Chine s...

Page 82: ...tetyk Nr 80 100 Nici dolnego i g rnego mechanizmu Nylon we niany Nylon poliestrowy Syntetyk Nr 80 100 Syntetyk Nr 60 100 Jedwab Nr 50 100 Nylon we niany Nylon poliestrowy Syntetyk Nr 80 100 Materia Ma...

Page 83: ...edle thread tension is too loose The illustration shows the sewing results when the w y right needle thread tension is too loose Remedy t r Tighten the right needle thread tension y Right needle threa...

Page 84: ...er la tension du fil du boucleur inf rieur u Cadran de tension du fil du boucleur sup rieur i Cadran de tension du fil du boucleur inf rieur Napr enie nici Dla obr biania zawijanego i zaka czania piko...

Page 85: ...Picot edging Pull the fabric lightly to the back while sewing q Fabric q For narrow hemming q Correct tension The illustration at left shows sewing results with t correct tension settings e q Wrong s...

Page 86: ...oite r Fil du boucleur sup rieur t Fil du boucleur inf rieur Se r f rer la page 67 pour le r glage Dla lepszych rezultat w Obr bianie zawijane Przeci gnij delikatni koniec a cuszka do ty u przy pocz t...

Page 87: ...s pull the thread chain to the back lightly at the beginning and end of sewing q q Overedging Thread and Fabric Medium to Heavy Fabric Machine Setting HA 1 SP No 14 e w 3 4 q 2 r q q Needle plate sett...

Page 88: ...najdziesz na stronach 61 63 i 67 Dla osi gni cia lepszego rezultatu poci gnij delikatnie a cuszek do ty u przy pocz tku i ko cu szycia q Obr bienie Nici i materia y Tissu moyen pais rednie i ci kie ma...

Page 89: ...r knife Down r Lower looper pre tension setting slider STD t Changeable thread guide 3 4 r 3 4 2 w Sewing r Turn off the power switch e Remove the needle on the left hand side Deactivate the upper kni...

Page 90: ...p rieur Allumer l interrupteur puis coudre le bord pli en se guidant le long des lignes guides q Bord pli w Ligne guide de plaque aiguille e Ligne de position d aiguille droite sur le pied presseur r...

Page 91: ...st position Loosen the hexagonal bolt and adjust the position of the upper knife so that its blade overlaps the edge of lower knife 0 8 mm to 1 5 mm 3 64 as shown Then tighten the hexagonal bolt firml...

Page 92: ...u sup rieur ou la griffe d entra nement Le couteau inf rieur durera plus d un an dans des conditions d usage normal Cependant s il heurte une pingle ou un objet dur il peut tre n cessaire de changer l...

Page 93: ...e is designed to use a 15 WATT maximum light bulb The light bulb will be HOT Protect your fingers when you handle it Cleaning the Feed Dog 1 Turn off the power switch and unplug the machine 2 Open the...

Page 94: ...t en utilisant la brosse anti charpie ou utiliser un aspirateur 6 Poser nouveau la plaque aiguille le pied presseur et les aiguilles Fermer le couvercle du boucleur et le couvercle lat ral e Griffe d...

Page 95: ...ewing machine oil to the parts indicated with arrows It is recommended to apply oil once a week in normal use once in ten hours in continuous use Open the looper cover and apply oil Carrying the Machi...

Page 96: ...cle du boucleur et appliquer de l huile Oliwienie maszyny Nanie kilka kropki dobrej jako ci oleju do maszyn na cz ci wskazane strza kami patrz rysunek Przy normalnym u ytkowaniu zaleca si by oliwi mas...

Page 97: ...attachment onto the setscrew from the right Tighten the q setscrew to fix the attachment w 4 Attach the extension table as necessary q Attachment mounting plate w Side plate e Slot r Setscrew t Attac...

Page 98: ...z la vis de r glage et enlevez l attachement Serrez l g rement la vis 3 Tirez vers le haut le plaque de support d attachement pour le d sengager et pour l enlever vers la droite Dodatkowa p ytki do mo...

Page 99: ...age 18 See pages 34 54 64 and 68 See page 18 The seam is not sewn neatly 1 The needle and or looper thread tensions are not correctly adjusted 2 The machine is not correctly threaded 3 The needle and...

Page 100: ...les page 35 55 65 et 69 Voir la page 19 La couture n est pas nette 1 Les tensions du fil d aiguille et ou du boucleur ne sont pas bien r gl es 2 La machine n est pas enfil e correctement 3 L aiguille...

Page 101: ...trony 35 55 65 i 69 Patrz strona 19 Szew jest niestaranny 1 Napr enie nici od igie lub mechanizmu jest niew a ciwie wyregulowane 2 Maszyna jest niew a ciwie nawleczona 3 Ig a i lub ni jest le dobrana...

Page 102: ...99...

Page 103: ...e cord decoration cording etc y Gathering attachment Use when sewing sleeves cuffs collars etc u Elastic gathering attachment Use for elastic taping decorative taping etc i Cloth guide Use to help you...

Page 104: ...un ruban sur une ligne d paule ou d aisselle pour l emp cher d tirer ou pour d corer Id al avec le pied ruban ou le pied guide cordonnet e Pied guide cordonnet 1 Utiliser pour faire des gans s d corat...

Page 105: ...Printed in Taiwan 794 800 505 E F S...

Reviews: