background image

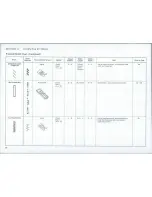
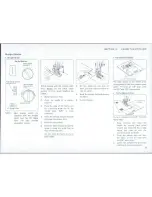
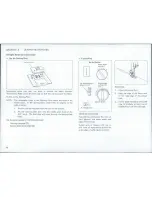
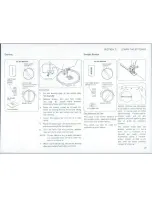
Summary of Contents for mystyle 16

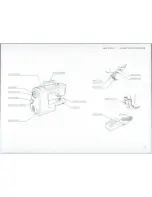
Page 1: ...INSTRUCTION BOOK MODEL 652...

Page 2: ...hoose Your Needle and Thread 12 Blind Hemming 36 Needle Thread and Fabric Chart 12 Lace Work 37 Check Your Needle 12 Buttonhole Making 38 39 To Change Your Needle 12 Sew in a Zipper 40 41 Prepare the...

Page 3: ...ECTION 1 KNOW YOUR MACHINE Locate and Identify the Parts Thread Spool Pins Uppe Thead ideBobbinl Winding Spindle Take up Lever Controlh onro Stitch Wid th Control Face Cover PIate Thread CutteGuide 2h...

Page 4: ...SECTION 1 KNOW YOUR MACHINE At Coer PateCarrying Harndle Foote roontr TOM m HmAWel Pesse Foo Push Pe Clue...

Page 5: ...lug To increase speed gently press down with the ball of your foot 1 Insert the machine plug into the three prong To decrease speed release your foot pres outlet as shown It will only fit one way sure...

Page 6: ...Set the dial aligning the setting mark on the dial with the groove as follows 3 most sewing 2 applique and Cut Out work 1 basting sewing chiffon lace organdy and other lightweight fabrics Also for vel...

Page 7: ...scissors to cut the spools of thread in order to feed thread to thread after you finish sewing Just use the the machine handy thread cutter To use pull up the spool pins Place the The Presser Foot Le...

Page 8: ...d of the accessory storage box lifts as shown open toward you 2 Pull gently toward you Sewing accessories are conveniently located The extension table will snap out Bar tacking to reinforce pockets pl...

Page 9: ...E FOR SEWING Set Up the Machine Continued Stitching sleeves waistbands pant legs Darning socks or mending knees elbows Sewing buttons on sleeves waistbands or any circular garment area or areas of wea...

Page 10: ...ser feet snaps on the foot holder which is seldom removed If you need to remove or attach the foot holder here is what you do To Remove To Attach To Snap Off Presser barfF npn I oIf Foot t holder To R...

Page 11: ...h see page 33 Rick rack stretch see page 33 To Snap On the Presser Foot Three step zigzag see page 34 1 Place the presser foot so the hori Serging see page 35 zontal pin on the foot lies just Overcast...

Page 12: ...be set to sew on each side of Use this transparent foot for satin stitch and system It is marked to measure your your zipper The edges of the foot guide the outlining applique buttonholes accurately...

Page 13: ...e thread for needle and bobbin When sewing stretch very fine fabrics and synthetics use a BLUE TIPPED needle The NOTE Raise the needle bar to its highest posi blue tipped needle effectively prevents s...

Page 14: ...e you winding the bobbin 3 Draw thread from spool through bobbin winder tension disc as shown 4 Place the threaded bobbin on the bobbin winding spindle so that the thread comes out on top 5 Push the b...

Page 15: ...bin 2 Pull about 10 cm of thread 3 Then pull the thread clockwise 4 Slide the bobbin cover plate while holder so that the thread feeds toward you through the tension toward the back of the machine pus...

Page 16: ...hread near spool draw thread down into the tension area and then around the check spring holder The numbered steps above follow the numbers 3 Firmly draw thread up and through take up lever from right...

Page 17: ...Your Bobbin Thread 1 Raise presser foot lever Hold 2 Bring bobbin thread up by pulling 3 Pull both threads under and to the needle thread loosely in left hand top thread back of the presser foot leavi...

Page 18: ...d between the two layers of The top thread The bobbin thread fabric as shown above magnified to show detail appears on the appears on the underside of the upper surface of the If you look at the stitc...

Page 19: ...the red indicator on the stitch indicator panel The bottom row of stitches is selected when the stitch length control is set at the stretch stitch position NOTE To avoid needle or fabric damage be su...

Page 20: ...titch may need to adjust this control to tmeans no feed i balance the stitches for appearance sake If design seems open like the illustrations To select Stretch Stitches set this to the left adjust th...

Page 21: ...e sewing of the first 3 or 4 stitches of the seam 3 Test the machine stitch on a scrap of fabric you plan to use The fabric should be double thickness Adjust the machine for the length of stitch and t...

Page 22: ...STRAIGHT Straight Check 2 6 Yellow 0 Use on knits and other stretch fabrics good 27 STRETCH Chart Stretch for topstitching on p 12 iStitch oPosition ZIGZAG Zigzag Check 3 8 Pink 1 5 Finish edges butt...

Page 23: ...ng seams 34 ZIGZAG Chart on p 12 SMOCKING Zigzag Check 2 6 i Yellow 3 5 Use in smocking or as a decorative stitch 43 STITCH Chart 1 Stretch Ion p 12 Stitch Position SHELL Satin Check 4 9 Pink 3 5 Fini...

Page 24: ...applying elastic 45 STRETCH Chart Stretch on p 12 Stitch Position FAGOTING Zigzag Check 3 8 0 5 2 5 Join two folded edges for decorative 44 Chart open work appearance on p 12 STRETCH Zigzag Check 2 6...

Page 25: ...E Zigzag Check 2 6 Yellow 3 5 Use as hemming stitch for blankets table 44 STR ETCH Chart Stretch cloth and draperies on p 12 Stitch Position BUTTONHOLE HButtonhole Check 2 6 Blue Zone 3 S Buttonholes...

Page 26: ...e threads Cornerroy Stretch Stitch position 4 c de H h3 Place the edge of the fabric next H Straight foot to a stitching guide line on the needle plate 5 8 is most NOTE Best sewing results are common...

Page 27: ...the holes in the needle plate In the darning plate these holes are slightly to the Stretc Stitc 3 Evely duid te fabri along thiso right of center edge tops produce acn frmtevendrweo 1 Position the dar...

Page 28: ...fabrics as well It works well on start darning __ 4 Lower the presser bar and sew at a slow This stitch is the stretch variation of curved seams and on any pered pthe straight stitch especially devel...

Page 29: ...tin Stitch page 29 Stretch Stitch Applique Work page 30 Bar Tacking page 30 FMonogramming page 31 A Zigzag foot Embroidery page 31 Button Sewing page 32 The Stitch and Its Uses Overcasting page 33 The...

Page 30: ...h and Its Uses The Satin stitch is a versatile and often Here s How used decorative stitch but it can also be used to overcast a raw edge for ex Once your machine is set up to stitch you may want to e...

Page 31: ...ic is2 T 3 This stitch is similar to a very short L 3 joiner applique pieces on the fabric satin stitch and is used to reinforce 3 Stitch around the applique making 4 points of strain such as corners...

Page 32: ...itch 3 Draw the letters on the fabric foot Stretch Stitch see page 19 with tailor s chalk 4 Draw the design on to the fabric F Satin stitch 4 Satin stitch adjusting the stitch with tailor s chalk fot...

Page 33: ...the shank cut the 3 1 Match the center of the button holes to the center of the slot on the presser threads leaving a 20cm tail Bring the 4 foot needle thread down through the hole 2 Adjust the stitch...

Page 34: ...H postion The Stitch and Its Uses Start overcasting about 0 3 cm inside Sew on stretch fabrics in any area that 4 the raw corner of your seam If you L3 you might use a zigzag stitch start right at th...

Page 35: ...ching will catch both sides teright hand side of the presser foot SrthStitch Guide the work so the right hand F T R stitches tall at the edge of the fabric A Zigzag foot The Stitch and Its Uses The th...

Page 36: ...a Stretch Stitch NOTE When using stretch knit 1 5 cm seam then trim seam fabric use a blue stretch A Zigzag foot allowance after A Zigzag foot fabric needle which Raw or worn edges of older garments...

Page 37: ...e turn up your hem and pin M c NOTE For light weight fabrics you may need adouble fold A Zigzag foot 3 Fold the material bottom side out on the edge to be stitched as shown leaving 0 4 to 0 7 cm of th...

Page 38: ...gth control I 4Ar Stretch Stitch Lace adds a fanciful feminine touch A Zigzag toot to blouses and lingerie Table linens and pillows become more elegant when trimmed with lace Turn raw edge of fabric u...

Page 39: ...r nyu Stretch Stitch c Insert the garment under the foot with the top mark on your c Stop sewing at the left stitch F foot with the buttonhole mark garment Sliding buttonhole foot A4 ing running towar...

Page 40: ...w 4 to 6 stitches b Sew until you reach the back of b Sew 4 to 6 stitches hole open with the buttonhole opener in your accessory storage c Stop sewing at the ight stitch the buttonhole cc Stop sewing...

Page 41: ...the zipper foot on the top Top side KFold back the left seam allowance side at the bottom of the zipper of farc as shown so that the needle pierces the fold StechSith2 Turn under the right seam allow...

Page 42: ...fabric top side up attach the presser bar to the left the zipper the rest of the seam pins on the zipper foot 15 Lower the needle into the fabric 12 Stitch across and below the hot and raise the press...

Page 43: ...need to tighten the top thread tension slightly Stretch Stitch allow the needle to just l Stretch Stitch F Satin stitch clear the folded edge of the foot fabric when it zigzags A Zigzag foot 2 If you...

Page 44: ...he Stitch and Its Uses For patching worn out elbows or 3 knees 4 7 Stretch Stitch FF_____ Stec Stch I F V A Zigzag foot A Zigzag foot With the stitch length at 4 sew straight stitching lines 1 cm apar...

Page 45: ...ne ac arc de 4 K 3 Place the fabric top side up and sew 1 5 cm and press 3 1 cm from the edge 2 Pin the two edges to paper or Trim close to stitching The stitch will Stretch Stitch tear away backing 0...

Page 46: ...etch stitch zone posilion no 2 Use this stitch to join heavy weight 3 4 Overlap two raw edges together and CDSrth tth interlining _use this stitch to join them Stretch Stitch A Zigzag foot A Zigzag fo...

Page 47: ...c guide it gently Breaking Needle Incorrect size needle Choose correct size needle for thread and fabric Incorrect setting of needle Reset needle Loose presser foot Reset presser foot Upper and lower...

Page 48: ...eedle for thread and fabric Sharp eve in needle Insert new needle Nicks or burrs at hole of needle plate Replace needle plate mi polish off burrs completely Breaking Bobbin Thread Improper bobbin thre...

Page 49: ...en the face cover CAUTION The lght bulb will he4 H OT Protect your Bbi fngers when you cvrp lt handle it Follow these directions 4 Brush or vacuum the dust and lint 6 Slide on the bobbin cover plate b...

Page 50: ...move the bobbin cover plate 3 Remove the screw on the left side 7 of the needle with the large screw driver 4 Remove the needle plate In case machine is not used for an extended time oil it before sew...

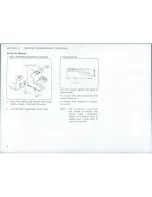
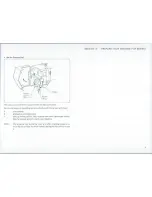
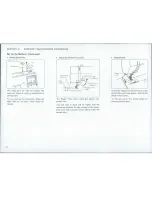
Page 51: ...652 800339 E N...

Reviews: