background image

53

www.janome.com

User Manual

  QUILT MAKER PRO 20


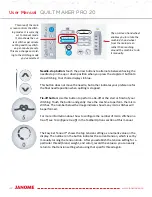
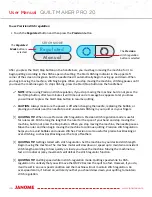
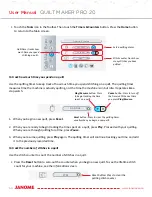
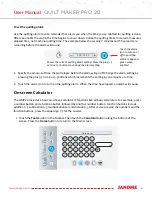
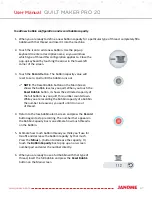
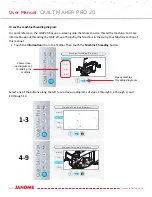
1.  Insert the USB drive into the USB port on the bottom- 

side of the front display. Then touch the machine icon to 
update the machine’s software. 

Software Updates

Update Machine Software

Update Display Software

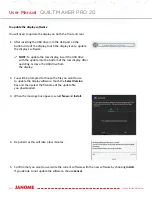
2.  You will be prompted to choose the file you want to use  

to update the machine software. Touch the Select Version 
box and then select the filename of the update file  
you downloaded. 

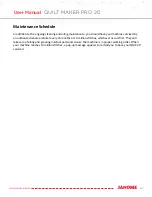
3.  Be patient as this will take a few minutes. 

4.  When complete, the machine will beep. Remove the USB drive and restart the machine. 

To update the machine software


Â

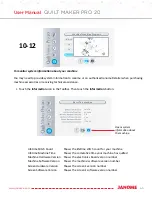
IMPORTANT: If you are running the QMP 20 from a Pro-Stitcher tablet computer, the Update screen 
has only the machine icon because you update the machine software only. The QMP 20 display 
software is part of the Pro-Stitcher software. Make sure you are also using the latest version  
of Pro-Stitcher. 

Summary of Contents for Quilt Maker Pro 20

Page 1: ...USER MANUAL Version 1 0 Janome America Quilt Maker Pro 20...

Page 2: ...User manual Frame Setup Information Quilt Maker Pro Quilting Frame installation manual Machine Setup Information User manual How to Thread your Machine Quick reference card Needle System for your Mac...

Page 3: ...able Handlebar Buttons 19 Optional Accessory Rear Handlebar Kit 20 Touch Screen Displays 21 Thread Tray and Thread Mast 23 Optional Accessories 23 QMP 20 Ruler Base 23 Rear Laser Stylus 24 Machine Hea...

Page 4: ...5 Diagnostics 55 Machine Settings 56 Low Bobbin Alarm 56 Handlebar Button Options 58 Pinpoint Needle Laser 60 Alarms 61 Tie offs 62 Set Language 62 Information Screens 63 Machine Maintenance 66 Clean...

Page 5: ...rton and packing materials You will need them if you need to return the machine to the retailer or send it for repair If you don t pack the machine properly or if you don t use the correct packaging m...

Page 6: ...fter using and before cleaning WARNING To reduce the risk of burns fire electric shock or injury to persons The Janome QMP 20 is heavy Never attempt to lift it alone Always use two people when lifting...

Page 7: ...ion quilting and recommended by Janome for this machine Other types of needles may break during normal quilting Children shall not play with the machine Close attention is necessary when this machine...

Page 8: ...teur sur arr t puis retirez la fiche de la prise en tirant partir de la fiche et non du cordon N utilisez jamais la Janome QMP 20 si le cordon est endommag ou ne fonctionne pas correctement En cas de...

Page 9: ...direct sunlight or high humidity Never use or store the machine near a heater an iron a halogen lamp or other hot things 2 Use only neutral soaps or detergents to clean the machine Benzene solvents a...

Page 10: ...ould be used only until a properly grounded outlet can be installed by a qualified electrician The green colored rigid ear lug and the like extending from the adapter must be connected to a permanent...

Page 11: ...es Per Inch 4 stitches per inch to 24 stitches per inch Basting mode one stitch per quarter inch one stitch per half inch one stitch per inch one stitch every two inches and one stitch every four inch...

Page 12: ...bars 1 Rear display optional accessory 2 Rear handlebars optional accessory 3 Machine Y encoder 4 Front on off switch 5 Front display 6 Front handlebars Close up view of needle area 7 Needle stop sigh...

Page 13: ...4 Thread tray 15 Spool pins 16 Thread mast 17 Thread guide 18 Ruler base mounts Close up view of tension assembly area 19 Three hole thread guide 20 Thread guide 21 Top tension assembly with take up s...

Page 14: ...d 30 USB stick connection for updating rear display Machine Connections 31 Machine rear display connection 28 to 32 32 Machine power connection 33 Machine to handlebar connection 29 to 34 34 Machine t...

Page 15: ...when lifting Always lift from the throat of the machine not from the handlebars needle bar area or needle bar 3 From the back of the machine plug the carriage stitch regulator cable into the top round...

Page 16: ...ther down or adjust them to any number of variable positions For more information about using the touch screen displays see Using the Touch Screen Displays later in this section of the manual U CAUTIO...

Page 17: ...nd align the threaded hole on the handlebar bracket 4 Place the wedge and M6x45 hex screw with washer into hole and start the screw into the threaded piece with your fingers Once the screw is nicely s...

Page 18: ...vers below the handlebars Loosen the levers by turning them counterclockwise Then grasp the front of the handlebars and adjust them inward or outward to a comfortable position Tighten the levers by tu...

Page 19: ...nfiguring the handlebars and buttons see To customize the handlebar buttons in the Toolbar Options section of this manual Install the handlebar labels according to what you want each handlebar to do F...

Page 20: ...the USB mini B connector to the back of the machine You will need the other end for the display later Note that this cable powers the display The round power input to the display is not used IMPORTAN...

Page 21: ...y bracket Use the small Phillips screwdriver to fully tighten the screws 3 Plug the USB mini B cable with 90 connection coming out of the top front cover into the bottom of the display This cable prov...

Page 22: ...TE If you do not have 2 5mm hex screws then you will have 4 40 screws for the rear handle bar hinges 2 Insert the screws into the openings on the display s metal hinge Align the screws in the hinge wi...

Page 23: ...e stable surface on which to rest the ruler or template The ruler base and rulers and templates are optional accessories For more information visit http www Janome com To install the ruler base 1 The...

Page 24: ...much pressure will keep the machine from moving The quilting line will be approximately 1 4 inch away from the ruler edge The markings on all Janome rulers take this into consideration NOTE Set the ma...

Page 25: ...guide or stylus enabling you to use printed pantograph designs and stitch the pattern onto a quilt by tracing the design with the laser dot The laser attaches to a mounting post which attaches to the...

Page 26: ...ze Laser Safety When using the laser stylus observe the following basic safety precautions Never shine directly into the eyes The laser stylus should never be left on and unattended Do not use the las...

Page 27: ...rce IMPORTANT Refer to the safety instructions Lighting The QMP 20 includes several lights to make it easy for you to see your quilting area two lights under the throat of the machine that provide lig...

Page 28: ...splicing or shredding Optimum fabric protection IMPORTANT Change the needle regularly We recommend you use a new needle for each new quilt and any time the needle becomes bent dull or burred U CAUTION...

Page 29: ...hex wrench to tighten it just a bit more The QMP 20 runs at very high speeds and this ensures the needle will not loosen while quilting However do not over tighten the needle clamp screw as this may s...

Page 30: ...oothly with light to medium tension If thread pulls freely with no tension re thread the machine ensuring that the thread is flossed into the tension discs IMPORTANT The QMP 20 does not have a presser...

Page 31: ...packaged with the bobbin winder To insert the bobbin into the bobbin case U CAUTION To prevent personal injury always turn off the front power switch while inserting and or removing the bobbin case o...

Page 32: ...nd counterclockwise to loosen the tension Make tiny adjustments to the bobbin tension and test again To insert the bobbin case into the machine 1 Move the needle to the up position Turn off the power...

Page 33: ...on IMPORTANT Before adjusting your top tension remember to floss the top thread up between the tension discs or it will float outside the discs providing little or no top tension This could cause sign...

Page 34: ...e to tighten the top tension Threading the Machine Janome recommends that you select and use only high quality threads for your quilts To thread the machine 1 Place thread cone onto spool post on the...

Page 35: ...ooping on the bottom of the quilt can occur 4 After the thread is in place be sure that the thread catches on the take up spring Then guide the thread under the stirrup thread guide 5 Bring the thread...

Page 36: ...threaded move the machine over the quilt to your starting location 2 While firmly holding the tail of the needle thread press the needle up down button twice causing the needle to go down through the...

Page 37: ...configure automatic tie offs in the Toolbar Options section of this manual Free Motion Quilting QUILTING TIP When quilting relax your hands and maintain a light touch on the handlebars Gripping the h...

Page 38: ...overrides some of the QMP 20 settings For more information about how Pro Stitcher works with the QMP 20 see the Pro Stitcher user manual First turn on the QMP 20 then turn on the Pro Stitcher tablet c...

Page 39: ...20 version of the Pro Stitcher manual for more information about how the star and diamond buttons work with these functions Programmable Button Updating the Janome QMP 20 Software If you are running...

Page 40: ...have installed the tablet computer that came with Pro Stitcher at the front of the machine rather than the 7 inch touch screen You will then use the Pro Stitcher tablet to control the functions of the...

Page 41: ...ls in the Toolbar Options section of this manual Touch this icon to open the Settings For more information about the various settings see Machine Settings in the Toolbar Options section of this manual...

Page 42: ...nfigure the number of micro stitches in a tie off see To configure tie offs in the Toolbar Options section of this manual The Easy Set Tension shows the top tension setting as a numeric value on the d...

Page 43: ...heel enables you to rotate the hand wheel from the Main screen rather than reaching around the machine to do it manually Drag your finger down from the top of the on screen hand wheel in the direction...

Page 44: ...and it becomes the current speed For example perhaps you will set one preset for the speed you prefer for continuous line free motion quilting a different speed for ruler work and yet another speed f...

Page 45: ...Cruise button 112 STITCH MODE Regulated Manual 12 25 5 0 After you press the Start Stop button on the handlebars the Start stitching indicator in the upper left corner of the screen turns green and t...

Page 46: ...titch regulation Precision stitch regulation mode is useful for ruler work Stitch along the length of the ruler for the span of your hand and stop moving the machine but do not press the Stop button W...

Page 47: ...f movement of the machine To baste a quilt 1 Touch the Regulated button 2 Press the minus button next to the stitches per inch box on the screen until you see 5 stitches per inch Continue touching the...

Page 48: ...are on the on off button displays in color When off the button is gray Touch the on off button to quickly turn on or off the light Touch the All Lights button to turn on or off all of the lights at o...

Page 49: ...screen the Tools Options icons will appear allowing you to quickly and easily switch between screens Diagnostics Contact Technical Solutions for passcode Quilting Timer Alarm and Stitch Counter The t...

Page 50: ...for a time press Pause 3 When you resume quilting press Play again The quilting timer will continue tracking your time and add it to the previously recorded time To track the number of stitches in a...

Page 51: ...nute at a time 2 Touch the alarm icon to turn on the quilting alarm When the time has elapsed an alarm will sound On screen Calculator The QMP 20 includes a basic on screen calculator It functions lik...

Page 52: ...to the Internet Touch the Tools button in the Toolbar on the front display Then touch the Update button along the bottom of the screen Software Updates Update Machine Software Update Display Software...

Page 53: ...Touch the Select Version box and then select the filename of the update file you downloaded 3 Be patient as this will take a few minutes 4 When complete the machine will beep Remove the USB drive and...

Page 54: ...the rear display After updating remove the USB drive from the display Software Updates Update Machine Software Update Display Software 2 You will be prompted to choose the file you want to use to upd...

Page 55: ...t Tension 4 Turn the Easy Set Tension knob three full clockwise turns to return the tension close to factory setting Diagnostics There are several diagnostics tests that you may be asked to perform by...

Page 56: ...to the type and weight of thread you use You can create a low bobbin capacity for up to twenty types of thread that you use in your bobbin You ll then use this capacity for setting a low bobbin alarm...

Page 57: ...the bobbin level as you quilt When you touch the Reset Bobbin button it shows the estimated capacity of the full bobbin As you quilt this number counts down While you are recording the bobbin capacity...

Page 58: ...d choose the specified thread name by touching it Then touch the Edit Bobbin button Make any changes using the pop up keyboard Handlebar button options Your QMP 20 came with labels for the handlebars...

Page 59: ...Make sure that the handlebar labels are consistent with your selection To configure the star and diamond buttons on the handlebars Handlebar Buttons 1 Select the down arrow next to the star or diamond...

Page 60: ...ie Off Performs a tie off stitch IMPORTANT If you use Pro Stitcher it will override your settings for the star and diamond handlebar buttons for selected Pro Stitcher functions For more information ab...

Page 61: ...ead breaks while quilting Over speed alarm Alerts you if you are moving the machine faster than 100 of motor capacity and therefore are quilting too fast for stitch regulation to work properly Because...

Page 62: ...fs 5 After you indicate how many stitches are in an automatic tie off use the Tie off button on the Main screen to perform the tie off Touch the button and gently move the machine to perform the micro...

Page 63: ...dle and thread chart For quick reference the QMP 20 has an on screen guide for which size needle is appropriate for different weights of thread Touch the Information icon in the Toolbar Then touch the...

Page 64: ...tion icon in the Toolbar Then touch the Machine Threading button 1 3 4 9 10 12 Machine Threading Diagrams Overall 1 2 12 11 10 3 5 4 6 8 9 7 1 2 12 11 10 3 5 4 6 8 9 7 Shows close up diagrams of threa...

Page 65: ...ne 541978 06 34 24 3 01 3 08 1 1 17 08 53 Lifetime Stitch Count Shows the lifetime stitch count for your machine Lifetime Machine Time Shows the cumulative time your machine has quilted Machine Hardwa...

Page 66: ...iling your machine To clean the bobbin area and oil the bobbin hook 1 Turn off the machine by powering off the front switch Then remove the bobbin and bobbin case 2 Clean the bobbin basket area using...

Page 67: ...ve your machine serviced by an authorized Janome retailer every 24 months or 10 million stitches whichever occurs first They will take care of oiling and greasing internal parts and ensure the machine...

Page 68: ...the needle if it has been hit bumped or pulled off center while maneuvering the machine over the quilt A slightly bent needle can be a major cause of skipped stitches Incorrect needle size Use the pro...

Page 69: ...mage in the bobbin area and throat plate The needle hits the throat plate Correctly position the needle throat plate or hopping foot Replace with a new needle Stitches are Puckered Corrective Measure...

Page 70: ...ble for a thread lock to cause a timing problem Thread Nests Under Quilt Corrective Measure s Improper threading Refer to threading diagram and threading instructions Not enough tension on top thread...

Page 71: ...y For more information about adjusting tension see Bobbin and Bobbin Tension and Easy Touch Tension in the Using Your Machine section of this manual The machine head has been threaded incorrectly or t...

Page 72: ...isible on the display Corrective Measure s Display cables unplugged Locate the black cables that plug into the touch screen display and connect to the side of the machine Make sure both ends are plugg...

Page 73: ...otection against harmful interference in a residential installation This equipment generates uses and can radiate radio frequency energy and if not installed and used in accordance with the instructio...

Page 74: ...does not exceed the Class B limits for radio noise emission from digital apparatus as set out in the interference causing equipment standard entitled Digital Apparatus ICES 003 of the Department of Co...

Page 75: ...orted within this period manufacturer will provide free replacement parts customer pays for labor and shipping The 5 year electronic electrical warranty will be invalid if the machine is left plugged...

Page 76: ...n or punctured seal s Any use besides machine quilting applications using customary fabrics threads and accessories Operator error in the customary use of the Product Internal adjustments tampering or...

Page 77: ......

Page 78: ......

Reviews: