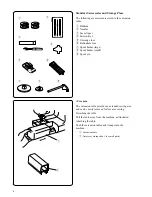
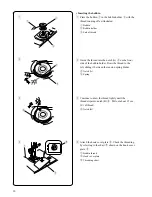
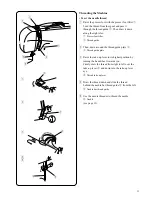
background image

15

q

w

r

e

t

w

q

w

e

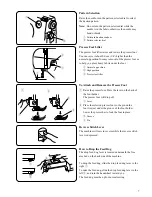
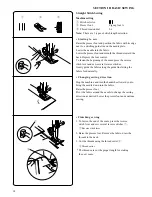
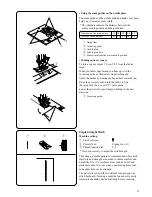
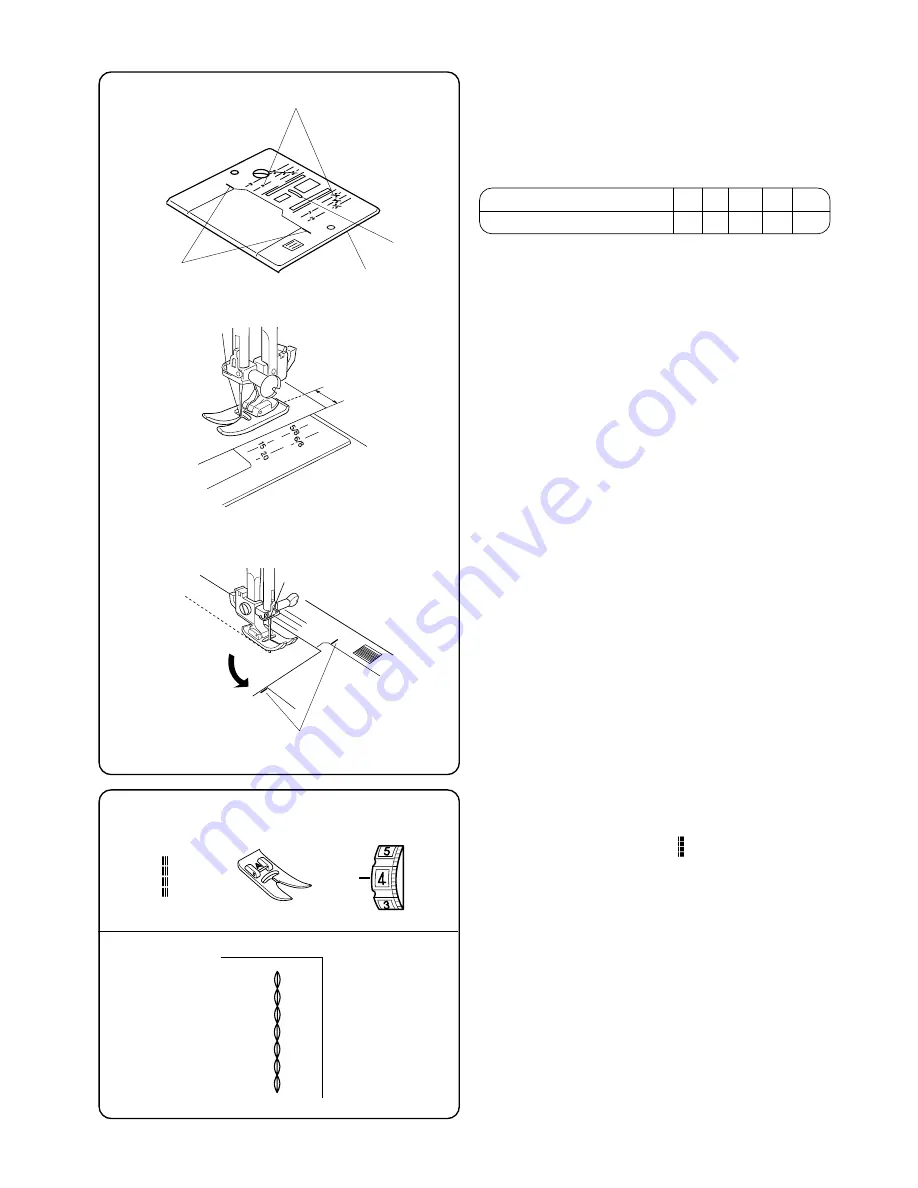
• Using the seam guides on the needle plate

The seam guides on the needle plate and hook cover plate
help you to measure seam width.

 * The numbers indicate the distance between the

center needle position and the guide line.

   Numbers on the needle plate       15    20   4/8

˝

  5/8

˝

   6/8

˝

   Distance in centimeters

      1.5  2.0    1.3   1.6     1.9

q

Guide lines

w

Cornering guide

e

Needle plate

r

Needle plate hole

t

Seam width from the center needle position

• Turning square corners

To turn a square corner 1.6 cm (5/8˝) from the fabric
edge:

When the fabric edge facing you lines up with the
cornering guide as illustrated, stop stitching and
lower the needle by turning the handwheel towards you.

Raise the presser foot and turn the fabric to line
the edge with the 1.6 cm (5/8˝) seam guide.

Lower the presser foot and begin stitching in the new
direction.

w

Cornering guides

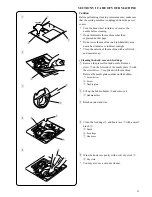
Triple Straight Stitch

Machine setting:

q

Stitch selector:

w

Presser foot:

Zigzag foot (A)

e

Thread tension dial:

2-6

 * It is not necessary to adjust the stitch length.

This strong, durable pattern is recommended where both
elasticity and strength are needed to insure comfort and
durability. Use it to reinforce areas such as crotch and
armhole seams. Also, use when constructing items such
as backpacks for extra strength.

The pattern is sewn with two stitches forward and one
stitch backward, forming a seam that does not rip easily.
Garments should be basted for fitting before seaming.

Summary of Contents for Sewing Machine

Page 1: ...orized dealer or service center for examination repair electrical or mechanical adjustment 4 Never operate the appliance with any air opening blocked Keep ventilation openings of this sewing machine a...

Page 2: ...ding the Machine 11 To set the needle thread 11 Using the needle threader 12 Drawing up the bobbin thread 13 SECTION III BASIC SEWING Straight Stitch Sewing 14 Starting to sew 14 Changing sewing direc...

Page 3: ...spindle r Thread take up lever t Thread tension dial y Thread cutter u Needle threader i Needle plate o Extension table Accessory storage box 0 Hook cover plate 1 Hook cover plate release button 2 Rev...

Page 4: ...y Buttonhole foot u Spool holder large i Spool holder small o Spool pin Free arm The extension table provides an extended sewing area and can be easily removed for free arm sewing Detaching the table...

Page 5: ...peed Foot control Sewing speed can be varied by the foot control The harder you press on the control the faster the machine runs q Foot control for 120V w Foot control for 240V x c v t r e q w q w SEC...

Page 6: ...ric NOTE In general fine threads and needles are used for sewing thin fabrics and thicker threads and needles are used for sewing heavy fabrics Always test thread and needle size on a small piece of f...

Page 7: ...esser foot lifter To Attach and Remove the Presser Foot z Raise the presser foot Press the lever on the back of the foot holder The presser foot will drop off q Lever x Place the selected presser foot...

Page 8: ...over plate w Lift out the bobbin e q Hook cover plate release button w Hook cover plate e Bobbin Set the spool Place the spool of thread on the spool pin with the thread coming off the spool as illust...

Page 9: ...n winder spindle e with the free end of the thread coming out at the top e Bobbin winder spindle b Push the bobbin to the right n With the free end of the thread held in your hand depress the foot con...

Page 10: ...side of the bobbin holder Draw the thread to the left sliding it between the tension spring blades r Notch A t Spring c Continue to draw the thread lightly until the thread slips into notch B y Pull o...

Page 11: ...ad guide x Then down around the thread guide plate e e Thread guide plate c Raise the take up lever to its highest position by turning the handwheel towards you Firmly draw the thread from right to le...

Page 12: ...b q to the back so that the hook e is coming out from the backside of the needle eye Hook the thread around the guide w from the left Pass the thread under the threader hook e and draw the thread to t...

Page 13: ...needle thread lightly with your left hand q Needle thread x Turn the handwheel slowly towards you one complete turn Bring the bobbin thread up by pulling the needle thread as illustrated w Bobbin thr...

Page 14: ...se stitches Gently guide the fabric along the guide line letting the fabric feed naturally Changing sewing direction Stop the machine and turn the handwheel toward you to bring the needle down into th...

Page 15: ...hing and lower the needle by turning the handwheel towards you Raise the presser foot and turn the fabric to line the edge with the 1 6 cm 5 8 seam guide Lower the presser foot and begin stitching in...

Page 16: ...he tension Results depend on stiffness and thickness of the fabric number of fabric layers type of stitch q Needle thread Top thread w Bobbin thread Bottom thread e Wrong side of fabric r Right side o...

Page 17: ...oot C e Thread tension dial 3 6 Overcasting is used on the seam allowance to prevent fabrics from raveling at raw edges It can be used to finish a hem edge Place the edge of the fabric next to the bla...

Page 18: ...nd iron to press the tacks flat to one side If thread tension is too loose tuck will not be formed Therefore increase the tension and set it between 6 to 8 Blind Stitch Hemming Machine setting q Stitc...

Page 19: ...aise the needle and select the BH 2 4 and sew five bartack stitches n Raise the needle and presser foot Remove the fabric from the machine Cut both needle and bobbin threads leaving approximately 10 c...

Page 20: ...h the fabric between embroidery hoops and place the hoops under the needle Lower the presser foot lifter to engage the needle thread tension Holding the needle thread in your left hand rotate the hand...

Page 21: ...neutral soap Cleaning the hook race and feed dogs z Remove the presser foot and needle Remove screw w on the left side of the needle plate e with the screwdriver q supplied with the machine Remove th...

Page 22: ...bulb counterclockwise To replace Turn the bulb clockwise B To remove Push and turn counterclockwise To replace Push and turn clockwise z x q w e Replacing the bobbin holder z Insert the bobbin holder...

Page 23: ...ot when sewing is started 6 The thread is too heavy or too fine for the needle 1 The bobbin thread is not threaded properly in the bobbin holder 2 Lint has collected in the bobbin holder 3 The bobbin...

Page 24: ......

Page 25: ...Printed in Taiwan 661 800 038 E...

Reviews: