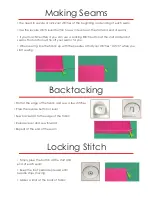
background image

Making Seams

•You need to secure or lock your stitches at the beginning and ending of each seam

•Use the reverse stitch lever/button to sew in reverse at the start and end of seams

• If your machine offers it, you can use a Locking Stitch button at the start and end of

seams. This function will tie off your seams for you.

• When sewing, line the fabric up with the needle so that your stitches “catch” when you

start sewing.

Backtacking

•Start at the edge of the fabric and sew a few stitches

• Press the reverse button or lever

• Sew backward to the edge of the fabric

• Release lever and sew forward

•Repeat at the end of the seam

Locking Stitch

• Simply press the button at the start and

end of each seam

• Keep the foot pedal depressed until

needle stops moving

• Makes a knot at the back of fabric

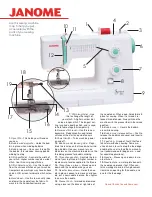
Summary of Contents for Sewist 500

Page 1: ...Beginning Sewing eBook brought to you by ...

Page 2: ...bbin winding 11 Thread tension dial Controls the ten sion of your top thread A higher number in dicates more tension applied to the thread 12 Thread take up lever Moves up and down with the needle bar as you sew 13 Needle clamp screw Holds the nee dle in place Loosen to remove an old nee dle put a new needle in place then tighten to secure the needle 14 Presser Foot Is raised and lowered using a l...

Page 3: ...Cutting Shears Snips Seam Rippers Pinking Shears Measuring and Marking Chalk Pencil Tape Meausre Gridded Ruler Vanishing Fabric Marker Regular Pencil ...

Page 4: ...achine Mechanical Computerized The Janome Sewist 500 Use dials for stitch selection Components are controlled by mechanical means rather than a computer The Janome Magnolia 7330 Computerized machines offer a wider range of features and memory capabilities ...

Page 5: ... zag stitch Be careful which foot you have on when making adjustments so you don t break your needle Reverse Stitch Lever Used to secure stitching at the start and end of seams Tension Adjustment When diagnosing tension problems always re thread your top and bobbin thread and try sewing again This often does the trick When tension is out of balance threads will break or seams will pucker Problems ...

Page 6: ... make sewing easier These include a locking stitch button a memorized needle up down button and a start stop button Speed Control Slider Use the slider to control your speed Set it low for difficult angles and curves Stitch Adjustment Buttons Buttons rather than dials allow you to change stitches and settings ...

Page 7: ...ve additional abilities like a built in walking foot to advance fabric from the top and bottom at once Plate Guides Use seam guides to help guide your fabric as you are sewing Line the fabric with a guide and look at that as you sew not at the needle and fabric There are also add on fabric guides and feet with guides for special tasks ...

Page 8: ... to wind Auto Declutch Push over the bobbin pin the bobbin re leases when full Inserting the Bobbin Reference your machine s man ual for specific instructions The bobbin locks the stitches on the bottom of your seam The bobbin thread has its own tension and you have to make sure that the thread is engaged in the tension spring ...

Page 9: ...l tie off your seams for you When sewing line the fabric up with the needle so that your stitches catch when you start sewing Backtacking Start at the edge of the fabric and sew a few stitches Press the reverse button or lever Sew backward to the edge of the fabric Release lever and sew forward Repeat at the end of the seam Locking Stitch Simply press the button at the start and end of each seam K...

Page 10: ...nd Hem Stitch Straight Stitch Zig Zag Stitch Overedge Stitch Basting Stitch straight stitch with longer stitch length Stitching Corners Needle up down keep needle in fabric at corner raise presser foot to pivot Clip the corners when turning to reduce bulk ...

Page 11: ...ded edge One trick is to put the right outside edge of the presser foot against the fold to keep a straight line Step 6 Repeat steps 2 5 for the remaining two oppo site edges of the napkin Pay special attention to the corner folds as there is added bulk in that seam Step 7 Press the finished napkin Repeat steps to complete additional napkins Supplies Materials Fabric of Choice for Napkin You will ...

Page 12: ...ck of your fabric and cut out the pieces Step Three Pin the acorn bottom piece to your base fabric and stitch in place making your stitches about 1 8 from the edge of the fabric Step Four Pin the acorn top piece on the fabric and stitch in place making stitches about 1 8 from the edge of the fabric Step Five Press Supplies Materials Scraps of fabric for top and bottom of acorn Thread in colors to ...

Page 13: ......

Reviews: