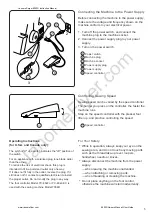
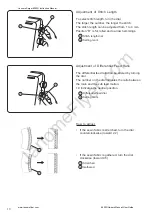
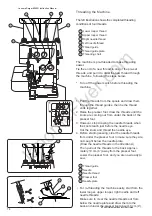
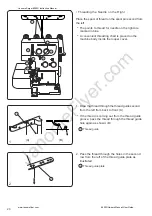
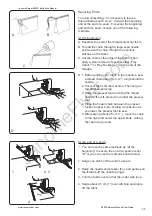
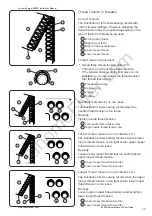
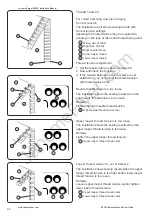
background image

JanomeFlyer.com

19

NOTE:
* When you thread the upper looper only, to avoid

tangled threads pull out both threads over the
needle plate and under the presser foot.

Turn the handwheel toward you until the upper
looper comes to the middle point of its travel, and
unhook the thread of the lower looper from the
upper looper.
Thread the upper looper.

1

Lower looper thread

2

Upper looper

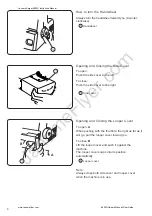
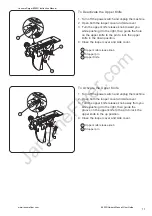
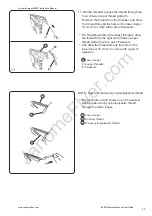
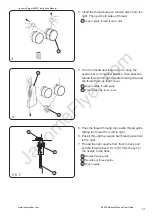
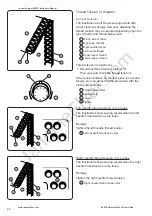
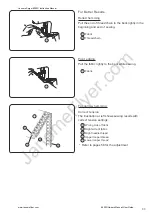
4. Insert the thread between tension discs from the

right. Then pull both sides of thread.

5. Pass the thread through upper looper thread

guide (1)

4

Upper looper thread tension dial

5

Upper looper thread guide (1)

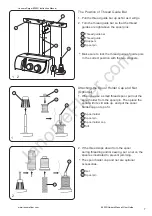
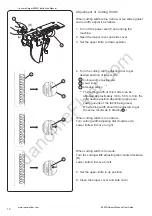
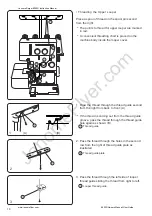
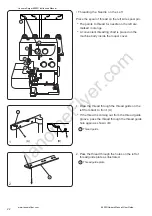
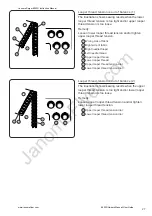
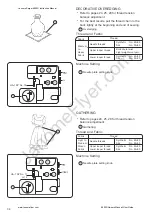
6. Pass the thread through upper looper thread

guide (2).

7. Pass the thread through the looper thread

take-up lever (upper).

6

Upper looper thread guide (2)

7

Looper thread take-up lever (upper)

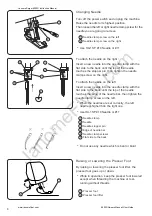
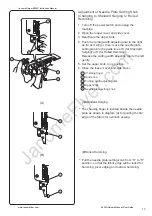
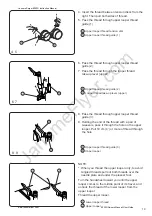
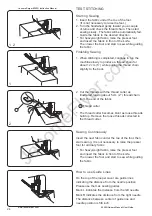
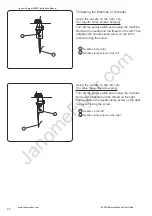
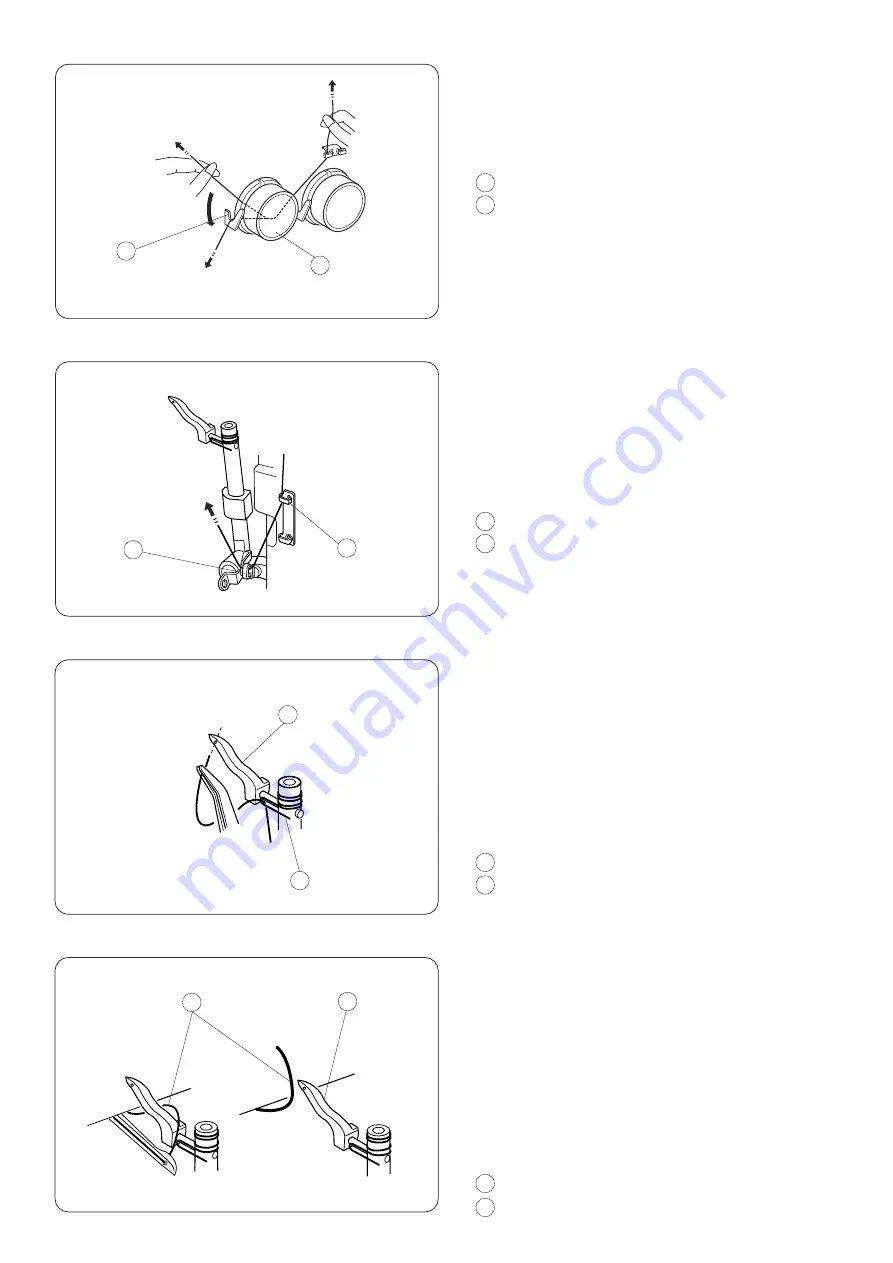
8. Pass the thread through upper looper thread

guide (3).

9. Holding the end of the thread with a pair of

tweezers, pass it through the hole on the upper
looper. Pull 10 cm (4˝) or more of thread through
the hole.

8

Upper looper thread guide (3)

9

Upper looper

5

4

6

7

8

9

1

2

4  5

6  7

8  9

Janome Serger 8002D Instruction Manual

www.janomeflyer.com

8002D Owners Manual/ User Guide

Summary of Contents for Stirling 8002D

Page 1: ...J a n o m e F l y e r c o m Janome 8002D Instruction Manual Janome Serger 8002D Instruction Manual www janomeflyer com 8002D Owners Manual User Guide...

Page 2: ...to the nearest authorized dealer or service center for examination repair electrical or mechanical adjustment 4 Never operate the appliance with any air opening blocked Keep ventilation openings of th...

Page 3: ...ing lamps the machine must be disconnected from the power supply by removing the plug from the socket outlet 4 Do not place anything on the foot control otherwise the machine will start inadvertently...

Page 4: ...Upper Looper 18 Threading the Needle on the Right 20 Threading the Needle on the Left 22 TEST STITCHING Starting Sewing 24 Finishing Sewing 24 Sewing Continuously 24 How to use Guide Lines 24 Securing...

Page 5: ...ol pin 15 Thread guide bar 16 Thread guide 17 Pressure adjusting screw 18 Presser foot 19 Needle plate setting knob 20 Thread cutter 21 Presser foot lifter 22 Needle plate 23 Upper knife release knob...

Page 6: ...chine from the power supply when leaving the machine unattended when attaching or removing parts when threading or cleaning the machine Do not place anything on the foot control otherwise the machine...

Page 7: ...pening and Closing the Looper Cover To open A While pushing with the thumb to the right as far as it will go pull the looper cover toward you To close B Lift the looper cover and push it against the m...

Page 8: ...om the spool pin Then place the spool with its slit side up and put the spool holder cap on top of it 2 If the thread slips down from the spool during threading and or sewing put a net on the spool as...

Page 9: ...h the needle on the right Insert a new needle into the needle clamp with the flat side to the back until the top of the needle touches the stopper pin then tighten the needle clamp screw on the right...

Page 10: ...f the power switch and unplug the machine 2 Raise the needle and the presser foot 3 Press the lever located on the back of the foot holder The presser foot will drop off 1 Needle 2 Presser foot lifter...

Page 11: ...tio The differential feed ratio can be altered by turning the dial The number on the dial indicates the ratio between the main and the sub feed motion 1 0 indicates the neutral position 1 Differential...

Page 12: ...r and side cover 1 Upper knife release knob 2 Stopper pin 3 Upper Knife To Activate the Upper Knife 1 Turn off the power switch and unplug the machine 2 Open both the looper cover and side cover 3 Tur...

Page 13: ...f this model can be adjusted approximately 3 0 to 5 0 mm from the right needle position depending upon your sewing needs or the fabric being used The cutting width should be adjusted to get the same r...

Page 14: ...th adjusting dial to the left gently 5 Set the upper knife to up position 6 Close the looper cover and side cover 1 Chaining finger 2 Guide line 3 Cutting width adjusting dial 4 Upper knife 5 Needle p...

Page 15: ...the back of the presser foot 3 However stop drawing the needle threads when the knots reach just before the needle eye Cut the knots and thread the needle eye 4 Before starting sewing clear the needle...

Page 16: ...ad guide from back to front A If the thread is coming out from the thread guide groove pass the thread through the thread guide hole again as shown B 1 Thread guide 2 Pass the thread through the holes...

Page 17: ...ad guide 2 7 Looper thread take up lever lower 8 Lower looper thread guide 3 9 Lower looper thread guide 4 10 Turn the handwheel toward you until the lower looper comes to the right and pass the threa...

Page 18: ...lower looper thread guide 5 with a pair of tweezers And draw the thread through the hole on the lower looper 10 cm 4 or more with a pair of tweezers 11 Lower looper 1 Looper threader 2 Tweezers NOTE...

Page 19: ...t from back to front A 1 Thread guide 2 Pass the thread through the holes in the second row from the right of thread guide plate as illustrated 2 Thread guide plate 3 Pass the thread through the left...

Page 20: ...ead 5 Pass the thread through upper looper thread guide 1 4 Upper looper thread tension dial 5 Upper looper thread guide 1 6 Pass the thread through upper looper thread guide 2 7 Pass the thread throu...

Page 21: ...ver 1 Draw the thread through the thread guide second from the left from back to front A 1 Thread guide 2 Pass the thread through the holes in the second row from the left of the thread guide plate as...

Page 22: ...lever cover 4 Right needle thread guide 5 Thread take up lever cover 5 Pass the thread through the needle thread guide sliding the thread from left to right 6 Pass it through the needle bar thread gu...

Page 23: ...he looper cover 1 Draw the thread through the thread guide on the left from back to front A 1 Thread guide 2 Pass the thread through the holes on the left of thread guide plate as illustrated 2 Thread...

Page 24: ...ass it through the needle bar thread guide from left to right 7 Thread the left needle from front to back and pull the thread about 10 cm 4 from the eye of the needle to the back 5 Needle thread guide...

Page 25: ...m 2 thread chain from the end of the fabric 1 Thread cutter The thread cutter becomes blunt as loose threads build up Remove the loose threads collected in the thread cutter Sewing Continuously Insert...

Page 26: ...n the machine Then serge a few stitches and stop 3 Raise the presser foot and bring the thread chain to the left around and under the presser foot 4 Place the thread chain between the presser foot and...

Page 27: ...lance dial 7 Thread tension dial 8 Setting mark 9 Loosen 10 Tighten Left needle thread tension is too loose The illustration shows sewing results when the left needle thread tension is too loose Remed...

Page 28: ...al 14 Lower looper thread tension dial Looper thread tension is out of balance 2 The illustration shows sewing results when the upper looper thread tension is too tight and or lower looper thread tens...

Page 29: ...to prevent losing the screw 1 Needle on the right 2 Needle clamp screw on the left Using the needle on the left only for wide three thread serging Turn off the power switch and unplug the machine Rem...

Page 30: ...oper thread tension is out of balance 1 The illustration shows sewing results when the lower looper thread tension is too tight and or upper looper thread tension is too loose Remedy Loosen lower loop...

Page 31: ...de chine Lining Lightweight Heavy weight Knitte dfabric Knits Tweed Coating Denim Doeskin Thick fabric Cotton No 60 80 Synthetic No 60 90 Woolly nylon For looper thread Woolly polyester For looper th...

Page 32: ...looper thread Right side of fabric Needle thread Needle thread tension L Needle thread tension R Upper looper thread tension Lower looper thread tension Wrong side of fabric Lower looper thread Upper...

Page 33: ...ad tension 6 Right needle thread tension dial Upper looper thread tension is too loose The illustration shows the sewing results when the upper looper thread tension is too loose Remedy Tighten the up...

Page 34: ...htly to the back while sewing 1 Fabric For narrow hemming Correct tension The illustration at left shows sewing results with correct tension settings 1 Wrong side of fabric 2 Right side of fabric 3 Ri...

Page 35: ...ttonhole twist Light weight wool yarn Synthetic No 60 80 Silk No 50 80 Thread Machine Setting 1 Needle plate setting knob GATHERING Refer to pages 24 25 29 for thread tension balance adjustment 1 Gath...

Page 36: ...0 Synthetic No 60 100 Silk No 50 100 Thread Machine Setting 1 Remove the needle on the left hand side 2 Needle plate setting knob Sewing Remove the needle on the left hand side Deactivate the upper kn...

Page 37: ...adjust the position of the upper knife so that the edge of the upper knife overlaps 0 8 to 1 5 mm 3 64 from the edge of lower knife as illustrated Then tighten the hexagonal bolt firmly 4 Close the lo...

Page 38: ...ght bulb will be HOT Protect your fingers when you handle it Cleaning the Feed Dog 1 Turn off the power switch and unplug the machine 2 Open the looper cover and side cover 3 Remove the needles and pr...

Page 39: ...ecommended to apply oil once a week in normal use once in ten hours in continuous use Open the side cover and apply oil Open the looper cover and apply oil Carrying the Machine Put your fingers into t...

Page 40: ...chine is not correctly threaded 3 The needle and or the thread are not suitable for the fabric being sewn 4 The thread is not between the tension discs 1 The needle or looper thread tension is too tig...

Page 41: ...se to sew decorative cording Use for decorating cloth wide cord decoration cording etc Use when sewing sleeves cuffs collars etc Use for elastic taping decorative taping etc Use to help you create a c...

Page 42: ...J a n o m e F l y e r c o m 792 800 244 E Printed in Taiwan Janome Serger 8002D Instruction Manual www janomeflyer com 8002D Owners Manual User Guide...

Reviews: