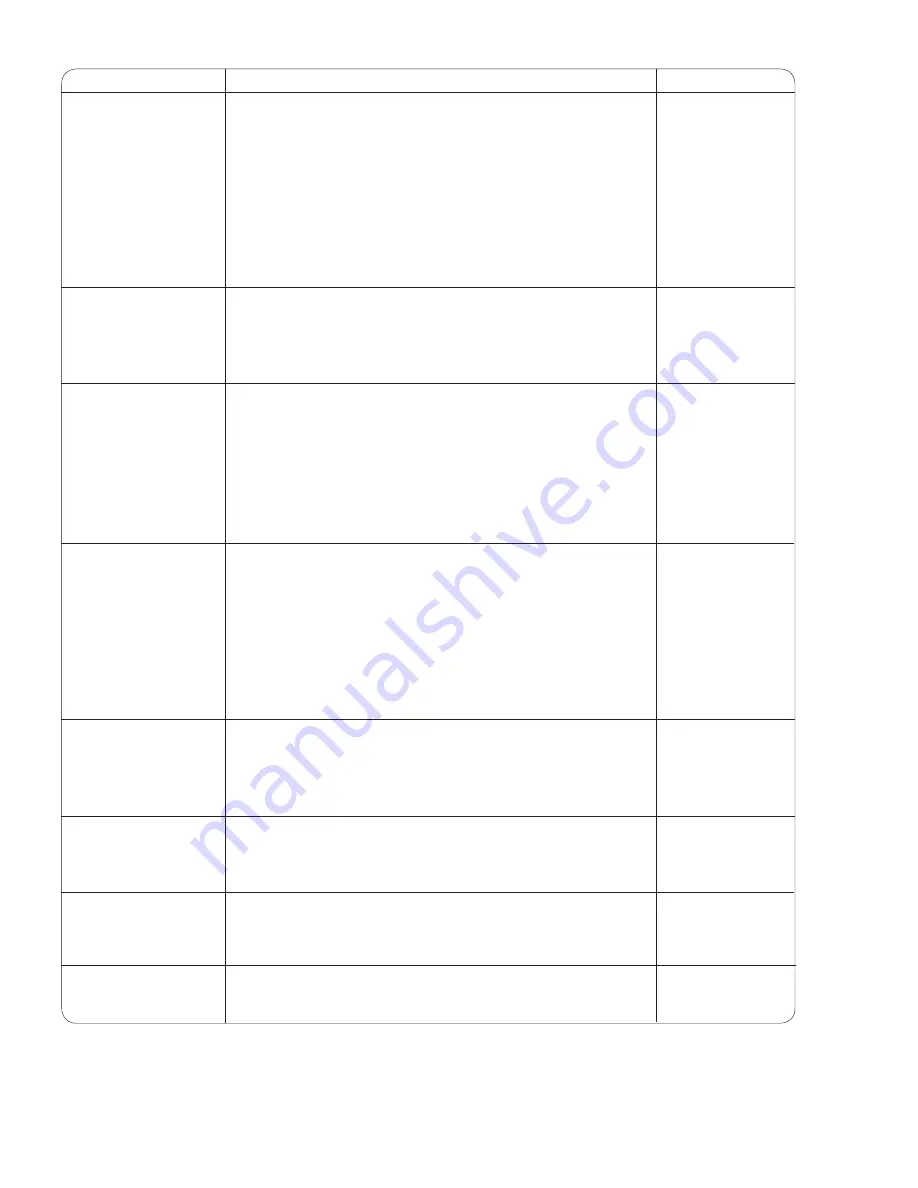
background image

28

Troubleshooting

Condition

Cause

Reference

The needle thread 
breaks.

The bobbin thread 
breaks.

The needle breaks.

Skipped stitches

Seam puckering

The cloth is not feed-
ing smoothly.

The machine doesn’t 
work.

Noisy operation

1.  The needle thread is not threaded properly.
2.  The needle thread tension is too tight.
3.  The needle is bent or blunt.
4.  The needle is incorrectly inserted.
5.  The needle thread and the bobbin thread are not set properly  
  under the presser foot at the beginning of sewing.
6.  The fabric is not drawn to the rear when the sewing has 
     finished.
7.  The thread is too heavy or too fine for the needle.

1.  The bobbin thread is not threaded properly in the bobbin    
  case and shuttle.
2.  Lint has collected in the shuttle area.
3.  The bobbin is damaged and doesn't turn smoothly.

1.  The needle is incorrectly inserted.
2.  The needle is bent or blunt. 
3.  The needle clamp screw is loose.
4.  The needle thread tension is too tight.
5.  The fabric is not drawn to the rear when the sewing has 
     finished.   
6.  The needle is too fine for the fabric being sewn.

1.  The needle is incorrectly inserted.
2.  The needle is bent or blunt.
3.  The needle and/or threads are not suitable for the work being  
 sewn.
4.  A blue tipped needle is not being used for sewing stretch,    
  very fine fabrics and synthetics.
5.  The needle thread is not threaded properly.
6.  The wrong needle is being used.

1.  The needle thread tension is too tight.
2.  The needle thread is not threaded properly.
3.  The needle is too heavy for the fabric being sewn.
4.  The stitch length is too long for the fabric.

1.  The feed dog is packed with lint. 
2.  The stitches are too fine.

1.  The machine is not plugged in.
2.  A thread is caught in the shuttle race.
3.  The clutch is disengaged.

1.  There is thread caught in the shuttle race.
2.  Lint has built up in the shuttle or the shuttle race.

Page 9 
Page 10
Page 6
Page 6
Page 13

Page 13

Page 6

Page 8

Page 26
Change the bobbin

Page 6
Page 6
Page 6
Page 10
Page 13

Page 6

Page 6
Page 6
Page 6

Page 6

Page 9
Change the needle

Page 10
Page 9
Page 6
Make stitch denser

Page 27
Make stitch coarser

Page 4
Page 26
Page 8

Page 26
Page 26

Summary of Contents for YC-482J-EC

Page 1: ...Instruction book...

Page 2: ...t 9 Do not unplug by pulling on cord To unplug grasp the plug not the cord 10 Keep fingers away from all moving parts Special care is required around the sewing machine needle and or cutting blade 11...

Page 3: ...h Dial 11 Reverse Stitch Button 12 Darning Plate 12 SECTION III BASIC SEWING Straight Stitch Sewing 13 Changing Sewing Direction 13 Seam Guide Lines 14 Turning a Square Corner 14 Variable Needle Posit...

Page 4: ...Needle threader 4 Needle plate 5 Extension table 6 Reverse stitch button 7 Presser foot holder 8 Needle clamp 9 Needle 0 Presser foot 1 Lever 2 Carrying handle 3 Handwheel 4 Power switch 5 Machine so...

Page 5: ...free arm sewing Detaching the table Pull the table away from the machine Accessories Storage Box Sewing accessories are conveniently located in the extension table q Accessories storage box Free Arm...

Page 6: ...tch to turn on the power and sewing light q Power supply plug w Power switch e Outlet r Machine socket t Machine plug Controlling Sewing Speed Sewing speed can be varied by the foot control The harder...

Page 7: ...iver To attach Match the hole in the foot holder w with the threaded hole in the presser bar e Fit the thumb screw q into the hole Tighten the screw q by turning it clockwise with screwdriver Changing...

Page 8: ...ize on a small piece of the fabric which will be used for actual sewing Use the same thread for needle and bobbin When sewing stretch very fine fabrics and synthetics use a BLUE TIPPED needle The blue...

Page 9: ...ins are used for holding the spool of thread in order to feed thread to the machine To use pull up the spool pin Push down for storage Removing or Inserting the Bobbin Case Open the hook cover q Hook...

Page 10: ...to the hole in the bobbin n Depress the foot control again When the bobbin is fully wound stop the machine Return the bobbin winder spindle to its original position by moving the spindle to the left...

Page 11: ...into needle bar thread guide on the left b Thread the needle eye from front to back NOTE You may want to cut the thread end with sharp scissors for easier needle threading z x c Needle Threader z Rais...

Page 12: ...ead bottom thread appears on the right side top side of the fabric loosen the needle thread tension by moving the dial to a lower number Needle thread tension is too loose When the needle thread top t...

Page 13: ...the number the longer the stitch length q Setting mark Adjust the dial in the 0 5 4 range when you sew the zigzag stitch Set the dial at S S to sew the stretch stitch pattern sewing If the stretch sti...

Page 14: ...the reverse stitch button depressed the machine will sew in reverse Darning Plate Position the darning plate with 3 pins on the bottom Fit the darning plate pins into the needle plate holes The feed d...

Page 15: ...he guide line letting the fabric feed by itself x For fastening the end of seams press the reverse stitch lever and sew several reverse stitches Raise the presser foot and remove the fabric drawing th...

Page 16: ...o turn a square corner 5 8 1 6 cm from the fabric edge Stop stitching and lower the needle by turning the handwheel counterclockwise Raise the presser foot and turn the fabric to line the edge with th...

Page 17: ...tching Simple zigzag stitching is widely used for overcasting sewing on buttons etc q Pattern selector C w Presser foot Zigzag foot e Thread tension 1 4 r Stitch length 1 2 t Stitch width 5 Overcastin...

Page 18: ...e seam allowance after sewing Be careful not to cut the stitches w e q Knit Stitch q Pattern selector G w Presser foot Zigzag foot e Thread tension 1 4 r Stitch length S S t Stitch width 5 This knit s...

Page 19: ...ing items requiring extra strength such as backpacks Straight Stretch q Pattern selector A B w Presser foot Zigzag foot e Thread tension 2 6 r Stitch length S S t Stitch width 0 or 5 Rick rack Stretch...

Page 20: ...of the holes in the button Lower the foot to hold the button in place Check to see if the needle enters into the holes in the button by turning the hand wheel by hand Sew about ten 10 stitches To str...

Page 21: ...back A and place the button in it Push back the button holder toward you B as far as it will go e Button holder If the button is extremely thick make a test buttonhole If it is difficult to fit the b...

Page 22: ...d place a pin just before the bartack at each end to prevent cutting bartacks Cut the opening with the seam ripper 2 Pin 3 Seam ripper To repeat buttonhole sewing To repeat buttonhole sewing turn the...

Page 23: ...Hook the filler cord into the fork on the front of the buttonhole foot to hold them tight q Spur w Forks x Lower the needle into the garment where the buttonhole will start and lower the foot Depress...

Page 24: ...2 4 r Stitch length 1 3 t Stitch width 5 Blind Hem Stitch z On heavyweight fabrics that ravel the raw edge should be overcast first Then fold the hem as illustrated leaving 1 4 0 7 cm of the hem edge...

Page 25: ...ive stitch between the gathering stitches Pull out the gathering stitches q 3 8 1 cm w e q Use a lightweight fabric tricot for example Fold and stitch on the bias When the needle swings to the right a...

Page 26: ...er foot and pivot the fabric to the right or left Applique q Pattern selector C w Presser foot Zigzag foot e Thread tension 1 4 r Stitch length 0 5 1 t Stitch width 5 w e q r t 1 2 4 3 5 0 w e q r t 1...

Page 27: ...a single layer with a tear away backing if necessary w e q r t 1 2 4 3 5 0 Decorative Satin Stitch Patterns q Pattern selector J L w Presser foot Zigzag foot e Thread tension 1 4 r Stitch length 0 5 1...

Page 28: ...the shuttle race ring making sure the bottom pin fits into the notch Lock the shuttle race ring by turning the holders back into position Insert the bobbin case y Pin u Notch WARNING Turn the power s...

Page 29: ...r unplug the machine before cleaning the feed dog q Sewing Light The sewing light is located behind the face cover To change the bulb take the face cover off the sewing machine by removing the cap and...

Page 30: ...wn to the rear when the sewing has finished 6 The needle is too fine for the fabric being sewn 1 The needle is incorrectly inserted 2 The needle is bent or blunt 3 The needle and or threads are not su...

Page 31: ......

Page 32: ...305 800 138 ENG...

Reviews: