

Mixing Station CLEVER II
with Stirring Device R1900 / R1800
- 16 -
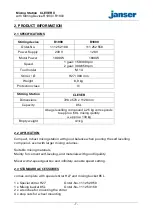
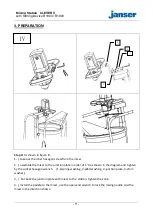
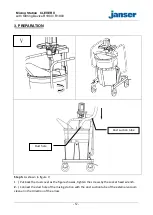
4. OPERATION
4.3 ELECTRONIC MOTOR CONTROL
4.4.1
Starting current limiting:
The electronically controlled smooth start takes care that the machine starts without
jerk. In this manner, the splashing of thin liquid materials is prevent at the same time
when switching on the machine. As a result of the machine´s reduced starting current,
a 16A fuse is sufficient
4.4.2
No-load speed reduction:
The electronic control reduces the no-load speed of the machine which results in
reduced noise and wear of motor and gear.
4.4 3
Speed pre-selection:
With the speed control, the speed can be continuously pre-selected. The necessary
speed is dependent on the type of material to be mixed. It is recommended that it be
confirmed. With a practical trial.
4.4.4
Speed selection
Two rpm ranges can be preselected with the speed selector switch (6).
Speed 1: 150 min
–
300 rpm
Speed 2: 300 min
–
650 rpm
The necessary speed depends on the type of the material mixed and it is
recommended to verify it by practical test.
4.4.5 Constant Electronics
The constant electronic keeps the Speed between no-load and load nearly constant
and ensure uniform mixing of the materials.
4.4.6 Electronic overload protection:
In case that the machine is extremely overloaded, an electronic overload protection
protects the motor from damage. In this case, the motor stops and restarts only after
the feeding pressure is reduced.
4.4.7 Temperature-dependent overload protection
To protect the motor from overheating at extreme permanent load, it is switched off by
the protective electronic system when a critical temperature is reached. After a
cooling-down period of approx. 3-5 min. the machine is again ready for use and can be
fully loaded.
When the machine is warmed by use, the temperature-dependent overload protection
reacts earlier as a result.


