background image

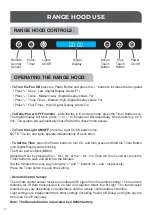
- To Turn the Fan ON

 press the Power Button and press the “+” button to increase the fan speed:

   • Press “+” Once - Low (Digital Display shows F1)
   • Press “+” Twice - Medium/Low  (Digital Display shows F2)
   • Press “+” Three Times - Medium/High (Digital Display shows F3)
   • Press “+” Four Times - High (Digital Display shows F4)

- To Delay Power OFF Function

 - while the fan is in working mode, press the Timer Button once. 

The digital display will blink, press “+” or “-” to increase or decrease delay time duration up to 15 
min. The system will automatically shut-off after the chosen time passes.

- To Turn the Light ON/OFF

 press the Light On/Off button once.

NOTE: The fan and lights operate independently of each other.

- To Set the Time

, press the Power button to turn On, and then press and hold the Timer Button 

until Digital Display starts blinking.
The Hour part will blink (

00

:00)

Adjust the Hour by pressing the “+” for + hrs, or the “-” for - hrs. Once the Hour is correct, press the 
Timer button to save and switch to the Minutes. 
Set the minutes the same way (using the “+” and “-” buttons for + and - respectively).
Press the Timer button to save time setting. 

- Remote Control Sensor:

The remote control sensor receives an infrared (IR) signal from the remote control. The maximum 
distance for IR data transmission is 20 feet and requires direct line of sight. The transmission 
distance may vary depending on temperature and the remote control battery condition. 
Light settings are independent from other settings (including Power Off Delay) and lights have to 
be turned On/Off manually.

Note: The Remote Control is powered by CR2025 battery.

00:00

RANGE HOOD USE

Remote

Control

Sensor

Lights

On/Off

Clock/

Timer 

Digital 

Display

Power

On/Off

Minus 

Touch 

Button

Plus 

Touch 

Button

RANGE HOOD CONTROLS:

OPERATING THE RANGE HOOD:

13

Summary of Contents for RHW-3687

Page 1: ...UNT RANGE HOOD Your satisfaction is guaranteed If you are not completely satisfied with our Wall Mount Range Hood and the results it brings we insist that you let us know We ll help make the Range Hoo...

Page 2: ...g Maintenance TROUBLESHOOTING SPECIFICATIONS 2 4 4 5 6 7 8 8 9 10 12 13 13 13 14 14 16 17 TABLE OF CONTENTS WARNING This indicates that death or serious injuries may occur as a result of non observanc...

Page 3: ...s be aware of electrical wires piping and other utilities To prevent back draft sufficient air is needed for proper combustion CAUTION To reduce the risk of fire and to properly exhaust air be sure to...

Page 4: ...m explosion will result Use an extinguisher ONLY if a You know you have a class A B C extinguisher and you already know how to operate it b The fire is small and contained in the area where it started...

Page 5: ...Screw RHW 3687 36in x 4 RHW 4813 48in x 6 RHW 4813 48in x 2 Baffle Filter Spacer RHW 3687 36in x 2 RHW 4813 48in x 2 Duct Cover Hooks and Screws Remote Control Hardware Note Please consult your instal...

Page 6: ...ng or there are too many bends please select a suitable position to install the range hood to ensure the appliance can suck in smoke efficiently A straight or short duct run will allow the unit to per...

Page 7: ...r enclosed areas DO NOT use 4 in 10 2 cm laundry type wall caps Use only metal aluminum ductwork Rigid metal aluminum vent is recommended Always keep the duct clean to ensure proper airflow DO NOT use...

Page 8: ...n one elbow is used DO NOT install two elbows together The length of the vent system and number of elbows should be kept to a minimum to provide efficient performance The vent system must have a dampe...

Page 9: ...ORTANT This installation is for mounting the product to a wall Ensure your wall has the proper support to hold the range hood weight RHW 3687 36in 44lbs 20kg and RHW 4813 48in 52 8lbs 24kg These instr...

Page 10: ...ctive coat from the exhaust duct covers and baffle filters 4 Remove the filters and filter spacers to reduce the weight for installation Using the filter han dles lift each filter slightly upwards tow...

Page 11: ...ighly recommended 4 Align and install the Duct Cover Mounting Bracket Part E close to the ceiling using 2 mounting screws appropriate for your wall construction Make sure that the Duct Cover Mounting...

Page 12: ...ng it onto the screws on the wall Tighten screws to secure hood to the wall 8 CAUTION Make certain the range hood is secure before releasing 9 For safety purposes pre drilled mounting holes are provid...

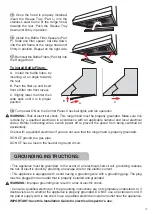
Page 13: ...ck by providing an escape wire for the electric current This appliance is equipped with a cord having a grounding wire with a grounding plug The plug must be plugged into an outlet that is properly in...

Page 14: ...isplay starts blinking The Hour part will blink 00 00 Adjust the Hour by pressing the for hrs or the for hrs Once the Hour is correct press the Timer button to save and switch to the Minutes Set the m...

Page 15: ...to prevent possible fires DO NOT operate the Range Hood when filters are removed Exterior Surfaces To avoid damage to the exterior surface do not use steel wool or soap filled scouring pads Always wi...

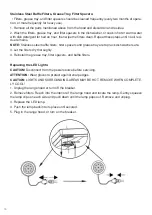
Page 16: ...filter spacers and grease tray are top rack dishwasher safe 3 Let the filters dry thoroughly 4 Reinstall the grease tray filter spacers and baffle filters Replacing the LED Lights CAUTION Disconnect f...

Page 17: ...he ceiling or wall Check that the duct size used is at least 6 or 8 in round depending on the Range Hood model or 3 1 4 x 10 in rectangular Range hood WILL NOT function efficiently with insuf ficient...

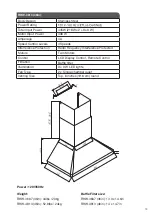
Page 18: ...peed Control Levels 4 Speeds Interference Protection Radio Frequency Interference Protected Motor Single Motor Control LCD Display Control Remote Control Filtration Baffle filter Illumination 2 x 3 W...

Page 19: ...quency Interference Protected Motors Twin Motors Control LCD Display Control Remote Control Filtration Illumination 3 x 3 W LED lights Fan Type 2 x Single chamber quiet Venting Size Top 8 inches 19 6...

Page 20: ...rt janskaus com If you are not happy with the product for any reason please contact us at support janskaus com with your feedback or questions and we will do our best to make things right for you Your...

Reviews: