Jason International, Inc. •
501.771.4477
Page 4 of 18
Customer Service : 800.255.5766
Copyright © 2011 Jason International.
INSTALLATION INSTRUCTIONS (cont.)
7. Mortar is required when the subfloor is not smooth and
level; when additional sound insulation is desired; or when
the bath is installed in a drop-in application. In alcove
installations, a bed of mortar may also be recommended
to aid in leveling the bath.
NOTE:
Do not use a sand
bed to install or level the bath.
8.
Secure the bottom of all equipment mounts so that it
is level with the bottom of the bath.
Position the bath
in the area of intended installation and cut the equipment
support strap(s) to allow the equipment to rest firmly on
the floor. We recommend securing the equipment mounts
to the floor with removable fasteners for ease of servic-
ing.
9.
Protect the acrylic bath surface from damage during
installation with a suitable material, i.e., cardboard
and/or plastic film.
The acrylic surface of this bath
has been provided with a protective film which helps
protect the bath during shipment and installation. Ad-
ditional protection may also be required to protect the
acrylic surface during installation. If the bath is tiled in,
remove the necessary portion of the film when installing
the tile.
INSTALLINg The MICROSILK ™PUMP ASSeMbLy
NOTE: These instructions can also be found in the
Installations, Operation and Maintenance manual of the
seperately packaged MicroSilk teraphy bath unit.
WARNING: SYSTEM UNDER PRESSURE - NEvER
PERFORM MAINTENANCE WhILE SYSTEM IS
RUNNING.
The Jason MicroSilk™ system has been factory assembled
following ETL and IAPMO guidelines. For shipping purposes,
the MicroSilk™ Pump Assembly is packaged separately and
disconnected from the bath.
NOTE:
verify the MicroSilk Pump Assembly is the same
unit that was provided for the bath being installed. The
serial number listed on the label provided on the MicroSilk
Pump Assembly carton should match the serial number
of the bath.
WARNING: ANY MODIFICATION TO ThE EqUIPMENT
IS NOT RECOMMENDED AND WILL vOID ThE
MANUFACTURER’S WARRANTY.
To install the MicroSilk™ Pump Assembly to the bath, the
following procedures must be followed.
NOTE:
Do not install the MicroSilk™ Pump Assembly
further than the length of the tubing that is factory
installed on the bath. These tubing lengths have been
designed for proper drainage of the system.
1. Position the bath in the area of
intended installation
.
2. Before beginning any work, the installer is to determine
the proper location of the MicroSilk™ Pump Assembly
and service access.
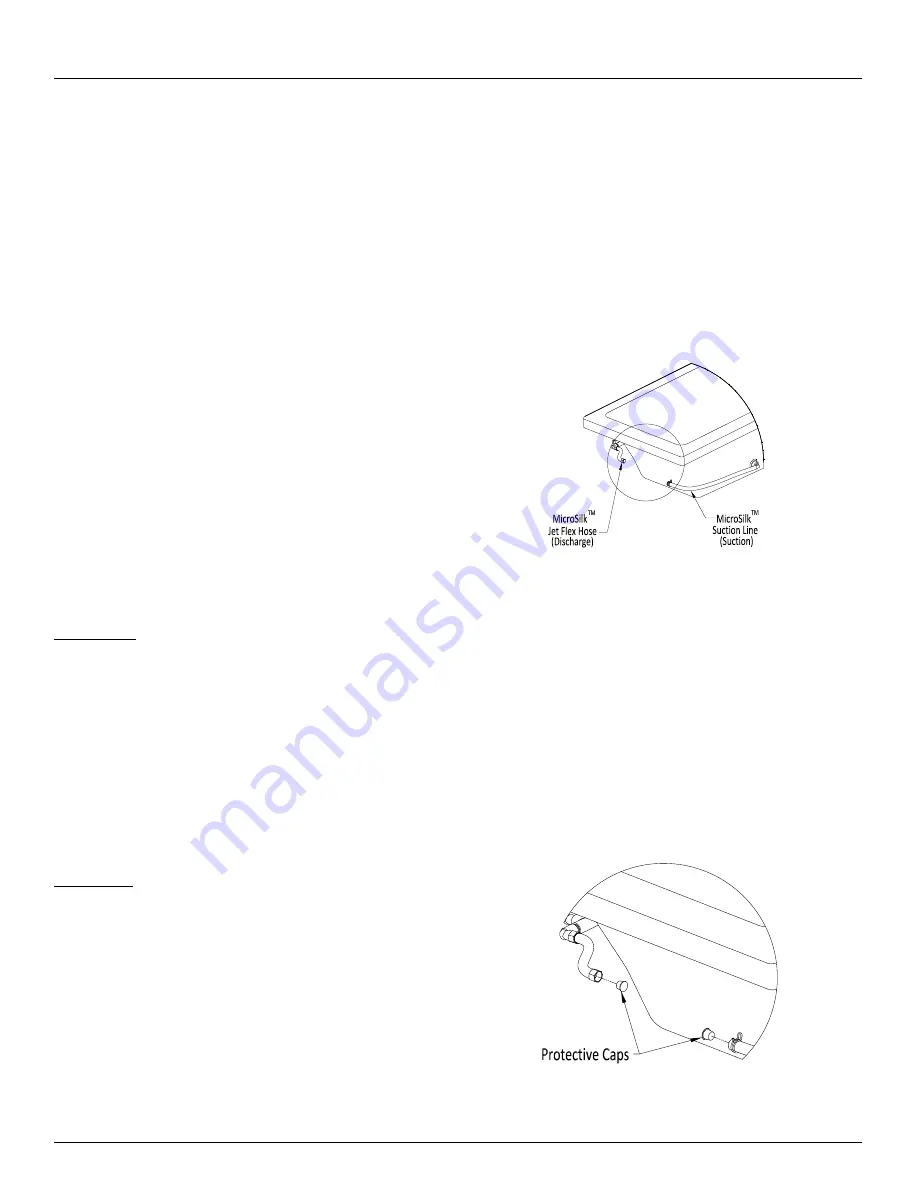
3. Do not disconnect the tubing with the MicroSilk™ Jet
Flex Hose or the tubing from the MicroSilk™ Suction
Line that are secured to the bath with nylon tie straps
(See Figure 4)
.
Figure 4
CAUTION: Do not allow any dirt or debris to enter
into the system plumbing or MicroSilk™ Pump
Assembly. This could cause system blockage and
equipment damage.
4. Remove the protective caps from the MicroSilk™ Jet Flex
Hose and the MicroSilk™ Suction Line that are located on
the bath
(See Figure 5)
, also remove the protective caps
from the MicroSilk™ Saturation Tank and the MicroSilk™
Suction Barb that are located on the MicroSilk™ Pump
Assembly
(See Figure 6)
.
Figure 5


