background image

Jason International, Inc.  •  


501.771.4477  


Page 4 of 15


Customer Service :  800.255.5766 

Copyright © 2010 Jason International.

2.  

Install the blower and control box in the remote location.  

–  A minimum ventilation opening of 2” x 4” [5 cm x 10 

cm] for the blower is required, and should be designed 
to draw in indoor ambient air at a minimum of 72°F 
(22°C).

–  Attach the blower mount firmly to the floor.  

–  Attach the piping to the blower’s check valve.  Use screws 

to attach the pipe to the check valve and route the hose 
to the remote blower tubing floor cutout location.  


CauTIOn:


Do nOT use aBs or PVC glue near the blower, it 

could ignite and cause a fire. 


3.  attach hose.  

Attach one end of the blower hose to the bath 

connection with the included clamp.

4. 

Pipe stub-out.

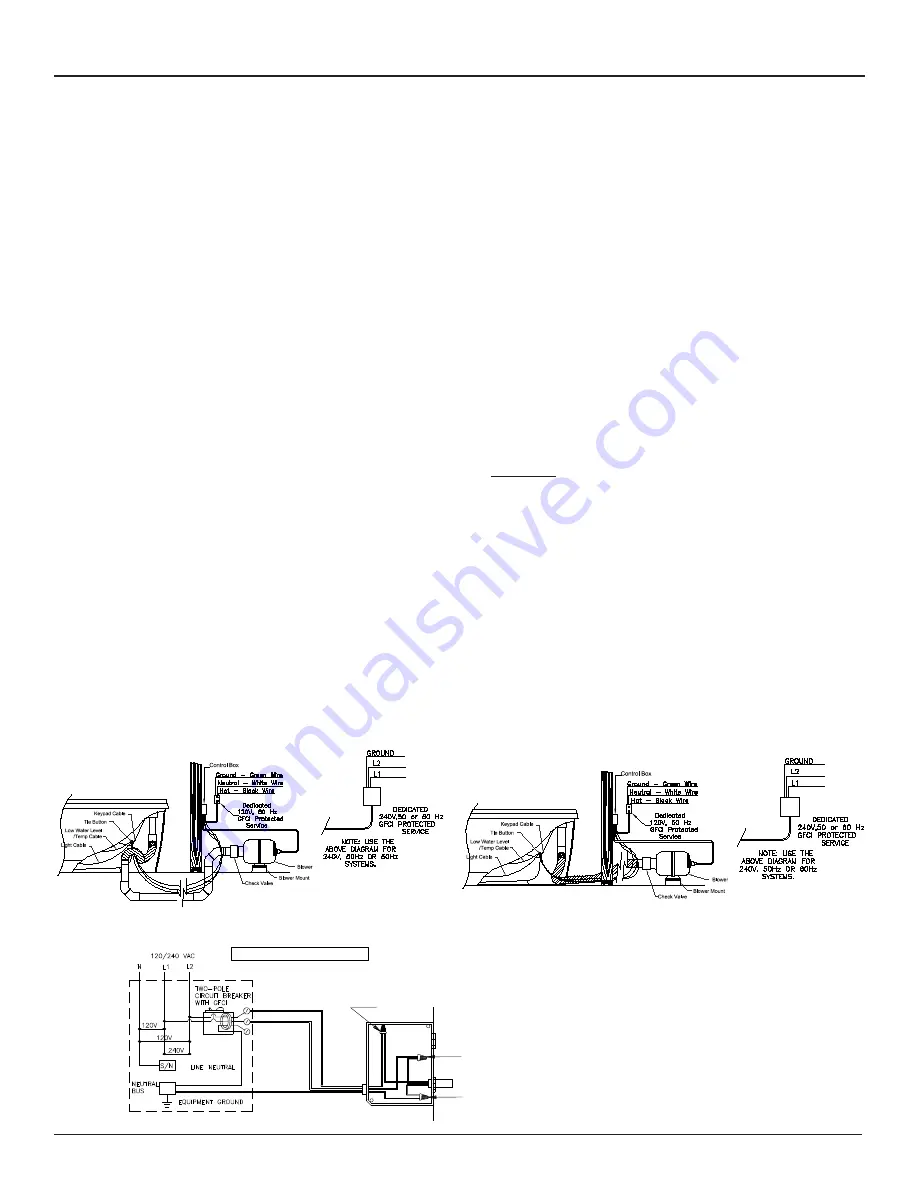
  Extend piping stub-out through the floor as 

illustrated in 

figure  6

.


Piping between the remote blower 

location and the bath can be insulated using a minimum 
of 1/2” [12 mm] thick insulation. 

warnIng:


any  MODIfICaTIOn  TO  The  equIPMenT  Is  nOT 

reCOMMenDeD  anD  wIll  VOID  The  ManufaCTurers 

warranTy.


5. 

reattach the skirt to the bath


by positioning the skirt on the 

bath and fastening the 5/16” nut and washers to the 5/16” 
leveling bolts, nuts and washers attached to the bath.  Be 
sure that the skirt is positioned correctly allowing the PS 
skirt clips to rest against the back of the skirt.

deck-mounted faucet (if applicable).  


nOTe:


Flex plumbing lines must be long enough so 

the bath can be removed from the skirt if access is 

required in the future.  

  1/2” [12 mm] 4 foot [122 cm] stainless steel flex hoses 

may be purchased from Jason International, Inc.  

20.

Test all connections for leaks.


REMOTE MOUNTING OF AIR BLOwER

The Jason AirMasseur

®

 system has been factory installed 

following E.T.L. guidelines. During installation, if remote 
mounting of the blower and its control box is desired, follow 
these procedures.
Note:  Do not remote mount the blower and control box more 
than 15 feet [457 cm] away from the air inlet of the bath. 
Choose a location as close as possible to the bath to assure 
maximum efficiency.

1. 

Determine layout.

  The installer is to determine the layout 

of the piping, exact remote mount location, and service 
access before beginning any work.  

–  Use 1.5” [38 mm] ABS or PVC plastic tubing. 

–  Locate  the  control  box  with  the  blower  in  an  area 

accessible for servicing.  

–  To insure proper functioning of the system, avoid remote 

mounting in a location which requires more than six 
(6) piping direction changes. A 90° direction change 
should be made up of two 45° elbows for maximum 
efficiency.

INSTALLATION INSTRUCTIONS (cont.)

L2-W HITE W ITH

RED M ARK

L1-BLACK

G ND-G REEN

FRO M  CO NTRO L

L2

240 V

L1

NO  CO NNECTIO N

(LO AD NEUTRAL)

BREAKER BO X

Note: The load neutral term inal is not used.  There should be no connection to the load neutral 

term inal on the G FCI circuit breaker.  The green wire (G ND-G REEN) is the equipm ent ground 

and should be connected to the neutral bus found in the m ain breaker box.

BREAKER BO X CO NNECTIO NS

nOTe: 

The  load  neutral  terminal  is  not  used.  

There  should  be  no  connection  to  the  load 

neutral  terminal  on  the  GFCI  circuit  breaker.  

The green wire (GND-GReeN) is the equipment 

ground and should be connected to the neutral 

bus found in the main breaker box.

Standard/Premier and Signature edition

Signature edition onLY

figure  6

Summary of Contents for forma AirMasseur RC553PS

Page 1: ...er s responsibility Damage sustained in transit is the responsibility of the carrier If damage is discovered If the carton shows sign of damage inspect the product before accepting and describe the pr...

Page 2: ...ions have been indicated on the template Choose the water inlet stub out position that is preferable for your installation 9 Remove the template and cut out the floor CAUTION The floor drain location...

Page 3: ...rain assembly free standing in the P trap 15 Align the drain with the center line on the template Refer to Figure 4 16 Permanently attach the drain tee to the P trap 17 Remove the template from the fl...

Page 4: ...oses may be purchased from Jason International Inc 20 Test all connections for leaks REMOTE MOUNTING of air blower The Jason AirMasseur system has been factory installed following E T L guidelines Dur...

Page 5: ...e 6 10 Remove blocks and place bath and skirt assembly in position Jason baths are designed to be supported at the base of the bath If the floor is smooth and level the bath s Level INSTALLATION INSTR...

Page 6: ...CODES MUST BE OBSERVED Where there are no local codes the National Electric Code NEC and Uniform Plumbing Code UPC shall be observed It is the responsibility of the installer owner to determine speci...

Page 7: ...ing a quality plastic polish like Novus Plastic Polish No 2 available from the Jason Dealer It is always preferable to protect the acrylic surface during installation to minimize cleanup and prevent s...

Page 8: ...ems the power cord for the Blower control box must be plugged into a 120v 15 amp GFCI dedicated circuit NOTE This diagram Figure 10 also applies to 50 Hz 240v controls and power supply systems Except...

Page 9: ...TRUCTIONS section of this owner s manual before its first use and periodically thereafter All Jason air baths are pre plumbed at the factory WARNING Before operating refer to the instructions pertaini...

Page 10: ...ture Remote Control In addition to the main control touchpad installed on the bath deck a floating waterproof Universal Remote Control is provided with all Signature Edition AirMasseur baths This remo...

Page 11: ...he Option icon is used to operate an optional LED light if installed Press the icon for less than two 2 seconds to turn the lights Off or On Hold the icon for more than two 2 seconds to change modes T...

Page 12: ...e correct control box See the CONTROL BOX CONNECTIONS section Remote Control The Signature Edition control system includes a waterproof floatingUniversalRemoteControl Itcontrolsallbathfunctions plus a...

Page 13: ...iquid detergent solution i e glass cleaner and a soft wet cloth or sponge Do not run the air system with foaming cleaners or soaps Rinse the bath thoroughly after cleaning SURFACE MAINTENANCE Areas wi...

Page 14: ...inserted into the outlet c Keypad is disconnected c Check and reconnect if necessary Blower shuts off by itself or before time elapses a Blower motor overheated and thermal protection device deactiva...

Page 15: ...the possibility of drowning Never use the therapy bath while under the influence of alcohol anticoagulants stimulants antihistamines vasoconstrictors vasodilators hypnotics narcotics or tranquilizers...

Reviews: