background image

Jason International, Inc.  •  


501.771.4477  


Page 5 of 15


Customer Service :  800.255.5766 

Copyright © 2010 Jason International.

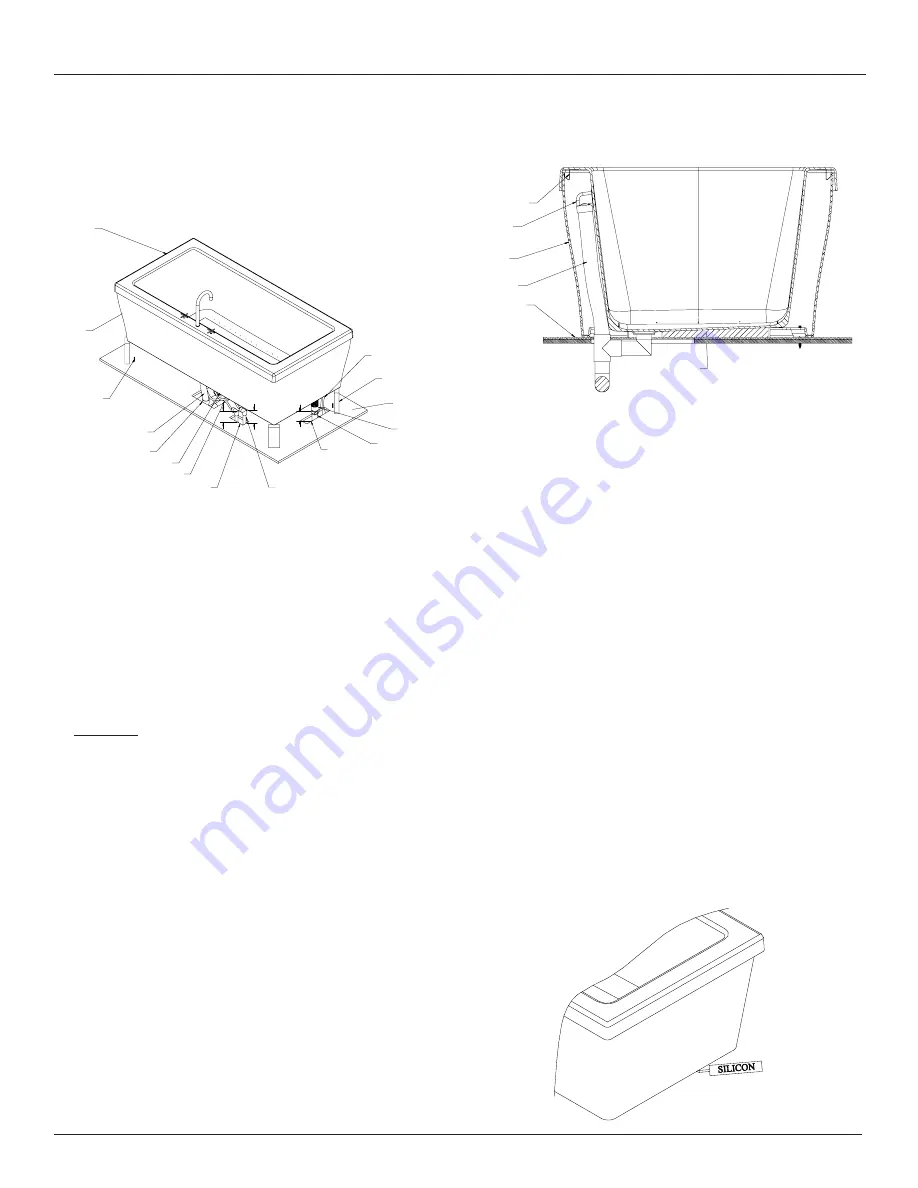
figure  7

6. 

Position the bath and skirt assembly over the four locating studs

.  

Align the drain and overflow


with the corresponding bath 

holes.  See

 figure 7.


  Place  bath  and  skirt  assembly  on  raised  blocks 

approximately 8” tall.

7. 

attach hose.

  Attach the other end of the hose to the 1-1/2” 

[38 mm] PVC pipe that is plumbed to the blower with the 
included clamp.  

8.  flex  Plumbing. 

  Attach  stainless  steel  flex  plumbing  to 

stubouts (if applicable).  Faucetry connections should be 
tested for leaks at this time.

9. 

route cables.

 Route the keypad cable, remote control cable 

(if applicable), and the light cable through the floor cutout 
and connect to the control box.  

  warnIng:


when  rOuTIng  CaBles,  DO  nOT  allOw  The 

CaBle TO Be PInCheD unDer The BaTh shell. 


  Use the tie buttons attached to the bath to support the 

cables.  

  nOTe:

 A minimum of 4 feet [122 cm] of hose and cable 

must  be  free  from  binding  to  allow  for  pulling  the 

cables back up through the floor cutout.  

  When installing on a cement slab a conduit may be used 

if desired to run the cable from the bath to the control box.  
This will allow the bath to be lifted and removed from the 
skirt if access is required in the future.  

  During installation if it is preferred to run the blower hose 

on top of the floor, a 2 1/2” [6.35 cm] diameter hole can 
be drilled at the bottom of the skirt.  A means to cover the 
hole, hose, and wires is not provided.  See 

figure  6.


10. remove  blocks

  and  place  bath  and  skirt  assembly  in 

position.

Jason baths are designed to be supported at the base of 
the bath.  If the floor is smooth and level the bath’s Level 

INSTALLATION INSTRUCTIONS (cont.)

3"

8"

6"

Bath

Skirt

Sump Area

Location

Water Inlet

Stub-Out

Location

Remote Blower

Tubing Floor

Location

Raised Blocks (x4)

Locating Stud Bolts (x4)

Flex Tubing with Clamp

Remote Blower

Tubing (3" Above Floor)

Stubouts (6" and

8" Above Floor)

Overflow

(PVC Fllex Pipe)

Drain

Stainless Steel

Flex Plumbing (x2)

RC630PS Shown

Electronic Cables

Floor

Form™ Base will provide proper drainage and support. 
See F

igure 8.  

figure  8

LEVELFORM BASE

PS SKIRT CLIP

SKIRT

PVC FLEX PIPE

FINISHED FLOOR

OVERFLOW


nOTe:

  Do not use a sand bed to install or level the 

bath.

  nOTe: 

The  bottom  of  the  bath’s  Level  Form™  Base 

must be 1/8” lower than the bottom of the skirt.

11. Drain and overflow.

  Complete the installation of the drain 

and overflow per the instructions included with the drain 
and overflow.

12. Test bath controls.

    Before  finishing  the  installation,  it  is 

recommended that the bath controls be tested without filling 
the bath with water to assure that all electric connections 
are properly working.  

  nOTe:

    Refer  to  the  electrical  section  for  correct 

installation of electrical components.

  nOTe:

    Refer  to  the  Product  Test  Diagnostics  in 

the  Operating,  Features,  and  Controls  section  for 

testing.  

13.  It is recommended that the bath be water tested (filled 

and operated), and the bath be inspected for leaks  Refer 
to the 

fIllIng anD DraInIng

 Instructions in the Features 

and Controls section of this owner’s manual.

14.  Seal the joint between the skirt bottom and the floor with 

a silicone caulk.  See 

figure 9. 

figure  9

Summary of Contents for forma AirMasseur RC553PS

Page 1: ...er s responsibility Damage sustained in transit is the responsibility of the carrier If damage is discovered If the carton shows sign of damage inspect the product before accepting and describe the pr...

Page 2: ...ions have been indicated on the template Choose the water inlet stub out position that is preferable for your installation 9 Remove the template and cut out the floor CAUTION The floor drain location...

Page 3: ...rain assembly free standing in the P trap 15 Align the drain with the center line on the template Refer to Figure 4 16 Permanently attach the drain tee to the P trap 17 Remove the template from the fl...

Page 4: ...oses may be purchased from Jason International Inc 20 Test all connections for leaks REMOTE MOUNTING of air blower The Jason AirMasseur system has been factory installed following E T L guidelines Dur...

Page 5: ...e 6 10 Remove blocks and place bath and skirt assembly in position Jason baths are designed to be supported at the base of the bath If the floor is smooth and level the bath s Level INSTALLATION INSTR...

Page 6: ...CODES MUST BE OBSERVED Where there are no local codes the National Electric Code NEC and Uniform Plumbing Code UPC shall be observed It is the responsibility of the installer owner to determine speci...

Page 7: ...ing a quality plastic polish like Novus Plastic Polish No 2 available from the Jason Dealer It is always preferable to protect the acrylic surface during installation to minimize cleanup and prevent s...

Page 8: ...ems the power cord for the Blower control box must be plugged into a 120v 15 amp GFCI dedicated circuit NOTE This diagram Figure 10 also applies to 50 Hz 240v controls and power supply systems Except...

Page 9: ...TRUCTIONS section of this owner s manual before its first use and periodically thereafter All Jason air baths are pre plumbed at the factory WARNING Before operating refer to the instructions pertaini...

Page 10: ...ture Remote Control In addition to the main control touchpad installed on the bath deck a floating waterproof Universal Remote Control is provided with all Signature Edition AirMasseur baths This remo...

Page 11: ...he Option icon is used to operate an optional LED light if installed Press the icon for less than two 2 seconds to turn the lights Off or On Hold the icon for more than two 2 seconds to change modes T...

Page 12: ...e correct control box See the CONTROL BOX CONNECTIONS section Remote Control The Signature Edition control system includes a waterproof floatingUniversalRemoteControl Itcontrolsallbathfunctions plus a...

Page 13: ...iquid detergent solution i e glass cleaner and a soft wet cloth or sponge Do not run the air system with foaming cleaners or soaps Rinse the bath thoroughly after cleaning SURFACE MAINTENANCE Areas wi...

Page 14: ...inserted into the outlet c Keypad is disconnected c Check and reconnect if necessary Blower shuts off by itself or before time elapses a Blower motor overheated and thermal protection device deactiva...

Page 15: ...the possibility of drowning Never use the therapy bath while under the influence of alcohol anticoagulants stimulants antihistamines vasoconstrictors vasodilators hypnotics narcotics or tranquilizers...

Reviews: