background image

Jason International, Inc.  •  


501.771.4477  


Page 5 of 8


Customer Service :  800.255.5766 

Copyright © 2011 Jason International.

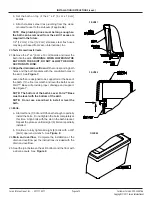
b.  Set  the  bath  on  top  of  the  2”  x  4”  [5  cm  x  10  cm] 

boards.  

c.  Attach  stainless  steel  flex  plumbing  from  the  deck-

mounted faucet to the stubouts (if applicable).  


NOTE:

  Flex plumbing lines must be long enough so 

the bath can be removed from the skirt if access is 

required in the future.  

  1/2” [12 mm] 4 foot [122 cm] stainless steel flex hoses 

may be purchased from Jason International, Inc.  

20.

Test all connections for leaks.


21.Remove the 2” x 4” [5 cm x 10 cm] boards and lower the 

bath into the skirt.  

WARNING: WheN lOWeRING The 

bATh INTO The SkIRT, DO NOT AllOW The hOSe 

SeCTIONS TO bIND.  

22.

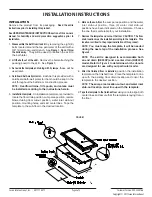
Align the drain and overflow

 with the corresponding bath 

holes and the bath brackets with the pre-drilled holes in 
the skirt.  See 

Figure 7

.  

  Jason baths are designed to be supported at the base of 

the bath.  If the floor is smooth and level the bath’s Level 
Form™ Base will provide proper drainage and support. 
See Figure 7.  


NOTe: The bottom of the bath’s level Form™ base 

must be level with the bottom of the skirt.

  NOTe:  Do not use a sand bed to install or level the 

bath.

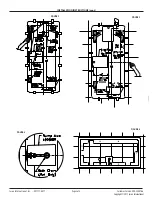
23.

bolts.  

a.  Start with one (1) bolt and lift the bath enough to partially 

install the bolts.  Do not tighten the bolts completely at 
this time.  Align bolts with the slot in the bath bracket.  
Repeat the process until all eight (8) bolts are partially 
installed.  

b.  Continue to fully tighten all eight (8) bolts with a 3/8” 

[9mm] open-end wrench.  See 

Figure  8

24.

Drain  and  overflow.

    Complete  the  installation  of  the 

drain and overflow per the instructions included with the 
drain and overflow.

25. Seal the joint between the skirt bottom and the floor with 

a silicone caulk.  See 

Figure 9


INSTALLATION INSTRUCTIONS (cont.)

FIgURE 8

FIgURE 7

FIgURE 9

Summary of Contents for forma RC630P

Page 1: ...claim promptly The installer is responsible for insuring that the unit is free from defects or shipping damage In the event of a problem DO NOT install the unit Jason International is not responsible...

Page 2: ...emote blower tubing floor cutout position water inlet stub out position mounting holes and skirt center lines Tape the template to the sub floor in the desired location figure 1 installation instructi...

Page 3: ...Jason International Inc 501 771 4477 Page 3 of 8 Customer Service 800 255 5766 Copyright 2011 Jason International figure 2 figure 4 figure 3 figure 5 INSTALLATION INSTRUCTIONS cont...

Page 4: ...o the P trap 15 Remove the template from the floor 16 Placethebathskirtintoposition and align the center line hole inthebottomoftheskirtandtheoffsetholeontheopposite end with the pre drilled holes in...

Page 5: ...illed holes in the skirt See Figure 7 Jason baths are designed to be supported at the base of the bath If the floor is smooth and level the bath s Level Form Base will provide proper drainage and supp...

Page 6: ...for safe use of cleaning products If the surface becomes scratched or dulled it may be restored by using a quality plastic polish like Novus Plastic Polish No 2 available from the Jason Dealer It is a...

Page 7: ...by the manufacturer Replace the air filter on the HVAC unit once a month 8 Clean moldy surfaces as soon as any mold appears by using a detergent soapy solution and appropriate household cleaner Always...

Page 8: ...age during the early months of pregnancy pregnant or possibly pregnant women should limit whirlpool water temperatures to 38 C 100 F E The use of drugs or alcoholic beverages before or during soaker b...

Reviews: