background image

11

•  If the cable were to deteriorate it must be changed by an 

Authorised Service Centre.

•  Leave the lid opened after each use, avoid pressure being 

applied to the sealing foam.

•  The vacuuming system is not suitable for liquid foods.

•  Do not vacuum food with a large amount of liquid because the 

vacuuming tube can not be cleaned properly.

•  After use, do not touch the sealing strip when opening the lid. 

Hot surface.

INSTRUCTIONS OF USE

•  Always use original spare parts. (B22x30 / B28x40 / R22x6 / R28x6).

I. Making a bag with a plastic roll

1. Connect the appliance to the mains. 

2. Pull the roll until the extent desired for the bag and cut.

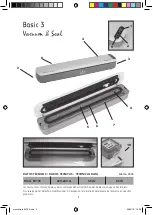
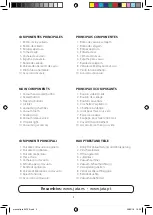
3. Open the side latches (3) and lift the lid.

4. Place one end of the cut piece on the sealing element (7).

5. Close the top cover and secure the side locks.

6. Press the button (2) to start sealing the bag. During the process, the pilot (9) will light on in blue colour.

7. At the end of the process the pilot (9) will switch off after 10 seconds.

8. Pull slightly the valve (8) to facilitate the opening of the lid.

9.  Press the opening buttons (3) to open the lid and remove the bag. The bag will be ready for vacuuming 

and sealing.

II. Vacuum packaging with bag

1. Place the items inside the bag. 

2.  Clean and stretch the opening of the bag, ensure that there is no dust, waves or wrinkles and have in mind 

that the sealing area is totally dry.

3.  Place the bag opening into the vacuuming chamber (5). Make sure the air intake (4) is not covered by the 

bag and the vacuum foam (6) will be correctly placed.

4.  Close the lid until you hear a “click” in both sides and press the button (1) to start the vacuum and sealing 

process.

5.  The appliance will perform the vacuuming, this process can reach a pressure of -60kPa and will seal the 

bag automatically. During the process the pilot (9) will be in blue colour. At the end of the process, it will 

switch off.

6.  You can cancel the process if you wish a medium vacuuming, by pressing again the button (1) or (2). After 

that, press the button (2) for sealing. The process will finish automatically and the pilot (9) will switch off.

7.  The vacuum packaging is complete. Lift up the valve (8) to make easier the opening of the lid. Press at the 

same time the opening buttons (3) to open the lid and remove the bag.

NOTE 

•  For an improved sealing effect, leave the machine to cool for a minute before using it again. Eliminate any 

remaining liquid or food from the vacuum chamber before further packing.

•  Do not carry out the sealing function continuously to avoid overheating the heating element. The machine 

will reject the function if the button (1) is activated 20 seconds from the last time.

•  The machine is designed to be used with suitable bags. Do not use another type of bag that is not suitable 

for vacuum packing.

•  Cut the bag with scissors to open the sealing area.

manual jata EV109.indd   11

26/03/18   16:29

Summary of Contents for Basic 3 Vacuum & Seal

Page 1: ...20 ABADIANO Bizkaia Tel 94 621 55 40 Fax 94 681 44 44 PORTUGAL Avenida Engenheiro Duarte Pacheco Torre 2 3 Sala 3 1070 102 Lisboa Tel 213 876 355 Fax 213 867 398 www jata es www jata pt ENVASADORA SELLADORA AL VACÍO SELADOR DE SACOS A VÁCUO VACUUM SEALER CONDITIONNEUSE SCELLEUSE SOUS VIDE INVASATRICE SIGILLATRICE SOTTOVUOTO EINFÜLLER UND VAKUUMIERER manual jata EV109 indd 1 26 03 18 16 29 ...

Page 2: ...EV109 220 240 V 50 Hz 85 W Los textos fotos colores figuras y datos corresponden al nivel técnico del momento en que se han impreso Nos reservamos el derecho a modificaciones motivadas por el desarrollo permanente de la técnica en nuestros productos manual jata EV109 indd 2 26 03 18 16 29 ...

Page 3: ...oto 9 Spia di funzione 10 Accessorio sottovuoto PRINCIPAIS COMPONENTES 1 Botão de vácuo e selagem 2 Botão de selagem 3 Botões abertura 4 Entrada de ar 5 Câmara de vácuo 6 Espuma para vácuo 7 Banda de selagem 8 Válvula de libertação de vácuo 9 Piloto funcionamento 10 Acessório de vácuo PRINCIPAUX COMPOSANTS 1 Bouton vide et scellé 2 Bouton de scellage 3 Boutons ouverture 4 Clochette d aspiration 5 ...

Page 4: ...a de características y el de su casa coinciden La manipulación o sustitución de cualquier componente deberá ser realizada por un ServicioTécnico Autorizado No lo deje en funcionamiento sin vigilancia Evite que el cable de alimentación entre en contacto con las partes calientes Debe vigilarse que los niños no jueguen con el aparato Mantenga la envasadora fuera de su alcance Manténgalo alejado de co...

Page 5: ... 8 Estire levemente de la válvula 8 para facilitar la apertura de la tapa 9 Presione los botones de apertura 3 laterales para abrir la tapa y sacar la bolsa La bolsa estará preparada entonces para el vaciado y sellado II Empaquetado al vacío con bolsa 1 Coloque el producto en el interior de la bolsa 2 Limpie y estire la apertura de la bolsa asegúrese de que no haya polvo ondas o arrugas y que la z...

Page 6: ... la tapa del aparato cerrada y el otro extremo en la toma de la tapa del recipiente 4 Presione el botón de vacío y sellado 1 para comenzar el vaciado La máquina parará automáticamente cuando se haya conseguido la suficiente presión de vaciado NOTA Retire primero el extremo del tubo del recipiente Si retira antes el extremo del tubo de la toma de aire el vaciado se perderá Abrir el recipiente tras ...

Page 7: ...ciais fontes de perigo Não o ligue sem se certificar que a voltagem indicada na placa de características e a da rede coincidem O manuseamento ou a substituição de qualquer componente deverá ser realizado por um Serviço de AssitênciaTécnica Autorizado Não o deixe em funcionamento sem vigilância Evite que o cabo de alimentação entre em contacto com as partes quentes Deve vigiar para que as crianças ...

Page 8: ...tamente Após a utilização não toque na banda de selagem quando abrir a tampa Superfície quente INSTRUÇÕES DE UTILIZAÇÃO Use sempre recargas originais B22x30 B28x40 R22x6 R28x6 I Obter um saco de um rolo de plástico 1 Ligue o aparelho à rede 2 Estique o rolo até obter a medida desejada para o saco e corte o 3 Abra os fechos laterais 3 e levante a tampa 4 Coloque uma extremidade do pedaço cortado so...

Page 9: ...tá pronta para ser usada com os sacos apropriados Não utilize outro tipo de saco que não seja apropriado para o vácuo Corte o saco com uma tesoura para abrir a zona de selagem III Vácuo do recipiente hermético BW1L não incluído 1 Limpe a tampa a base do recipiente hermético não incluído e certifique se que tudo está limpo e seco 2 Coloque os alimentos dentro do recipiente e deixe pelo menos 2 cent...

Page 10: ...at of your household are the same Manipulation or replacement of any component must be performed by an authorized service centre Do not leave unattended while in use Take care the cable does not touch any hot parts Don t allow children play with the appliance Keep the appliance out of the reach of children Keep out of curtains or other flammable materials Avoid any contact with the sealing strip I...

Page 11: ...at the sealing area is totally dry 3 Place the bag opening into the vacuuming chamber 5 Make sure the air intake 4 is not covered by the bag and the vacuum foam 6 will be correctly placed 4 Close the lid until you hear a click in both sides and press the button 1 to start the vacuum and sealing process 5 The appliance will perform the vacuuming this process can reach a pressure of 60kPa and will s...

Page 12: ...ove the end of the tube from the bowl If you remove first the end of the tube from the air inlet the vacuum will be lost Opening the bowl after vacuuming To open the bowl the air needs to be released pushing the red button MAINTENANCE AND CLEANING Before you proceed to cleaning make sure the appliance is unplugged from the mains Clean with a slightly dampened cloth Do not use abrasive or chemical ...

Page 13: ...entuelles sources de danger Ne le branchez pas sans être sûrs que le voltage indiqué sur la plaque de caractéristiques et celui de votre maison coïncident Manipulation ou le remplacement d un composant doit être effectué par un centre de service autorisé Ne le laissez jamais en marche sans surveillance Évitez que le câble d alimentation n entre en contact avec les parties chaudes Il faut veiller à...

Page 14: ...itée pour le sac et ocupes le 3 Ouvrez les fermetures latérales 3 et soulevez le couvercle 4 Placez une extrémité de la pièce découpée sur l élément d étanchéité 7 5 Fermez le couvercle supérieur et sécurisez les serrures latérales 6 Appuyez sur le bouton 2 pour commencer le scellage du sac Pendant le processus le voyant 9 va s allumer bleu 7 À la fin du processus le voyant 9 s éteindra au bout de...

Page 15: ...1 Nettoyez le couvercle la base du récipient hermétique non inclus et assurez vous qu ils sont bien propres et secs 2 Placez les aliments dans le récipient en laissant au moins 2 centimètres entre l aliment et le bord du couvercle 3 Une fois le couvercle fermé introduire un embout de l accessoire 10 dans la prise d air 4 et l autre embout dans la prise du couvercle du récipient 4 Appuyez sur le bo...

Page 16: ...voltaggio sia compatibile La manipolazione o la sostituzione di qualunque componente dovrá essere realizzata da un servizio tecnico autorizzato Non lasciare incustodito quando è in funzione Evitare il contatto del cavo con le parti calde Fare attenzione affinché i bambini non giochino con l apparecchio Mantenere l apparecchio lontano dai bambini Usare lontano da materiali infiammabili Eviti il con...

Page 17: ...are l apertura del coperchio 9 Prema i pulsanti di apertura 3 laterali per aprire il coperchio e togliere la busta a questo punto la busta sará pronta per il sottovuoto e il sigillato II Impacchettamento sottovuoto con contenitore plastico 1 Collochi il prodotto all interno di un contenitore plastico 2 Pulisca e allisci l apertura del sacchetto assicurandosi che non ci sia polvere non ci siano ond...

Page 18: ... estremo la presa del coperchio del recipiente 4 Prema il pulsante di sottovuoto e sigillatura 1 per cominciare il sottovuoto L apparecchio si fermerá automaticamente al raggiungere la giusta pressione NOTA Tolga per primo l estremo del tubo del recipiente Se toglie prima la parte esterna del tubo della presa d aria il sottovuoto si perderá Apra il recipiente dopo il sottovuoto Per aprire il recip...

Page 19: ... auf da sie potentielle Gefahrenquellen darstellen Ehe Sie das Gerät anschließen vergewissern Sie sich dass die auf demTypenschild angegebeneVoltzahl mit der Netzspannung übereinstimmt Komponenten dürfen nur von autorisiertem Fachpersonal ausgetauscht repariert und manipuliert werden Lassen Sie das Gerät nicht im Betrieb unbeaufsichtigt Vermeiden Sie dass das Stromkabel mit den heißenTeilen in Kon...

Page 20: ...iegelung streifen beim Öffnen de Abdeckung nicht Heiße Oberfläche BEDIENUNGSANWEISUNGEN Verwenden Sie stets Originalersatzteile B22x30 B28x40 R22x6 R28x6 I Wie kann man einen Speisebeutel aus der Plastikrolle erhalten 1 Schließen Sie das Gerät ans Stromnetz an 2 Ziehen Sie die Rolle aus bis Sie die Länge erhalten die Sie für die Tüte wünschen und schneiden Sie die Folie an dieser Stelle ab 3 Schli...

Page 21: ...er als 20 Sekunden das letzte Mal aktiviert wurde Die Maschine ist für die Nutzung mit den geeigneten Speisebeuteln konzipiert Nutzen Sie keine Beutel die sich für den Vakuumierungsprozess nicht eignen Schneiden Sie die Beutel mit einer Schere auf um den Versiegelungsbereich zu öffnen iii Entleerung des hermetischen Behälters BW1L nicht inbegriffen 1 Reinigen Sie die Abdeckung den Sockel des herme...

Page 22: ... de entrega e a identificação do fornecedor Sem esse documento a garantia não terá validade Adicionalmente el titular de la garantía disfrutará en cada momento de todos los derechos que la legislación vigente le conceda GARANTIA COMERCIAL Com esta garantia a Jata amplia de 2 para 3 anos a garantia do seu aparelho sem qualquer custo para o seu titular Para que esta ampliação seja válida o certifica...

Page 23: ...trega y la identificación del proveedor Sin ese documento la garantía no tendrá validez Adicionalmente el titular de la garantía disfrutará en cada momento de todos los derechos que la legislación vigente le conceda GARANTÍA Comercial Jata con esta garantía amplia de 2 a 3 años la garantía de su aparato sin coste alguno para el titular de la misma Para que esta ampliación tenga validez el certific...

Page 24: ..._______ Certificado de garantía Certificado de garantia Mod EV109 Sello del Vendedor Carimbo do Vendedor Fecha de Venta Data da Venta Electrodomésticos JATA S A ESPAÑA Zubibitarte 8 48220 ABADIANO Bizkaia Tel 94 621 55 40 Fax 94 681 44 44 PORTUGAL Avenida Engenheiro Duarte Pacheco Torre 2 3 Sala 3 1070 102 Lisboa Tel 213 876 355 Fax 213 867 398 www jata es www jata pt Nombre y dirección del compra...

Reviews: