background image

9

MANUAL DE INSTRUCCIONES • INSTRUCTION MANUAL • MANUAL DE INSTRUÇÕES

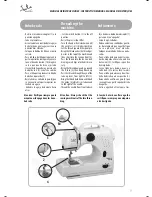
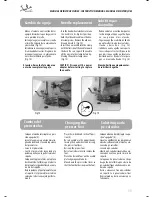
- Deslice el mando interruptor (1) a la

posición apagado.

- Suba el prensatelas.
- Gire el volante en sentido de las agujas

del reloj hasta que la aguja esté en su
posición más elevada.

- Coloque la bobina de hilo en el porta

carrete.

- Pase la hebra del hilo por la guía en la

parte superior de la máquina y encáje-
lo en el disco de tensión (14). Asegúre-
se de que quede bien ajustado.

- Lleve el hilo hacia abajo y páselo alre-

dedor de la U (2) y vuelva a subirlo.

- Pase el hilo por la palanca tira hilo de

derecha a izquierda (3).

- Baje la hebra y enhebre la guía (4) que

se encuentra en la parte superior de-
recha de la aguja.

- Enhebre la aguja de delante hacia

atrás.

Atención: Verifique siempre que la
máquina esté apagada antes de en-
hebrarla.

Enhebrado

- Faça deslizar o botão do interruptor (1)

para a posição “apagado”.

- Levante o pé-calcador.
- Rode o volante no sentido dos pontei-

ros do relógio até que a agulha fique
na sua posição mais elevada.

- Coloque o carrinho de linhas no porta-

carros.

- Passe a linha pela guia na parte supe-

rior da máquina e encaixe-a no disco
de tensão (14). Certifique-se que fica
bem ajustada.

- Leve a linha para baixo e passe-a à

volta da U (2) e volte a fazê-la subir.

- Passe a linha pela alavanca do estica-

linha da direita para a esquerda (3).

- Baixe a linha e enfie-a na guia (4) que

se encontra na parte superior direita
da agulha.

- Enfie a agulha da frente para trás.

Atenção: Antes de enfiar a agulha
certifique-se sempre que a máquina
está desligada.

- Set the switch button (1) to the off

position.

- Raise the presser foot lifter.
- Turn the hand wheel clockwise until

the needle is in its highest position.

- Set the thread spool on the spool pin.
- Bring the thread under the thread gui-

de slot at the top of the machine and
then slip it into the tension disk (14).
Pass the thread into the tension disk,
making sure it slips into the disk secu-
rely.

- Bring the thread down and go around

the U-turn (2), then bring it back up.

- Pass the thread through the eye of the

take-up lever, from right to left (3).

- Bring the thread back down and thread

the guide (4) which is just above and
to the right of the needle.

- Thread the needle from front to back.

Attention: Always check that the
sewing machine is off before threa-
ding.

Threading the
machine

Enfiamento

114

2

4

3

Summary of Contents for Mini 675 MMC675N

Page 1: ...MANUAL DE INSTRUCCIONES INSTRUCTION MANUAL MANUAL DE INSTRU ES Mod MMC675N Mini 675...

Page 2: ...o the local garbage regulations Dispose the batteries according to the local garbage regulation Never throw it away to the rubbish So you will help to the improvement of the environment PROTEC O DO ME...

Page 3: ...de la aguja Cambio del prensatelas Caracter sticas Ojal en cuatro tiempos Brazo libre Safety instructions Machine identification Accessories Connecting the machine to the power supply Winding the bob...

Page 4: ...a desconectarla ponga todos los controles en la posi ci n de apagado 0 y desconecte el enchufe de la toma de corriente Instrucciones importantes de seguridad Descon ctela siempre por la clavija no tir...

Page 5: ...ons vel pela sua seguran a Use este aparelho somente para o fim para o qual foi concebido utilizando exclusivamente os acess rios reco mendados pelo fabricante como se indica neste manual Nunca fa a f...

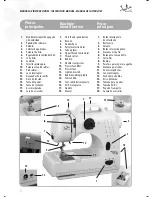
Page 6: ...de velocidade 2 Retrocesso 3 Volante 4 Bot o selector do ponto 5 Alavanca estica fio 6 Bot o para tens o do fio 7 Corta fios 8 Bobina 9 Parafuso para segurar a agulha 10 Alavanca p alcador 11 Dentes...

Page 7: ...fique se que o interruptor 1 se encontra na posi o apagado Ligue o adaptador na parte traseira da m quina e de seguida rede Ligue o pedal na parte traseira da m quina Existem duas formas de trabalhar...

Page 8: ...justada Fig 2 4 Coloque a canela vazia no enrolador e empurre a para a esquerda 5 Passe uns cent metros de linha do carro de linhas para a canela no sentido con tr rioaodosponteirosdorel gio Fig 3 6 C...

Page 9: ...guia na parte supe rior da m quina e encaixe a no disco de tens o 14 Certifique se que fica bem ajustada Leve a linha para baixo e passe a volta da U 2 e volte a faz la subir Passe a linha pela alava...

Page 10: ...me ar a coser 4 Segure a linha da agulha levemente com a m o esquerda Rode o volante nasuadire ofazendocomqueaagul ha baixe e continue a fazer rodar o volante at que a agulha volte sua posi o mais ele...

Page 11: ...funcione sem o pedal como o bot o interruptor 1 selecione qualquer das duas posi es desse bot o para a di reita ou para a esquerda sempre com o adaptador ligado rede Quando posiciona o bot o para a e...

Page 12: ...B this indicates that the upper thread is too loose Turn the thread tension dial to a higher number to increase the tension until the stitching is balanced Se o ponto inferior se apresentar de masiad...

Page 13: ...p screw Fig 15 CAUTION Disconnect the power adaptor before starting to replace the needle Cambio del prensatelas Coloque el mando interruptor en posi ci n apagado 0 Levantelaagujaasuposici nm salta gi...

Page 14: ...dle to its highest position and thensetwiththepatternselectiondial the desired stitch type Features Caracter sticas Ojal en cuatro tiempos 1 Ajuste el prensatelas de ojales y mar que la longitud del o...

Page 15: ...do n mero 4 ao 9 para aumentar a tens o enquanto cose para tr s Volte a coloc lo na posi o normal para continuar a coser C Selec o de velocidade Esta m quina tem duas posi es de velocidade de ponto A...

Page 16: ...odom sticos JATA S A ESPA A Zubibitarte 8 48220 ABADIANO Bizkaia Tel 902 100 110 94 621 55 40 Fax 902 100 111 94 681 44 44 PORTUGAL Avenida Engenheiro Duarte Pacheco Torre 2 3 Sala 3 1070 102 Lisboa T...

Reviews: