background image

MANUAL DE INSTRUCCIONES  •  INSTRUCTION MANUAL •  MANUAL DE INSTRUÇÕES

34

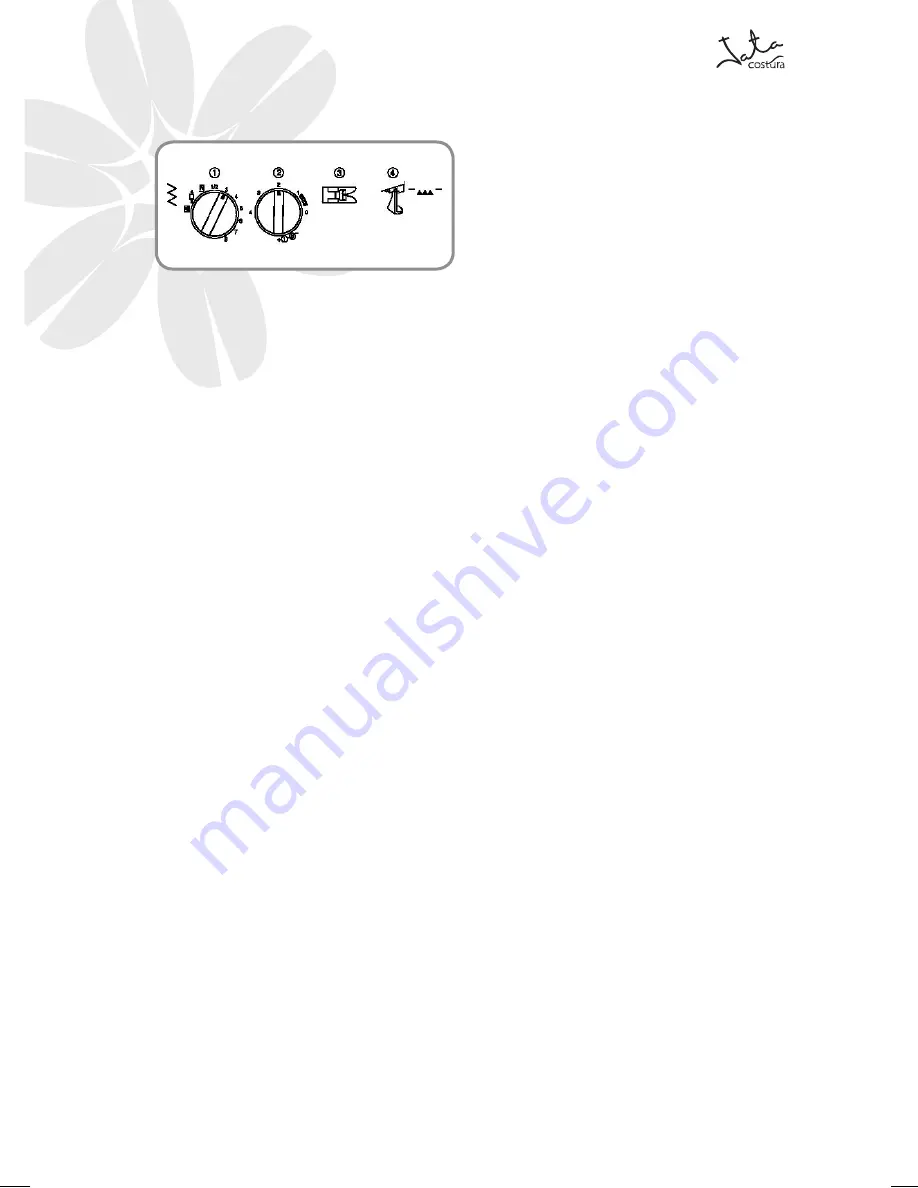
COSTURA DE BOTONES

1. Puntada: 3
2.  Largo de puntada
3.  Prensatelas para botones

1.  Mida la distancia entre los distintos agujeros del 

botón y seleccione el ancho de puntada apropiado 
mediante el selector de ancho de puntada. Por 
ejemplo, si la distancia entre los agujeros es de 1,5 
mm., ponga el ancho de puntada en 1,5.

2.  Cambie el prensatelas por uno para botones
3.  Baje los alimentadores con la palanca
4.  Coloque un botón entre el prensatelas  y el tejido y 

asegúrese de que la aguja pase por los agujeros sin 
pinchar el botón. Si lo hace, volver al paso 1.

5.  Cosa unas 10 puntadas a baja velocidad
6.  Retire el tejido de la máquina. Corte los hilos inferior 

y superior y haga in nudo con ambos en el revés del 
tejido.

Summary of Contents for Seleccion MC725

Page 1: ...MANUAL DE INSTRUCCIONES INSTRUCTION MANUAL MANUAL DE INSTRU ES Mod MC725...

Page 2: ...mbiente ENVIRONMENTPROTECTION Dispose the appliance according to the local garbage regulations Dispose the batteries according to the local garbage regulation Never throw it away to the rubbish So you...

Page 3: ...ries Extendable cloth plate Connecting plugs Changing the sewing lamp Changing the presser foot Replacing the needle Stitch length dial Twin needle sewing Winding the bobbin Lower threading Machine th...

Page 4: ...esponsable de su seguridad Use este aparato solamente para el fin para el que fue dise ado y utilizando exclusivamente los ac cesorios recomendados por el fabricante como se indica en este manual Nunc...

Page 5: ...cabo Mantenha os dedos das m os afastados das pe as em movimento Necessitam se cuidados especiais perto da agulha Usesempreachapaadequada agulha Usarumachapa erradapoder provocaraquebradaagulha N ouse...

Page 6: ...bin winding assembly Vertical spool holder Wind thread tension disc Thread passing cam Thread take up lever Thread tension dial Lamp cover Blade Needle bar Needle plate Extension box Handle Wheel Lamp...

Page 7: ...lubricante 1 2 3 4 5 6 7 8 9 10 11 12 13 SEWING FOOTS All purpose foot Zipper foot Buttonhole foot Button sewing foot Hem foot Blind stitch foot OTHER ACCESSORIES Guiding plate Brush with Buttonhole k...

Page 8: ...ufe de tres clavijas a la m quina Dicho enchufe est situado en el cable entre el pedal y el enchufe de alimentaci n de corriente 2 Conecte el enchufe a una toma de corriente ATENCI N 1 Cuando se cambi...

Page 9: ...r light bulb or when the sewing machine is not in use it is recommended that the power supply plug be disconnectedfromthewallsockettoavoidelectrical hazards 2 Thisproductisequippedwithapolarizedaltern...

Page 10: ...TELAS Puede necesitar cambiar el prensatelas en funci n de lo que se disponga a coser 1 Levantelaagujahastasuposici nm saltahaciendo girar el volante en sentido antihorario y levante la palanca alza p...

Page 11: ...a alavanca do p calcador 2 Liberte o p calcador elevando a alavanca situada por tr s do suporte 3 Coloque um p calcador diferente na chapa da agulhadeformaaqueabarradop calcadoresteja alinhado com a...

Page 12: ...aguja aflojando el tornillo de la aguja con una moneda 5 Coloqueotraagujaconlaparteplanamirandohacia atr s y s bala hasta que llegue a tocar con el tope superior Verificaci ndelaaguja 1 La aguja de c...

Page 13: ...lha n o est dobrada deite a sobre uma superf cie plana e com a parte plana para baixo 3 Substitua a agulha se estiver dobrada ou gasta REPLACINGTHENEEDLE 1 Remove the power supply plug from the outlet...

Page 14: ...ALTO SEA EL N MERO M S LARGA SER LA PUNTADA El ajuste O no alimenta el tejido Puede usarse para coser un bot n La zona F se usa para realizar puntadas de realce una puntada zigzag cerrada que pueden s...

Page 15: ...type of stitch and length on a scrap of fabric to observe the feeding of the material 1 Stitch length 2 Shorter 3 Longer SELECTORDOCOMPRIMENTODOPONTO De acordo com o ponto seleccionado pode ser necess...

Page 16: ...ntrasquelaparteredondeadadebemirarleausted Colocadodelejedecarreteadicional Coloque el eje de carrete vertical en el orificio previsto encimadelam quina cercadelejehorizontal Coloque el segundo carret...

Page 17: ...le thread in front of the same guide COSTURACOMAGULHADUPLA A m quina de costura foi concebida para poder utilizar uma agulha dupla e permitir a costura com duas linhas superiores Pode usar a mesma cor...

Page 18: ...ilo por el orificio de la canilla desde el interior y meta la canilla en su eje 4 Gire la canilla hacia la derecha 5 Sujetando el extremo del hilo presione suavemente el pedal para que el hilo d vuelt...

Page 19: ...n the bobbin is full 1 Cut the thread near the bobbin 2 Pushtheshafttotheleftandremovethefullbobbin from the shaft ENCHIMENTODABOBINA 1 Rode o volante para levantar a agulha 2 Coloque um carro de linh...

Page 20: ...0 cm de hilo de la canilla llena e inserte la canilla en su alojamiento Tire del hilo suelto y p selo por la hendidura abajo y hacia la izquierda tal como se indica en la figura B hasta que quede dent...

Page 21: ...ck into the machine it will fall out from the shuttle immediately after starting to sew 1 Bobbin case latch 2 Bobbin case finger 3 Tension spring 4 Metal finger 5 Notch PASSAGEMDALINHAINFERIOR 1 Levan...

Page 22: ...M QUINA Gireelvolanteymuevalapalancaalza prensatelasasu posici n m s alta Suba el prensatelas y meta un carrete en el porta carretes tal y como se muestra en la figura Saque el hilo por la parte de at...

Page 23: ...e a linha pela parte de tr s do carro Seguidamente siga os passos que se indicam na ilustra o MACHINETHREADING Instruction Cut the thread with sharp scissors so as to make easy threading Turn the bala...

Page 24: ...n un n mero inferior o A2 Canilla Aumente la tensi n del hilo de la canilla apretandoeltornilloensentidohorarioconelpeque o destornillador suministrado B La tensi n del hilo superior es d bil Aparecen...

Page 25: ...ecta necess rioterumatens ocorrecta dado que a tens o insuficiente ou demasiado forte enfraquece as costuras ou franze o tecido 4 Avesso 5 Direito TENSIONADJUSTEMENTOFUPPERTHREAD Thread tension will a...

Page 26: ...el mando derecho una longitud de la mitad inferior del mando Como se observa en el panel frontal de puntadas hay dos filas de puntadas posibles Con el selector de la derechapodremoselegir posicion ndo...

Page 27: ...ated at the right side of the selectors With next selector you will be able to select the switch length To choose the double action switch the left selector has to be moved between 1 and 10 and in the...

Page 28: ...e la aguja a 1 cm de la tela 5 Baje el prensatelas 6 Para retroceder apriete el Pulsador de Retroceso y presione ligeramente el pedal El retroceso sirve para finalizar una costura o para reforzarla 7...

Page 29: ...ch on the Pattern Indication Window Set the Pattern Selection dial to 1 or 10 for the type of Straight Stitch required 2 Raise the needle to its highest position and lift the presser foot lever 3 Pull...

Page 30: ...o el cortador que se encuentra detr s de la barra del prensatelas 5 Con el fin de dejar la m quina preparada para la pr xima costura tire del hilo inferior sacando unos 10 cm y p selo por los saliente...

Page 31: ...r foot and pull the fabric out gently to the left side 4 Cut both threads using the thread cutter located on the back of the presser foot bar 5 topreparethemachineforthenextseam pullabout 10cm of thre...

Page 32: ...s zurcidos o para coser botones es necesario bajar el alimentador 1 Retire la extensi n con la caja de accesorios y levante la tapa del compartimento donde se aloja la canilla En el lado derecho ver u...

Page 33: ...to rise the feed dog 3 To bring it up again pull sown the flap and bring it to the right side ALAVANCADOSDENTESIMPELENTES Use a alavanca dos dentes impelentes para subir ou baixar os dentes em fun o...

Page 34: ...da Por ejemplo si la distancia entre los agujeros es de 1 5 mm ponga el ancho de puntada en 1 5 2 Cambie el prensatelas por uno para botones 3 Baje los alimentadores con la palanca 4 Coloque un bot n...

Page 35: ...ly 10 stitches 6 Remove the material from the machine Cut the upper and lower threads and tie both threads at the back of the material COSERBOT ES 1 Ponto 3 2 Comprimento do ponto 3 P calcador para bo...

Page 36: ...la parte delantera de ojal Pasos Zona de cosido Dise o Dise o Paso a remate de la parte delantera del ojal 1 Ponga el selector de dise o en a 2 Bajeelprensatelasycosa5o6puntadas 3 Pare la m quina cua...

Page 37: ...stabilizer material on the underside of the fabric Buttonhole making is a simple process that provides reliable results REALIZA ODECASAS 1 Selector de modelo do ponto 1 2 Comprimento do ponto 0 5 1 3...

Page 38: ...he Pattern Selection Dial to c same position as a 2 Lower the presser foot and sew 5 to 6 stitches 3 Stop the machine when the needle is at the right side of the stitch and raise the needle from the m...

Page 39: ...ento pr definido da linha marcada com giz 3 Pare a m quina quando q agulha se encontrar esquerda dos pontos e levante a do tecido Passo c remate da parte de tr s da casa 1 Baixeop calcadorecosa5ou6pon...

Page 40: ......

Reviews: