background image

User Manual Javo Rotofill


Version 2014-1-2 

 11 

5


Mounting, installation and commissioning 

Follow all instructions described in this manual, in particular chapter safety.  


This machine is CE marked. When placing multiple machines in one line, the entire line must be properly CE 
marked before using this machine. Up to CE Marking of the line, commissioning of this machine is prohibited.  
 

5.1


Placement  

The machine must be placed on a flat surface, with sufficient weight capacity. Install the machine so that there is 
enough space left for service providing, safe instructions and / or cleaning, maintenance and / or inspections. Put the 
brakes on the castors before the machine is turned on. 
 

This machine is not suitable to be used in the open air. Electrical components are only splashproof. Keep the 
machine away from rain and moisture. When using the machine in a humid location is unavoidable, you 
should use an RCD. 

5.2


Facilities to take care of  by the  user 

Prior to delivery of the machine, the required materials and facilities (air, power, substrate, etc.) needs to be present 
within 3 meters of machine.  
 
Required power supply: 400 Volt, 3 Phase + N Earth. (N. America: 208/220V 60Hz.).  

5.3


Mounting / Connecting 

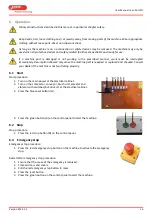
If applicable, the components supplied are to be mounted on the machine. Make sure that the moving parts are 
free. If the machine is complete, it can be connected (by a competent person) to the power supply.  
 

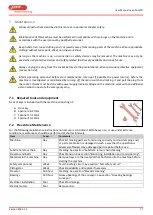
Keep  hands,  hair,  loose  clothing  and  /  or  jewellery  away  from  moving  parts  of  the  machine.  Wear 
appropriate clothing without loose parts. Wear non-slip work shoes. 

As long as  the machine is on, no connection or  safety devices may be removed. The machine may only be 
used when all protective devices and safety-related facilities are available and ready for use. 


Summary of Contents for Rotofill

Page 1: ...lland T 31 0 252 343121 F 31 0 252 377423 info javo eu www javo eu All rights reserved The information provided herein may not be reproduced and or published in any form by print photo print microfilm or any other means whatsoever electronically or mechanically without the prior written authorisation of JAVO BV ...

Page 2: ...s Use only the information that applies to your machine Depending on the intensity of use and customer requirements this machine can be equipped with various options Contact your sales consultant Supplier details if not directly supplied by Javo BV Dealer stamp Javo BV is not responsible for any errors in this manual or the consequences thereof Javo BV is not liable for damage or consequential dam...

Page 3: ...Facilities to take care of by the user 11 5 3 Mounting Connecting 11 5 4 Check rotation direction 12 5 5 Check substrate conveyor tension 12 5 6 Check elevator chain tension 12 5 7 Check substrate retour chain tension 13 5 8 Set substrate conveyor speed 13 5 9 Set compactor height 13 5 10 Set substrate slide height 14 5 11 Set brush height 14 5 12 Set speed tray conveyor and ground retour chain 14...

Page 4: ... 5 Test safety circuit 18 7 6 Greasing bearings conveyor 18 7 7 Fault list 19 7 8 Drawings and schemes 19 7 9 Spare parts 20 7 10 JavoNet 20 7 11 Customer support and advice 20 8 Disposal of machine or machine parts 20 9 EG conformity statement 21 ...

Page 5: ...ad to damage and danger to the operator and its environment This machine is CE marked When placing multiple machines in one line the entire line must be properly CE marked before using this machine Untill proper CE Marking of the line is carried out commissioning of this machine is prohibited Specifications Voltage 400Volt 50Hz 3 N PE Machine connection 16A 5pole Power consumption 2 05kW 3kW max W...

Page 6: ...suitable to be used outside Electrical components are only splashproof Keep the machine away from rain and moisture When using the machine in a humid environment is unavoidable you should use an RCD 8 Keep hands hair loose clothing and or jewelry away from moving parts of the machine Wear appropriate clothing without loose parts Wear non slip work shoes 9 As long as the machine is on no connection...

Page 7: ...lasses Wear during cleaning and maintenance work on this machine also safety gloves and protective clothing Warning Important points and or instructions regarding safety and or injury prevention are marked with this warning sign Dangerous electrical voltage Dangerous electrical voltage present Risk of crushing Danger of moving or rotating parts It is forbidden to wear Loose clothing long hair and ...

Page 8: ...view A Substrate bin B Elevator C Exit trays D Entrance trays E Brush disc unit F Substrate retour chain Moving parts of the machine are protected by hoods and doors when the machine was delivered 3 2 Outline drawing with main dimensions 460 2415 drawing is a right hand version of the machine ...

Page 9: ...ate slide in substrate stock 212 270 Stainless steel substrate retour chain 212 001481 Stainless steel with 10 pushers Options Transport conveyor 3 4 Operation The process of the machine begins at the soil bin which is filled with substrate Substrate is transported with the substrate conveyor to the elevator The elevator transports substrate to the rotor The rotor divides substrate evenly over the...

Page 10: ... a cable The control panel consists of the following buttons A Start button B Stop button At the electrical cabinet of the machine these buttons and connectors are placed A Compactor off on B Belt off on C Brush off on D Elevator off on E Vibrator off on F Stopped error G Reset reset H Main switch The machine is equipped with emergency stop buttons I Emergency stop button H I ...

Page 11: ...lifted the state of the machine should be checked Make sure the path to be traveled is free so the machine can be moved to the desired position without obstacles If the machine is to be lifted for movement outside the company please contact your dealer or contact a professional shipping company Before the machine can be moved the conveyor belt must be removed The machine must be transported uprigh...

Page 12: ...roof Keep the machine away from rain and moisture When using the machine in a humid location is unavoidable you should use an RCD 5 2 Facilities to take care of by the user Prior to delivery of the machine the required materials and facilities air power substrate etc needs to be present within 3 meters of machine Required power supply 400 Volt 3 Phase Neutral Earth N America 208 220V 60Hz 5 3 Moun...

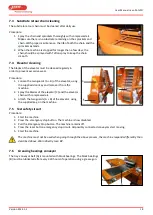
Page 13: ...eyor belt tension before you start working with the machine Procedure 1 Check the substrate conveyor belt tension The correct tension is obtained when the belt in the middle deflects 40mm 2 Adjust the belt tension if necessary a Loosen the four screws B to the block bearings b The tension can be adjusted by simultaneously turning both sides of the ground belt A c Tighten the four screws B to the b...

Page 14: ...d sufficiently before they reach the substrate slide 2 When the speed needs to be adjusted a Loosen locking bar A b Turn wheel B i CCW substrate conveyor will run slower ii Clockwise the speed of the conveyor is increased c Tighten locking bar A 5 9 Set compactor height Set the compactor height before you start working with the machine Procedure 1 Check the compactor height with respect to the tra...

Page 15: ...t working with the machine Procedure 1 Check the height of the brush with respect to the tray The slide should be placed approximately 5mm above the tray The brush is intended to evenly level the substrate in the tray 2 If the height is incorrect a Loosen clamp A b Set the desired height using crank B c Tighten clamp A 5 12 Set speed tray conveyor and ground retour chain The tray conveyor and grou...

Page 16: ...substrate deflectors at the elevator The elevator transports substrate up and pour it over the compactor The substrate that is deposited is to send over two substrate deflectors Set the substrate deflectors before you start working with the machine Procedure 1 Verify the distribution of substrate in the tray 2 If the distribution is incorrect a Loosen deflector A b Push the substrate deflector for...

Page 17: ...ired or replaced and checked Consult your dealer if the machine is not functioning properly 6 1 Start Start procedure 1 Turn on the main power at the electrical cabinet 2 Turn on the compactor conveyor brush unit elevator and vibrator with switches B C D E F at the electrical cabinet 3 Press the blue reset button G 4 Press the green button A on the control panel to start the machine 6 2 Stop Stop ...

Page 18: ...person who can operate the emergency stop 7 1 Required tools and equipment A set of keys is included with the machine consisting of A Door key B Spanner 24 27mm C Spanner 17 19mm D Spanner 10 13mm 7 2 Preventive Maintenance For the following maintenance instructions normal use is considered With heavy use or use under extreme conditions maintenance should be performed at shorter intervals Item 1x ...

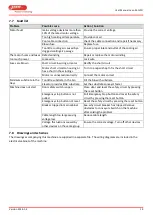
Page 19: ...he elevator using the supplied door key and remove it from the machine 2 Spray the blades of the elevator C and the elevator chain with compressed air 3 Attach the two guards A B of the elevator using the supplied key on the machine 7 5 Test safety circuit Procedure 1 Start the machine 2 Press the emergency stop button The machine is now disabled 3 Pull the Emergency Stop button The machine remain...

Page 20: ...t the motor correct Minimum substrate in the trays Too little substrate in the bin Fill the bin with substrate Elevator provides little substrate Set the substrate conveyor faster Machine does not start Door safety switch is open Close door and reset the safety circuit by pressing the reset button Emergency stop button is not pulled Pull Emergency Stop button and reset the safety circuit by pressi...

Page 21: ...ur machine on JavoNet This way you get online access to all technical drawings and documents pertaining to your machine Visit our website www javo eu for more information and to request an account 7 11 Customer support and advice Our technical department will answer your other questions about repair and maintenance of your machine and spare parts We can help you with any questions regarding the pu...

Page 22: ...of machinery Basic concepts general principles for design Part 1 Basic terminology methodology NPR ISO TR 14121 2 2010 Safety of machinery Risk assessment Part 2 Practical guidance and examples of methods NEN EN ISO 13857 Safety of machinery Safety distances to prevent hazard zones being reached by the upper and lower limbs NEN EN ISO 13849 1 Safety of machinery Parts of Control Systems with a saf...

Reviews: