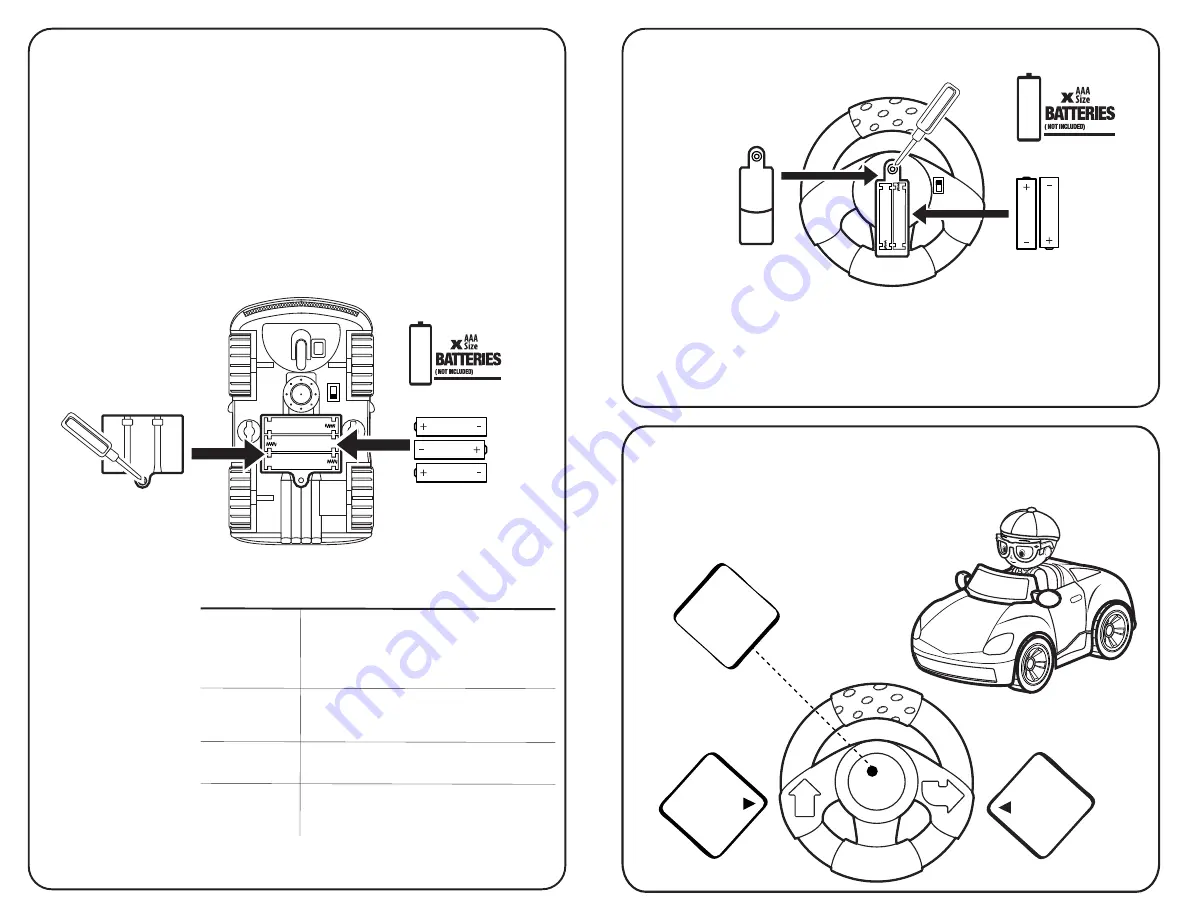
Bottom of Vehicle
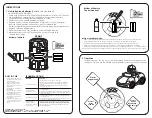
Press for
Blippi sounds!
Press to
drive
forward
Press to
reverse
and turn
RC Racecar
Bottom of Remote
Control Handset
3
(
1.5V
)
NOTES & TROUBLESHOOTING
• Remote Control Handset will function up to a distance of over 65 feet (20 meters) from the RC Racecar.
• Fresh batteries will allow the RC Racecar to function continuously for approximately 15 minutes.
• This product does not transmit well through obstacles such as buildings, metal structures and trees.
• Replace batteries if the RC Racecar does not operate as usual or signal range decreases noticeably.
• RC Racecar performs best on flat surfaces and will not work well on high pile carpet floors or very rough surfaces.
The most important is the vehicle* controller by sleep model (approx. 3min), need be re-press switch back on and try again.
INSTRUCTIONS
1. How to Replace Batteries (Batteries Not Included)
ADULT INSTALLATION REQUIRED.
• Ensure both RC Racecar and Remote Control Handset unit is in the “OFF” position.
•
Use a Phillips Head screwdriver (not included) to loosen screws in battery
compartment cover (screw remains attached to cover).
•
Remove cover and discard depleted batteries.
•
Replace with 3 x 1.5V AAA batteries (RACECAR) and 2 x 1.5V AAA batteries
(Remote Control Handset)
. Follow the (+) and (-) markings in the
battery compartment and on the batteries to ensure proper battery placement.
•
Replace cover and tighten screws.
•
Move the switch to the “ON” position to actvate the play features.
•
Move the switch to the “OFF” position when not in use to help save
battery life of the toy.
2. Operation
Switch mode from “TRY ME” on your RC Racecar and Remote Control Handset unit
settings to “ON” and use the Remote Control Handset to steer your new RC Racecar.
RANGE OF PLAY:
??
METERS/
??
FEET.
CONTROLLER FREQUENCY BAND
:
??
MHz -
??
MHz
,
MAXIMUM POWER
:
??
mW
RECEIVER FREQUENCY BAND
:
??
MHz -
??
MHz
,
MAXIMUM POWER
:
??
mW
TROUBLESHOOTING
HOW TO PAIR
1. Turn the vehicle ON, then turn
the transmitter controller ON
within 30 seconds.
*Do not press any buttons or
switches on the controller
while pairing, this may cause
interference.
2. The LED light on controller will
start blinking.
3. Once the pairing is successful,
the LED light on controller will
stop blinking and stay on.
4. If pairing is unsuccessful, turn
the vehicle and controller OFF
and try again.
5. If vehicle enters sleep mode,
turn the vehicle and controller
off, then back on and try
again.
Vehicle will not START
Vehicle does not
respond to controls
Vehicle does not move
Vehicle does not
respond properly
Transmitter controller
does not work
PROBLEM
SOLUTION
1. Power switch is off. Make sure to turn it on.
2. Batteries are installed with incorrect polarities. Check the +
and - markings to make sure the batteries are properly
aligned.
3. Batteries are drained. Charge batteries, then re-install or
install new batteries.
1. Transmitter controller battery is drained. Replace the
controller battery.
2. Vehicle is out of range. Bring controller closer to the vehicle.
3. Interference from surrounding electrical machinery. Bring to
a wide open space.
1. Stop operation, switch off the power and rest your vehicle
for a few minutes.
2. Check the position of the batteries in the vehicle, they may
have been knocked loose during play.
The vehicle is likely out of range. Bring controller closer to the
vehicle. If problem persists, remove the controller batteries and
replace with new batteries, then restart (ON/OFF) the vehicle.
If the controller light is off, its batteries are drained. Replace
the controller batteries.
FRONT
REAR
ON
OFF
ON
OFF
2
(
1.5V
)


