background image

ENGLISH  

OPERATION 

MANUAL 


JB SYSTEMS® 

5/48 

WINNER2 / ROVER 

 Before rigging make sure that the installation area can hold a minimum point load of 

10times the device’s weight. 

 Always use a certified safety cable that can hold 12times the weight of the device when 

installing the unit. This secondary safety attachment should be installed in a way that no 
part of the installation can drop more than 20cm if the main attachment fails. 

 The device should be well fixed; a free-swinging mounting is dangerous and may not be 

considered! 

 Don’t cover any ventilation openings as this may result in overheating.  

 The operator has to make sure that the safety-relating and machine-technical 

installations are approved by an expert before using them for the first time. The 
installations should be inspected every year by a skilled person to be sure that safety is 
still optimal. 


CONTROLLING THE WINNER (OR ROVER) 

1. Standalone 1unit: 

Just connect the unit to the mains and put on some music. The unit will start working 
automatically to the rhythm of the music. 


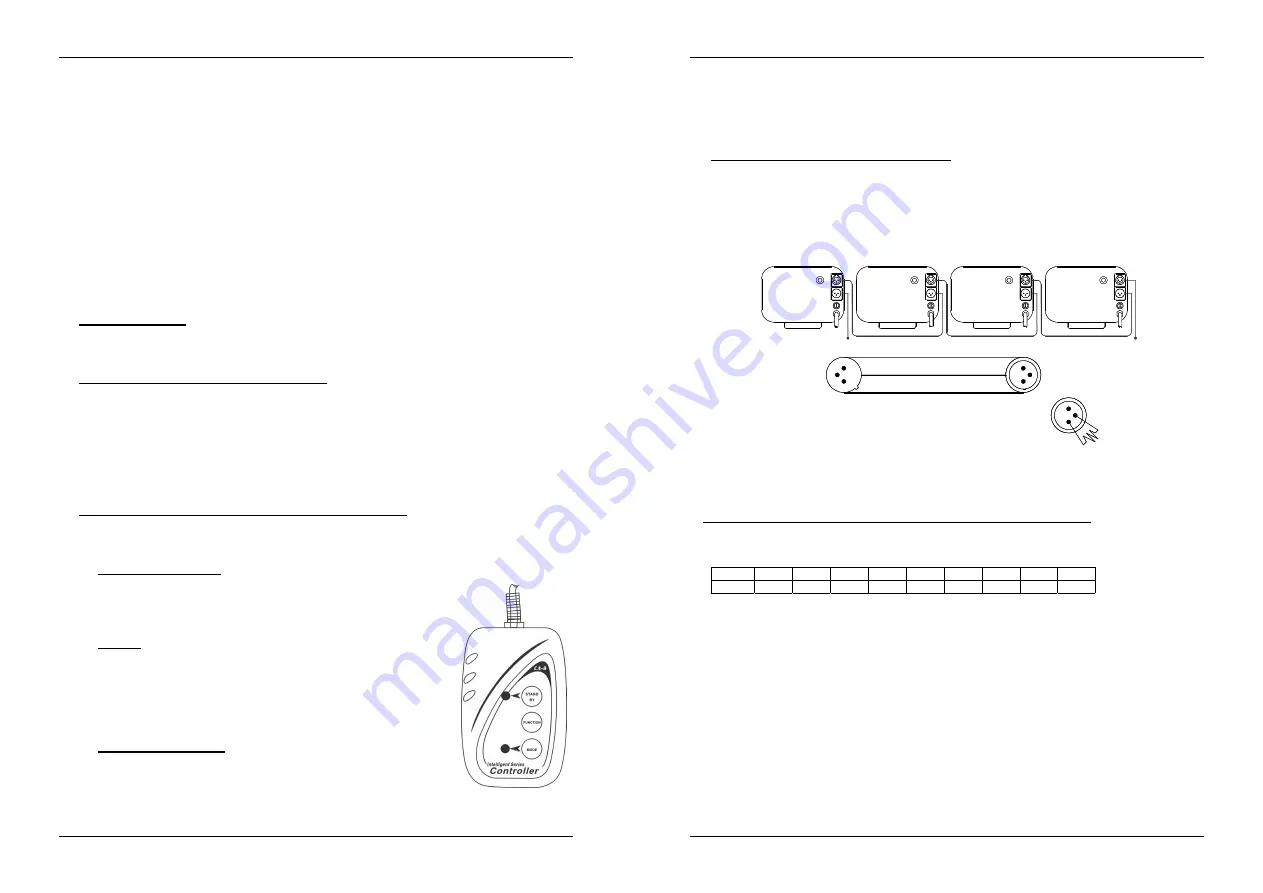
2.  Two or more units in master/slave setup: 

Connect 2 or more units together using good quality balanced XLR microphone cables 
(like for example JB Systems code 7-0063). The unit that has no cable connected to its 
input will react as master; the others are the slave units.  

You don’t have to worry about the settings of the DMX DIP-switches! 

It is only 

possible to inverse the behavior of a slave unit by changing the position of DIP-switch 
n°10. Just try it and see if the effect becomes better. Changing DIP-switch n°10 on the 
master has no effect. 


3.  Connect the optional CA-8 controller for more control: 

The CA-8 controller can only be used in standalone or master/slave mode. Connect the 
controller to the jack input of the first unit (master). Now you can control all the 
connected units: 

 STANDBY BUTTON: 

Press this button to start/stop blackout mode on all connected 
units. The led is ON when the blackout function is active. After 
about 30sec. blackout, the lamp will be switched off 
automatically to extend its lifetime.


 MODE: (fast/slow) 

When the led is off, the Winner (or Rover) is in FAST mode. 
The beam movements and gobo/color wheel are both sound 
activated. Press the button to switch the led on; now the 
Winner (or Rover) is in SLOW mode. The beam movements 
are sound activated but the gobo/color wheel is static and can 
be controlled with the FUNCTION-button. 

 FUNCTION BUTTON: (strobe/next) 

Push the FUNCTION button while the Winner (or Rover) is in 
FAST mode (MODE led is off) the units will strobe in 3 
different ways: 


Strobe with different gobos/colors 

ENGLISH  

OPERATION 

MANUAL 


JB SYSTEMS® 

6/48 

WINNER2 / ROVER 


Synchronous strobe in white color 


Two-light strobe in white color 

Every time you push the FUNCTION-button while the Winner (or Rover) is in SLOW 
mode (MODE led is on) the colors/gobos of the connected units change. 


4.  Controlled by universal DMX-controller: 

The DMX-protocol is a widely used high speed signal to control intelligent light 
equipment. You need to “daisy chain” your DMX controller and all the connected light 
effects with a good quality XLR M/F balanced cable (ex. JB Systems ref. 7-0063). To 
prevent strange behavior of the light effects, due to interferences, you must use a 90


to 120

 terminator at the end of the chain. Never use Y-splitter cables, this simply 

won’t work!  

120 ohm 1/4W

Termination reduces signal errors and to avoid signal

(Resistance 120 ohm 1/4W) between pin2 (DMX-) and 

transmission problems and interference. It is always 

3

pin3 (DMX+) of the last fixture.

advisable to connect a DMX terminal.

2

DMX -

1

COMMON

DMX +

3

1

DMX512

2

1

2

3

4

DMX INPUT

DMX OUTPUT

2

3

1


Each light effect in the chain needs to have its proper starting address so it knows 
which commands from the controller it has to decode.  


How to set the DIP-switches to obtain the right starting address: 

On the back of the Winner (or Rover) you will see that each of the first 9 DIP-switches 
corresponds to certain value: 
 

Dip  #1 #2 #3 #4 #5 #6 #7 #8 #9 
Value 

1 2 4 8 16 

32 64 

128 

256 

 
You can combine the values of these switches to become any starting address 
between 1 and 512: 
Begin address = 01 


Æ

 switch 1=ON 


values: 1 

Begin address = 05 


Æ

 switch 1+3=ON   

values: 1+4 = 5 

Begin address = 09 


Æ

 switch 1+4=ON   

values: 1+8 = 9 

Begin address = 13 


Æ

 switch 1+3+4=ON 

values: 1+4+8 = 13  

Begin address = 62 


Æ

 switch 2+3+4+5+6=ON values: 2+4+8+16+32 = 62 


Summary of Contents for Winner II

Page 1: ...tion or publication of the content in any manner without express permission of the publisher is prohibited Version 1 1 Operation Manual Mode d emploi Gebruiksaanwijzing Bedienungsanleitung Manual de i...

Page 2: ...t toestel en de gebruikte batterijen op een milieuvriendelijke manier conform de in uw land geldende voorschriften DU ENTSORGUNG DES GER TS Entsorgen Sie das Ger t und die Batterien auf umweltfreundli...

Page 3: ...ble A new light effect sometimes causes some unwanted smoke and or smell This is normal and disappears after some minutes To prevent fire or shock hazard do not expose this appliance to rain or moistu...

Page 4: ...e type of spare parts bulbs fuses etc When replacing parts please only genuine spare parts Switch off the unit and unplug the mains cable Wait for about 10 minutes until the unit has been cooled down...

Page 5: ...E fast slow When the led is off the Winner or Rover is in FAST mode The beam movements and gobo color wheel are both sound activated Press the button to switch the led on now the Winner or Rover is in...

Page 6: ...any and ventilation openings should be cleaned monthly The interior of the device should be cleaned annually using a vacuum cleaner or air jet The cleaning of internal and external optical lenses and...

Page 7: ...er l appareil s adapter la temp rature ambiante lorsqu il arrive dans une pi ce chauff e apr s le transport La condensation emp che l unit de fonctionner en performance optimale et peut m me causer de...

Page 8: ...nsibilit musicale REMPLACEMENT DES AMPOULES En cas d op ration de maintenance ou de remplacement des ampoules ne pas ouvrir l installation dans les 10 minutes suivant la fin de l utilisation jusqu ce...

Page 9: ...possible d inverser le comportement d une unit esclave en changeant la position de l interrupteur n 10 Essayez simplement et voyez si l effet s am liore Changer le DIP n 10 sur l unit master n a pas...

Page 10: ...fissure ou raflures profondes elle doit tre remplac e Les c bles doivent tre en parfaite condition et doivent tre remplac s imm diatement en cas de d tection d un probl me m me b nin Pour prot ger l a...

Page 11: ...beugel 2knoppen ELC 250W 24V lamp Handleiding VEILIGHEIDSVOORSCHRIFTEN Om het milieu te beschermen probeer zoveel mogelijk het verpakkingsmateriaal te recycleren Een nieuw lichteffect kan soms ongewen...

Page 12: ...oor het aansluiten van universele DMX kabels Deze ingang ontvangt zijn instructies van een DMX controller of van een andere Winner of Rover scanner in master slave mode 9 DMX uitgang deze 3pin vrouwel...

Page 13: ...komt zal zich automatisch als master schakelen de andere Winners of Rovers gedragen zich als slaven slaves en luisteren dus naar de master De stand van de DIP switches heeft hier absoluut geen belang...

Page 14: ...jn Wanneer een optische lens klaarblijkelijk beschadigd is door barsten of diepe krassen dan moet deze vervangen worden De stroomkabels moeten in perfecte staat zijn en behoren vervangen te worden wan...

Page 15: ...en Zur Vermeidung von Stromschlag oder Feuer Ger t bitte nicht Regen oder Feuchtigkeit aussetzen Zur Vermeidung von Kondensation im Inneren des Ger ts bitte nach Transport in eine warme Umgebung einig...

Page 16: ...s Ger ts oder technische Einzelheiten in dieser Bedienungsanleitung beachten damit stets das richtige Leuchtmittel eingesetzt wird Keine Leuchtmittel mit h herer Wattanzahl einsetzen Diese Leuchtmitte...

Page 17: ...oder Rover im LANGSAMEN Modus Die Beambewegungen werden von der Musik gesteuert aber das Gobo Farb Rad steht still und kann mit dem FUNCTION Knopf kontrolliert werden FUNCTION KNOPF strobe next Dr cke...

Page 18: ...und L ftungsschlitze monatlich gereinigt werden Ger t innen mindestens einmal pro Jahr mit Staubsauger oder Airjet reinigen Reinigung der inneren und u eren optischen Linsen und oder Spiegel m ssen i...

Page 19: ...C 250W 24V Instrucciones de manejo INSTRUCCIONES DE SEGURIDAD Af n de evitar todo riesgo de incendio o electrocuci n no exponer el aparato a la lluvia o ambiente humedo Un nuevo efecto de luz algunas...

Page 20: ...Rover en modo master slave 10 Espejo de escaneo 11 Control de sensibilidad musical para el micro interno RE COLOCACI N DE LA L MPARA En caso de sustituci n de la l mpara o mantenimiento no abra la in...

Reviews: