


ENGLISH
OPERATION MANUAL
JB SYSTEMS
®
3/6
MIX 7.1
•
To avoid condensation to be formed inside, allow the unit to adapt to the surrounding temperatures when
bringing it into a warm room after transport. Condense sometimes prevents the unit from working at full
performance.
CLEANING THE APPLIANCE:
Clean by wiping with a cloth slightly dipped with water. Avoid getting water inside the unit. Do not use volatile
liquids such as benzene or thinner which will damage the unit.
CONNECTIONS
Always use good quality cables to prevent bad audio quality.
For more information on connections, please refer to the next chapter.
Be sure to turn off the unit before you make changes to the different connections.
In this manual we talk about “line inputs”. This is a global name for inputs with a level between 750mV and
2V. This includes tuners, videos, CD-players, etc.
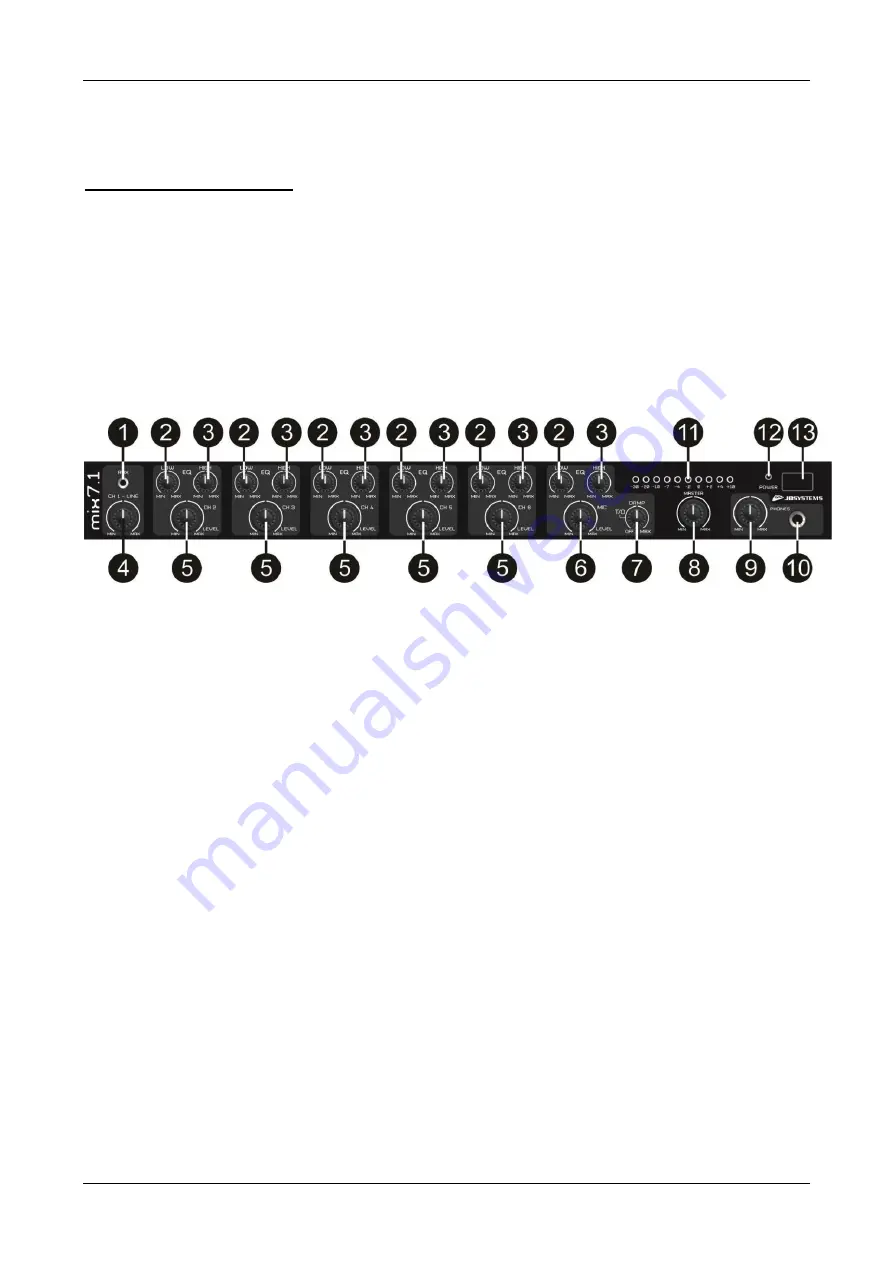
FUNCTIONS (FRONT)
1. Aux/Line input:
3.5mm stereo jack that makes it easy to connect a portable audio player to the front
panel of the unit.
Note:
This input has priority on the rear Line input CH 1. As soon as a plug is inserted into this front
LINE input, the signal of the rear input is automatically shut off.
2. LOW:
with this tone control you can adjust the low frequencies in a range of ±12dB. The centre position
= neutral.
3. HIGH:
with this tone control you can adjust the high frequencies in a range of ±12dB. The centre position
= neutral.
4. Level control for CH1:
adjusts the output level of the jack line inputs on the rear (18) or the AUX stereo
mini-jack on the front (1) .
5. Level control:
adjusts the output level of each line / microphone input. The input sensitivity can be
adjusted with the gain control on the back panel (15).
6. Microphone Level control:
adjusts the output level of the dedicated microphone channel. The input
sensitivity can be adjusted with the gain control on the back panel (20). To avoid mic feedback, please
make sure that the level control is closed before a mic is connected.
7. Talkover adjustment:
The talkover circuit make it possible to automatically damp the music while you
speak into the microphone that is connected to the dedicated microphone channel (21). There are two
controls to make sure that the talkover works as expected:
•
Talkover Damping (7) on the front:
adjusts the amount of damping once the talkover is active. If no
talkover effect is required the DAMPING control c
an be set to “off”.
•
Talkover Threshold (26) on the rear:
adjusts when the talkover should start damping the music.
The higher the setting, the faster the talkover will come in action. Adjustments shall be made with a
small screw driver. Do not apply excessive force with the screw driver.
8. Master output level control:
controls the general output level of [Master Out] connectors (28). The
control range can be adjusted using the
“max level” control on the back panel (27).
9. PHONES Volume:
Sets the signal volume of the headphone output (10).
Important: Always set this control to minimum before putting on headphones, as sudden high-volume
impact may damage your ears.
10. Headphones output:
a ¼” Jack connector to connect headphones. Turn the Phones volume (9) down
before plugging in any headphones.


