background image

5

APPLICATIONS – PX300.4

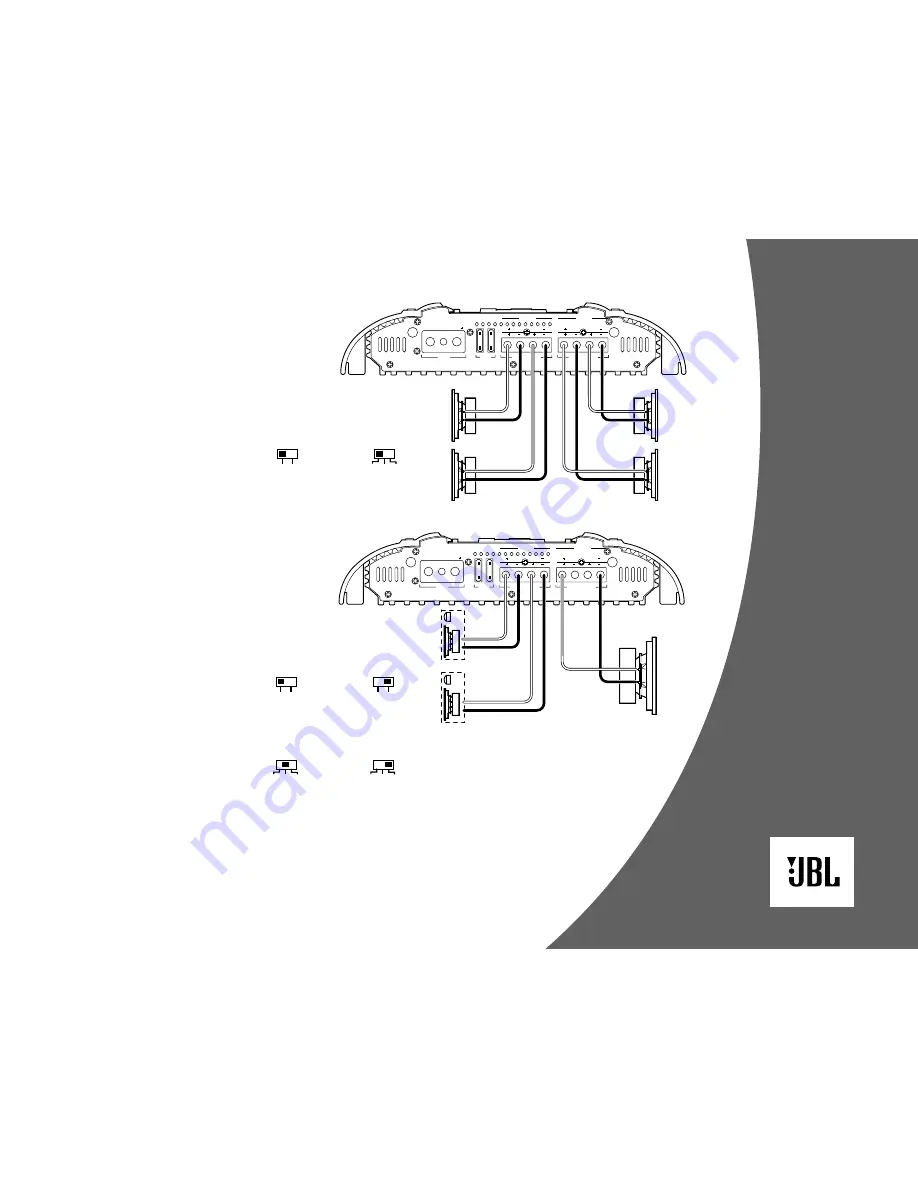
The JBL Px300.4 amplifier can be set up
for stereo or tri-mode operation, as
shown in 

Figures 6 and 7

NOTE: For simplicity, Figures 6 and 7 do 
not show power, remote and input 
connections.

Px300.4

(rear panel)

POWER

FUSES

GND

REM

BATT 

Px300.4

SPEAKER OUTPUTS

SPEAKER OUTPUTS

STEREO

REAR

FRONT

L

R

L

R

BRIDGED

NEON

NEON

-

+

+

-

LF
System

+

-

RF
System

Subwoofer

Set REAR

X-OVER MODE to LP

(on input panel)

FLAT HP

LP

MODE

Set FRONT

X-OVER MODE to HP

(on input panel)

FLAT HP

LP

MODE

Set FRONT

INPUT MODE to ST

(on input panel)

Set REAR 

INPUT MODE to MO

(on input panel)

ST

INPUT
MODE

MO

ST

INPUT
MODE

MO

See “Setting the Crossover(s)”

on page 6 to set FREQ and SLOPE

Px300.4

(rear panel)

POWER

FUSES

GND

REM

BATT 

Px300.4

SPEAKER OUTPUTS

SPEAKER OUTPUTS

STEREO

REAR

FRONT

L

R

L

R

BRIDGED

NEON

NEON

+

-

+

-

LR Speaker

RR Speaker

RF Speaker

LF Speaker

+

-

+

-

Set REAR and FRONT

INPUT MODE to ST

(on input panel)

Set REAR and FRONT

X-OVER MODE to FLAT    

(on input panel)

FLAT HP

LP

MODE

ST

INPUT
MODE

MO

Figure 6.

The JBL Px300.4

amplifier is set to stereo mode
to drive front and rear pairs of
full-range speakers.

NOTE: To limit bass sent to 
full-range speakers, set 
X-OVER MODE to HP. See 
page 6 to set FREQ and SLOPE.

Figure 7.

The JBL Px300.4 

amplifier is set to drive a stereo
component system and a 
subwoofer with a nominal
impedance of 4 ohms or greater.

NOTE: To drive a pair of rear
midbass speakers (instead of
subwoofer), set INPUT MODE 
to ST, X-OVER MODE to LP, 
and use DBO to set HP filter. 

Summary of Contents for BPx1100.1

Page 1: ...NK YOU for purchasing a JBL Power Series amplifier In order that we may better serve you should you require warranty service for your new amplifier please retain your original purchase receipt and ret...

Page 2: ...fier outside the car or in the engine compartment Using the amplifier as a template mark the location of the mounting holes on the mounting surface drill pilot holes and attach the amplifier to the mo...

Page 3: ...RALLEL CONNECTION 2 CHANNEL BRIDGED PARALLEL CH 1 CH 2 SPEAKER OUTPUTS NEON Subwoofer less than 2 ohms Set OUTPUT MODE to PARALLEL on input panel PARALLEL 2CH BR OUTPUT MODE See Setting the Crossover...

Page 4: ...FREQ See Setting the Crossover s on page 6 to set FREQ and SLOPE For Stereo or Mono signals use both L R inputs Px600 2 rear panel POWER FUSES GND REM BATT SPEAKER OUTPUTS BRIDGED STEREO Px600 2 L R N...

Page 5: ...on page 6 to set FREQ and SLOPE Px300 4 rear panel POWER FUSES GND REM BATT Px300 4 SPEAKER OUTPUTS SPEAKER OUTPUTS STEREO REAR FRONT L R L R BRIDGED NEON NEON LR Speaker RR Speaker RF Speaker LF Spea...

Page 6: ...highest frequency that will remove vocal information from the sound of the subwoofer SETTING DBO ALL MODELS EXCEPT PX600 2 Dynamic Bass Optimizer DBO is a new approach to enhancing low frequency repr...

Page 7: ...d in their owner s manual POWER FUSES GND REM BATT SPEAKER OUTPUTS BRIDGED STEREO Px600 2 L R NEON NEON PROTECT POWER I E OPT Installing A Clip On Extrusion Lip side view Clip Neon Tube Neon Tube and...

Page 8: ...x 1 external fuse Replacement Dimensions H x W x L 312mm x 432mm x 66mm 312mm x 432mm x 66mm 312mm x 330mm x 66mm 312mm x 432mm x 66mm 312mm x 555mm x 66mm SPECIFICATIONS Declaration of Conformity We...

Reviews: