background image

4

SPEAKER PLACEMENT

SUBWOOFER

SURROUND SPEAKERS

   5 – 6 ft

    1.5 – 1.8m

FRONT 
SPEAKERS

(0-2 ft)

0-0.6m

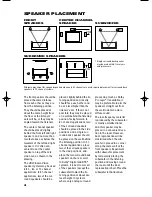
The front speakers should be
placed the same distance
from each other as they are
from the listening position.
They should be placed at
about the same height from
the floor as the listeners’
ears will be, or they may be
angled toward the listeners.

The center channel speaker
should be placed slightly
behind the front left and right
speakers, and no more than
two feet above or below the
tweeters of the left and right
speakers. It is often con-
venient to set the center
speaker on top of the tele-
vision set, as shown in the
drawing. 

The JBL Cinema Vision
speaker system may be used
in 5.1-, 6.1- or 7.1-channel
applications. In 5.1-channel
applications, two of the sur-
round speakers should be

placed slightly behind the lis-
tening position and, ideally,
should face each other and
be at a level higher than the
listeners’ ears. If that is not
possible, they may be placed
on a wall behind the listening
position, facing forward. In
6.1-channel applications, two
of the surround speakers
should be placed in the side
positions, and a single sur-
round back speaker should
be placed on the wall behind
the listening position. In 7.1-
channel applications, place
two of the surround speakers
in the side positions, and
place the two surround back
speakers on the rear wall.

In Dolby* Digital and DTS

®

systems, it is best to aim all
of the speakers (except the
subwoofer) toward the lis-
tening position at about ear-
level height. In systems
where only analog surround

processing (such as Dolby
Pro Logic*) is available, it
may be preferable to aim the
speakers straight out from
the wall to obtain a more 
diffuse sound.

The low-frequency material
reproduced by the subwoofer
is mostly omnidirectional,
and this speaker may be
placed in a convenient loca-
tion in the room. However,
bass reproduction will be
maximized when the sub-
woofer is placed in a corner
along the same wall as the
front speakers. Experiment
with subwoofer placement
by temporarily placing the
subwoofer in the listening
position and moving around
the room until the bass
reproduction is best. Place the
subwoofer in that location.

CENTER CHANNEL
SPEAKER

Single surround back speaker  
may be used with 6.1 receivers
and processors. 

Alternate placement for surround speakers when only 5.1 channels are used; required placement for surround back
speakers in 7.1-channel systems.

CV OM  6/15/04  4:06 PM  Page 4

Summary of Contents for CINEMA VISION CVCEN50

Page 1: ...CVSAT50 CVCEN50 CVSUB50 CINEMA VISION OWNER S GUIDE ...

Page 2: ... electrodes and require ments for the grounding electrode See Figure A 18 An outside antenna system should not be located in the vicinity of overhead power lines or other electric light or power circuits or where it can fall into such power lines or circuits When installing an outside antenna system extreme care should be taken to keep from touching such power lines or circuits as contact with the...

Page 3: ...with mounting brackets wall mount bracket attachment plates floor stand adaptors floor stand covers and speaker cable Each CVSAT50 speaker comes with a mounting bracket and metal clip preinstalled These parts are essential for mounting the speaker on the wall on an optional floor stand or on an optional CVTS50 table stand and therefore should never be removed from the speaker One CVCEN50 loudspeak...

Page 4: ...itions and a single sur round back speaker should be placed on the wall behind the listening position In 7 1 channel applications place two of the surround speakers in the side positions and place the two surround back speakers on the rear wall In Dolby Digital and DTS systems it is best to aim all of the speakers except the subwoofer toward the lis tening position at about ear level height In sys...

Page 5: ...in the bottom of the col umn Screw in the bolts mak ing sure the plastic washers are between the bottom of the glass base and the bolt heads Tighten the bolts securely using a Philips screwdriver not supplied Do not overtighten as this might strip the threads which is not covered by the warranty Prepare the speaker wire as described on page 8 Remove the rubber strip from the back of the column rev...

Page 6: ...stand adaptor to the stand by screwing the bolt through the hole in the bottom tab of the adaptor and into the threaded insert at the top of the stand Orient the adaptor so that the upright portion faces toward the listening position Prepare the speaker wire as described on page 8 and thread it through the floor stand s wire management system if any as instructed in the owner s guide for the stand...

Page 7: ...the binding post until the pass through hole under neath it is revealed Insert the bare end of the positive wire through the hole then screw the collar down until it is tight Follow the same procedure to connect the negative wire to its terminal Carefully lower the speaker onto the bracket so that the mounting bracket on the satellite slides over the wall attachment plate until the metal spring cl...

Page 8: ...speaker to on the amplifier Wiring out of phase results in thin sound weak bass and a poor stereo image With the advent of multi channel surround sound systems connecting all of the speakers in your system with the correct polarity remains equally important in order to preserve the proper ambience and directionality of the program material To use the binding post speaker terminals unscrew the colo...

Page 9: ...ncy effects channel Connect this jack to the LFE subwoofer output on your receiver or processor Connect each speaker to the corresponding speaker terminals on your receiver or amplifier Make sure that you have configured your surround sound processor for Sub woofer On Also configure your receiver for 5 1 6 1 or 7 1 channel operation as appropriate The front left front right center and rear speaker...

Page 10: ...ç Volume may be adjusted using the Subwoofer Level control as shown The Phase Control deter mines whether the sub woofer s piston like action moves in and out in phase with the main speakers or opposite the main speakers There is no correct or incor rect setting Proper phase adjustment depends on sev eral variables such as sub woofer placement and lis tener position Adjust the Phase Switch ç to ma...

Page 11: ...es make sure the receiver processor is configured so that the center speaker is enabled If the system plays at low volumes but shuts off as volume is increased Check all wires and con nections between receiver amplifier and speakers Make sure all wires are con nected Make sure none of the speaker wires are frayed cut or punctured or touching each other If more than one pair of main speakers is bei...

Page 12: ...source Low Frequency Driver 12 300mm Transducer with PolyPlas cone HeatScape motor structure video shielded Input LFE preamp level Dimensions H x W x D including feet 18 3 4 x 12 x 18 1 4 476mm x 305mm x 464mm Weight 49 lb 22 3kg SPECIFICATIONS All features and specifications are subject to change without notice Trademarks of Dolby Laboratories DTS is a registered trademark of Digital Theater Syst...

Reviews: