background image

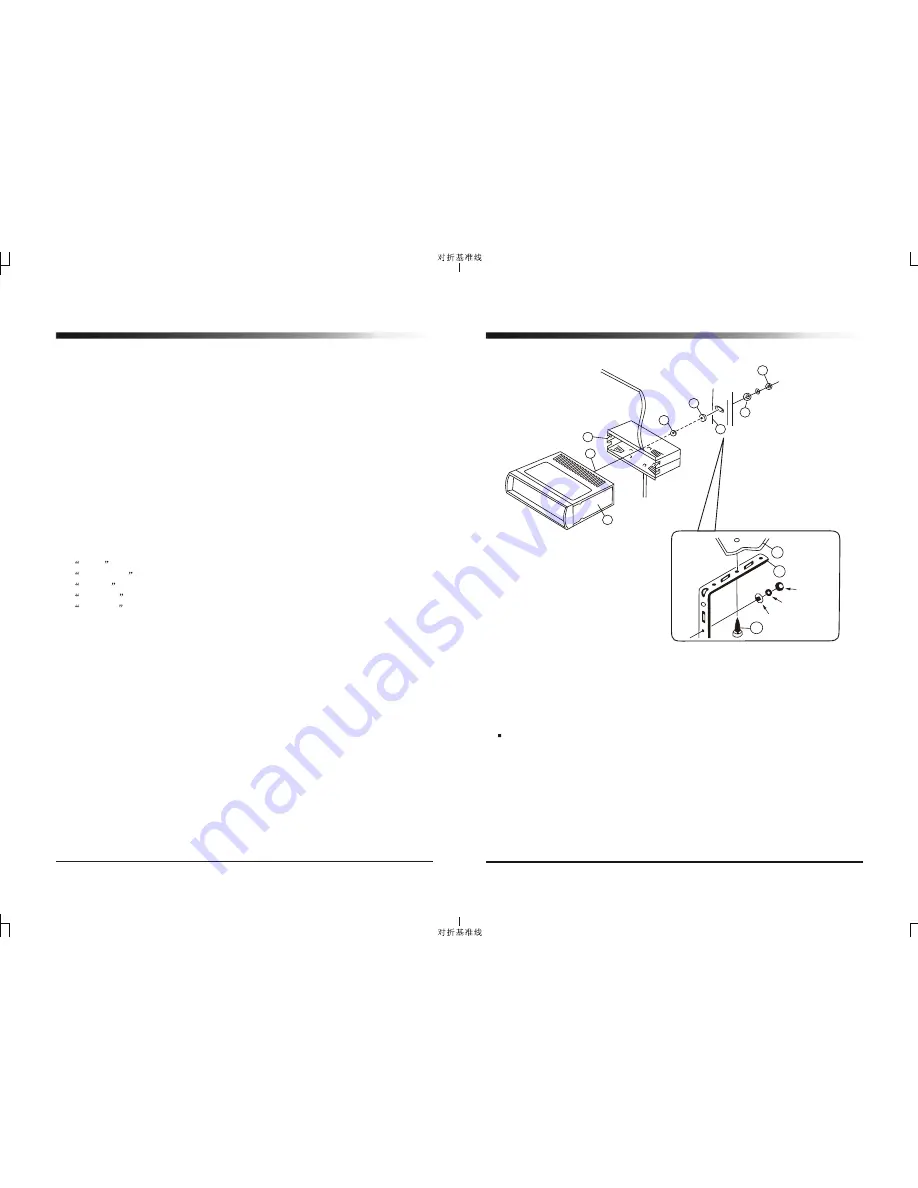
 1. UNIT
 2. HALF SLEEVE
 3. HEX NUT
 4. LOCK WASHER                                     
 5. PLAIN WASHER 
 6. BODY
 7. REAR SUPPORT STRAP
 8. TAPPING SCREW 
 9. M5 X 20 HEX BOLT

3

5

2

1

4

6

8

HEX

Lock Washer

Plain Washer

7

   Accessories subject to change without notice.  

1.  Fuse replacement

If the fuse blows, check the power connection and replace the fuse. If the fuse blows 
again after the replacement, there may be an internal malfunction. In this case, 
consult your nearest dealer.   

2. Warning

Use the specified amperage fuse for each lead. 
Use of a higher amperage fuse may cause serious damage.

Supporting the unit

3

9

7

5

b. I-Vol

By pressing the button again, the unit will be into the I- VOL mode. (Initial Volume 
Level Adjustment). You can adjust the I-Vol of what you want to set by turning the 
spindle knob and the I-Vol will be set automatically. After the setting of initial levels, 
when the unit is power on/off, detach on/off, and ACC on/off, if the present level is 
lower than Initial level, it will keep the present level. And if the present level is higher
than initial level, it will be automatically adjusted to the preset level.

c. Area Selection


By pressing SEL button again, the unit will be in Area Selection mode. Use the spindle 
knob to choose USA or EUR (Europe). Press and hold the BAND button for 1-2
seconds to set the format.

d. DSP

By pressing SEL button again, the unit will be in DSP mode. The (DSP=IEQ) feature 
creates a realistic atmosphere for the style of music you select using the latest digital 
sound technology. You can  select the following features with the spindle knob :

-

FLAT

display - normal operation mode 

-

CLASSICS

display - for the dramatic depth of classical music in an auditorium

-

POP M

display - for the electric excitement of stadium pop

-

ROCK M

display - for the subtle extension of the music's dimensions 

-

IEQ OFF

display - cancel the sound feature

3.Volume control 

Turn the spindle knob (2) left or right to decrease or increase the volume level. 
Switching on your radio automatically allows you to set the volume level without 
having to select it first. Simply turn the spindle knob to set the desired level.

Bass control


Turn left to lower the bass.
Turn right to increase the bass. 

Treble control

Turn left to lower the treble. 
Turn right to increase the treble. 
-


Balance control

Turn left to decrease the right speaker volume.
Turn right to increase the left speaker volume.

Fader control

Turn left to decrease the volume level of any loud speakers connected to the front channel.
Turn right to decrease the volume level of any loud speakers connected to the rear channel.

4."MODE" Button(4)

Press this button to select radio, CD, SIRIUS and AUX. 

8

Controls

Summary of Contents for MR-160

Page 1: ...anty repairs It can not be serviced under warranty by other JBL service centers All products sold and serviced exclusively by Prospec Electronics Inc For service contact us 3325 South Morgans Point Road Mount Pleasant SC 29466 Tel 843 849 9037 Fax 843 849 9054 SH SR PWR 0 LD 9 A PS BD FN MOD 8 DIS HI POWER 4x45 Watts COMPACT DISC PLAYER 1 us p h L S O E V L 3RPT 4RDM 5 6 2 INT 7SCN MR 160 TUN ...

Page 2: ...t channels For more information on SIRIUS visit siriusradio com 12 Trouble shooting guide INTERFERENCE ON RADIO Poor atmospheric conditions Try again later in the day Antenna lead broken or damaged Power Output 4 x 45 watts Power Supply DC 12V Negative Ground Speaker Impedance 4 ohm Tuning Range 530 1710KHz USA 522 1620KHz EUR Sensitivity 35dB uV Tuning Range 87 5 107 9MHz USA 87 5 108MHz EUR Sens...

Page 3: ...ar Left 10A Red White Black White ANT socket A Red Gray Rear Line out Front Line out B C D E Remote control SIRIUS control AUX IN 11 1 Select the RADIO CD SIRIUS AUX by pressing the MODE button 4 in sequence 2 Track tuning 6 Search the track on the DISC with buttons If you press or button continuously the track will fast forward or fast rewind 3 Play pause 7 Push to pause and push again to resume ...

Page 4: ... 0 LD 9 A PS BD FN MOD 8 DIS HI POWER 4x45 Watts COMPACT DISC PLAYER 1 us p h L S O E V L 3RPT 4RDM 5 6 2 INT 7SCN MR 160 TUN 17 Important notes 3 Prior to the final installation carry out a sound check If high distortion or intermittent sound is experienced it is possible that the wiring from the CD receiver to the boat s electrical system is poor or that the battery needs recharging If the batte...

Page 5: ... FN button 5 will shift FM AM bands FM1 FM2 FM3 AM1 AM2 In SIRIUS mode press the BD FN button 5 to select the SSR1 SSR2 or CATEGORY 6 DIS button 14 1 After your unit has been installed in the boat turn power on the radio frequency will appear on the display 2 Press DIS button once to display time mode Press DIS button once again within 5 seconds and hold until the displayed time begins to blink 3 ...

Page 6: ...UR Europe Press and hold the BAND button for 1 2 seconds to set the format d DSP By pressing SEL button again the unit will be in DSP mode The DSP IEQ feature creates a realistic atmosphere for the style of music you select using the latest digital sound technology You can select the following features with the spindle knob FLAT display normal operation mode CLASSICS display for the dramatic depth...

Page 7: ... 1 5 secs VOLUME Select BASS Select TREBLE Select FADER Select BALANCE Select Controls Beep 2nd I Vol Area Press Press DSP Press 3 2 6 13 5 7 9 10 11 12 16 1 4 14 8 15 SH SR PWR 0 LD 9 A PS BD FN MOD 8 DIS HI POWER 4x45 Watts COMPACT DISC PLAYER 1 us p h L S O E V L 3RPT 4RDM 5 6 2 INT 7SCN MR 160 TUN 17 1 POWER ON OFF button 2 Electronic function SELECT button Volume control knob 3 CD eject butto...

Reviews: