ENGLISH
OPERATION MANUAL
JB SYSTEMS
®
3/52
MPT200
INSTALLATION GUIDELINES:
Placing and using the unit for long periods near heat-generating sources such as amplifiers, spotlights,
etc. will affect its performance and may even damage the unit.
Take care to minimize shocks and vibrations during transport.
When installed in a booth or flight case, please make sure to have good ventilation to improve heat
evacuation of the unit.
To avoid condensation to be formed inside, allow the unit to adapt to the surrounding temperatures when
bringing it into a warm room after transport. Condense sometimes prevents the unit from working at full
performance.
Choose the place where you put your installation very carefully. Avoid presence of heat sources. Avoid
places with vibrations or places that are dusty and humid.
The player will work normally when installed on a surface with max. 15° inclination.
Be very careful while handling CDs, do not touch them with wet or dirty hands.
Discs that are dirty must be cleaned with special designed cloth and cleaning products.
Do not use CDs that are badly damaged (scratched or deformed) they can damage your appliance.
To prevent fire or shock hazard, do not expose this appliance to rain or moisture.
In order to prevent electric shock, do not open the top cover. If a problem occurs, contact your dealer.
Do not place metal objects or spill liquid inside the CD player. Electric shock or malfunction may result.
This CD player uses the semiconductor laser. To allow you to enjoy music at a stable operation, it is
recommended to use this in a room of 5°C – 35°C.
The compact disc player should not be adjusted or repaired by anyone except properly qualified service
personnel.
This unit may cause interference to radio and television reception.
CLEANING THE CD-PLAYER:
Clean by wiping with a polished cloth slightly dipped with water. Avoid getting water inside the unit. Do not
use volatile liquids such as benzene or thinner which will damage the unit.
CONNECTIONS
Connect the mini-DIN9 cable between the control unit and the main unit (CD loader)
Use the supplied cinch cables to connect the audio outputs of the CD player with the CD or line inputs on
your mixing unit.
Connect the mains cable.
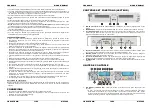
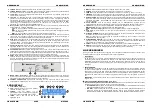
CONTROLS AND FUNCTIONS (MAIN UNIT)
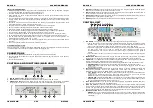
1. POWER ON/OFF switch:
switches the CD-player on and off.
2. DISC TRAY
: Use the OPEN/CLOSE buttons to open disc tray and put the CD in place.
3. OPEN/CLOSE button
: press this button to open and close the disc tray. These buttons are disabled
during playback. If the tray is not closed after 60sec. It will close automatically to prevent damage.
ENGLISH
OPERATION MANUAL
JB SYSTEMS
®
4/52
MPT200
4. CONTROL connector:
connect this connector to the control unit, using the supplied mini-DIN9 cables.
Make sure to not interchange the cables from decks 1 and 2!
5. AUDIO outputs:
Output for the audio signals from the CD-player. Use the supplied cinch/cinch cable to
connect this output to a CD/line input of your mixing unit.
6. DIGITAL OUT socket:
Use this connector to connect the digital signal (S/PDIF format) to the input of a
digital amplifier or digital recorder (ex. Mini disc)
7. MAINS input:
connect the CD player to the 230V AC mains, using the supplied power-cord.
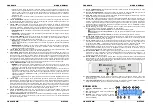
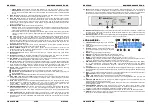
CONTROL UNIT
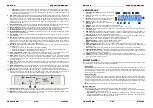
1. JOG WHEEL:
This jog wheel serves 3 functions depending on the mode you are working in.
The jog wheel acts as a slow frame search (1/75sec) control when the CD is not playing but either
paused or set to a cue point. To set a new cue point, spin the wheel then press PLAY or LOOP IN
when you have determined the proper position. Press CUE to return to the “CUE POINT”.
If the track is playing and the fast search function (4) is not active, the jog wheel temporarily bends
the pitch of the music up to +/-32% by rotating the wheel clockwise to speed it up or
counterclockwise to slow it down. The amount of pitch change is determined by the speed of
rotation.
If the fast search function (4) is active, you will be able to search at a higher speed through the
current track.
2. OPEN/CLOSE button
: press this button to open and close the disc tray. These buttons are disabled
during playback. If the tray is not closed after 60sec. It will close automatically to prevent damage.
3. TIME Button:
The TIME button switches between elapsed playing time, remaining time in a selection
and total remaining time of the disc. (standard = remaining /track)
If the button is pressed for more than 1second, the player toggles between single and continuous play:
Continuous play:
the complete CD will be played without interruption. (mostly used in pubs)
Single track:
player stops at the end of each track and waits at the beginning of the next track.
(mostly used by deejays)
4. FAST SEARCH button:
press this button to toggle the function of the JOG WHEEL(1) between fast
search mode (“SEARCH” shown in the display) and normal mode. The fast search function is
automatically turned off when the JOG WHEEL is not used for more than 10seconds.
PLAY MODE:
normally the JOG WHEEL is used as pitch bend tool to synchronize the beats of the
playing track to another track. When the fast search mode is turned on, you can use the JOG
WHEEL to search very quickly forward/backward inside the current track.
PAUSE MODE:
normally the JOG WHEEL is used to search very precisely (1frame precision) for the
exact cue point. When the fast search mode is turned on, you can use the JOG WHEEL to search
very quickly forward/backward inside the current track.
5. LOOP IN button:
Allows you to set the cue point without stopping the playback (CUE ON THE FLY).
This button also sets the beginning of a seamless loop.
6. LOOP OUT button:
Used to set the endpoint when looping music. The player starts to loop seamlessly
until you press this button again to exit. When a loop is programmed but not active you can also restart
the loop. The point where you press the button will be memorized as the new end point of the loop. In
loop edit mode pressing the OUT button stops the loop editing and saves the new loop endpoint.
7. RELOOP/STUTTER button:
This button has 2 functions:
RELOOP:
When a loop was programmed and you have hit the OUT button, press the reloop button
to enter the loop again. To exit the loop press the OUT button. (intro and end points of the loop are
unchanged)


