June, 2014
Part No. 960-100932R_Rev. A
© 2014, JCM American, Corporation
Part No. 960-100932R_Rev. A
© 2014, JCM American, Corporation
8
9
CLEANING THE VALIDATOR HEAD (6 MONTHS/72,000 CYCLES)
1. Perform the Monthly Validator Head Cleaning Procedures (refer to Page 4).
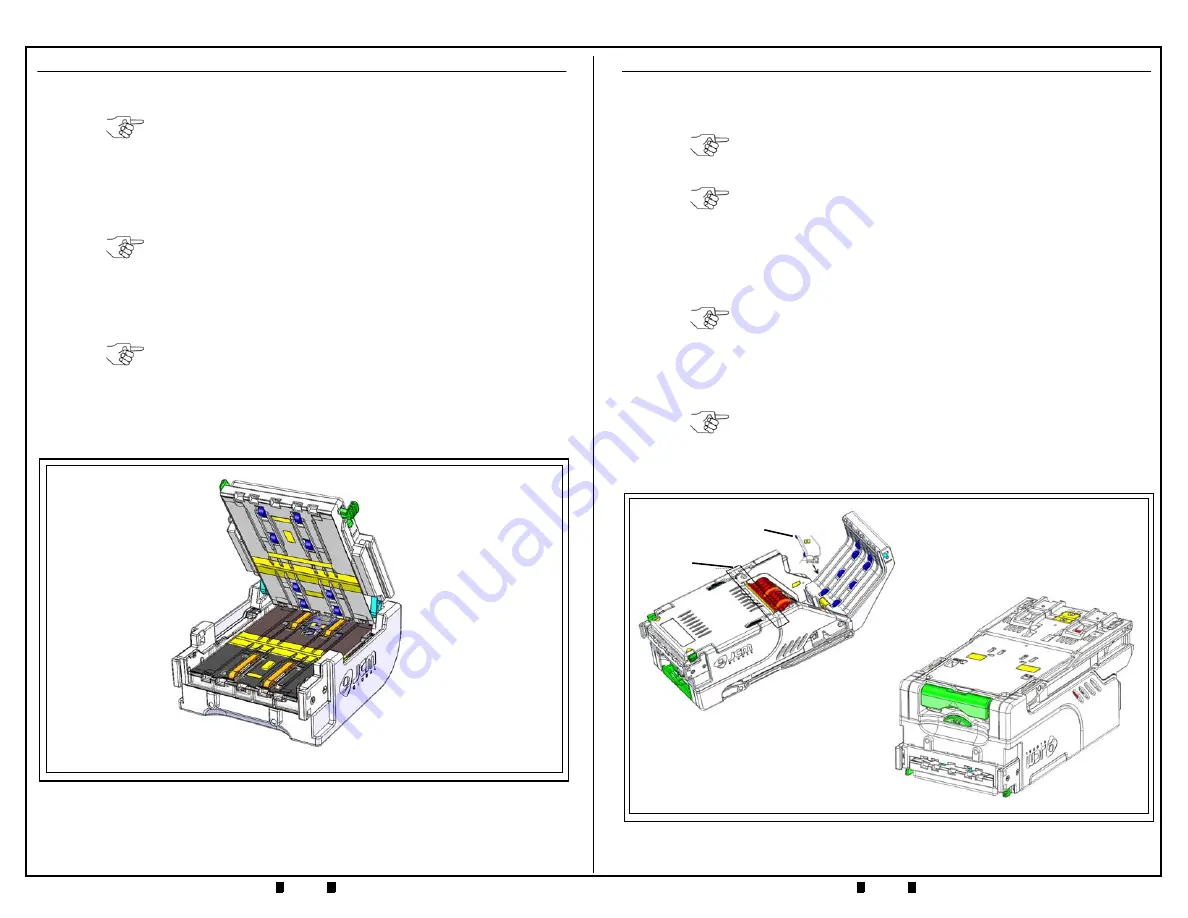
2. Inspect the Drive Belts in the Validator Head (refer to
Figure
5
, orange areas).
2. Inspect the Imaging and Optical Sensor Lenses on the Validator Head (refer to
Figure
5
, yellow areas) for scratches, chips, cracks or discoloration.
3. Using canned, compressed air or a clean, moisture-free source of low pressure
(LP) air, blow out any dust, debris, or paper fibers from the Validator Head.
4. Clean the Rollers in the Validator Head using a Technician’s Cleaning Brush
(JCM P/N 501-000097R) to remove the dirt and any build-up.
5. Clean the Drive Belts in the Validator Head using a clean cloth dampened with
cleaning solution. The Drive Belts in the iVIZION Validator Head can easily be
moved by hand, to allow cleaning of the entire belt.
NOTE: If the Drive Belts are heavily frayed, worn out, or damaged, the belts
should be replaced.
Minor fraying along the left and right edges of the drive belts may
result in “Belt Strings” extending out from the sides of the belts. These
strings can be snipped away with a small pair of scissors. Drive belts
do not need to be replaced if only minor fraying is evident.
NOTE: If a lens has any of these conditions, the lens should be replaced.
NOTE: Use a wood or plastic wand to apply pressure to the side of a Roller, to
keep it from turning during cleaning.
Be careful not to scratch the Rollers! Scratched Rollers will collect dirt
faster, and may require more frequent cleaning.
Figure 5
iVIZION Validator Head
CLEANING THE TRANSPORT (6 MONTHS/72,000 CYCLES)
1. Perform the Monthly Transport Cleaning Procedures (refer to Page 5).
2. Inspect the Optical Sensor Lenses on the Transport Unit (refer to
Figure
6
, yellow
areas) for scratches, chips, cracks or discoloration.
3. Inspect the Drive Belts in the Transport Unit (refer to
Figure
6
, orange areas).
4. Using canned, compressed air or a clean, moisture-free source of low pressure
(LP) air, blow out any dust, debris, or paper fibers from the Transport Unit.
5. Use a clean, lint-free Micro-Fiber cloth (dampened with cleaning solution) to
wipe off the Rollers in the Transport Unit (refer to
Figure
6
, blue areas).
6. Use a clean, lint-free Micro-Fiber cloth (dampened with cleaning solution) to
wipe off the Belts in the Transport Unit (refer to
Figure
6
, orange areas).
.
NOTE: If a lens has any of these conditions, the lens should be replaced.
NOTE: If the Drive Belts are heavily frayed, worn out, or damaged, the belts
should be replaced.
Minor fraying along the left and right edges of the drive belts may
result in “Belt Strings” extending out from the sides of the belts. These
strings can be snipped away with a small pair of scissors. Drive belts
do not need to be replaced if only minor fraying is evident.
NOTE: Be sure to blow out the Anti-Stringing Mechanism and the grooved
channel in front of it (refer to
Figure
6
).
NOTE: If necessary, use a Technician’s Cleaning Brush (JCM P/N 501-
000097R) to remove residue build-up from the Belts in the Transport
Unit. The Drive Belts can easily be moved by hand, in order to clean
the entire belt.
Figure 6
iVIZION Head and Transport Unit/Inverted Unit
Feed-In
Sensor
Stacker
Sensor Lens


