background image


Use safety glasses. Use face or dust mask if cutting operations create dust. 

10. Connect dust extraction equipment 

If devices are provided for the connection of dust extraction and collecting equipment, ensure 
these are connected and properly used. 

11. Do not abuse the cord 

Never  yank  the  cord  to  disconnect  it  from  the  socket.  Keep  the  cord  away  from  heat  oil  and 
sharp edges. 

12. Secure work 

Where possible use clamps or a vice to hold the work, it is safer than using your hand. 

13. Do not overreach 

Keep proper footing and balance at all times. 

14. Maintain tools with care 

Keep tools sharp and clean for better and safer performance. 
Follow instructions for lubricating and changing accessories. 
Inspect tool cords periodically and if damaged have them repaired by an 
authorized service facility. 

15. Disconnect tools 

When  not  in  use,  before  servicing  and  when  changing  accessories  such  as  blades,  bits  and 
cutters, disconnect tools from the power supply. 

16. Remove adjusting keys and wrenches. 

Form  habit  of  checking  to  see  that  keys  and  adjusting  wrenches  are  removed  from  the  tool 
before turning it on. 

17. Avoid unintentional starting 

Ensure switch is in "off" position when plugging in. 

18. Use outdoor extension leads   

When  the  tool  is  used  outdoors,  use  only  extension  cords  intended  for  outdoor  use  and  so 
marked. 

19. Stay Alert 

Watch  what  you  are  doing,  using  common  sense  and  do  not  operate  the  tool  when  you  are 
tired. 

20. Check damaged parts 

Before  further  use  of  tool,  it  should  be  carefully  checked  to  determine  that  it  will  operate 
properly and perform its intended function. 
Check for alignment of moving parts, binding of moving parts, breakage of parts, and any other 
conditions that may affect its operation. 
A guard or other part that is damaged should be properly repaired or replaced by an authorized 
service center . 
Have defective switches replaced by an authorized service center. 
Do not use the tool if the switch does not turn it on and off. 

21. Warning! 

The  use  of  any  accessory  or  attachment  other  than  that  recommended  in  this  instruction 
manual may present a risk of personal injury. 

22. Have your tool repaired by a qualified person 

Repairs should  only be carried out by a qualified person using original spare parts, otherwise 
may result in considerable danger to the user. 
 

Summary of Contents for MC1100B

Page 1: ...ODEL MC1100B VARIABLE SPEED WOOD LATHE INSTRUCTION MANUAL Please read and fully understand the instructions in this manual before operation Keep this manual safe for future reference Version 2015 02 0...

Page 2: ...nt Do not expose tools to rain Do not use tools in damp or wet locations Keep work area well lit Do not use tools in the presence of flammable liquids or gases 3 Guard against electric shock Avoid bod...

Page 3: ...g wrenches are removed from the tool before turning it on 17 Avoid unintentional starting Ensure switch is in off position when plugging in 18 Use outdoor extension leads When the tool is used outdoor...

Page 4: ...Do not operate the lathe if it is rotating in the wrong direction The workpiece must always be rotating toward you 12 Before attaching a workpiece to the faceplate always rough it out to make it as r...

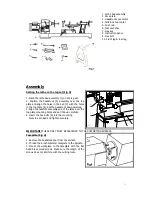
Page 5: ...1 1 Carefully remove the leg set and wood lathe from the carton CAUTION THE WOOD LATHE IS VERY HEAVY AND MUST BE LIFTED WITH THE HELP OF 2 PEOPLE OR MORE THE ASSEMBLY PROCESS REQUIRES 2 PEOPLE OR MOR...

Page 6: ...the top plate 4 Set the headstock down carefully 3 Align the tailstock assembly end of the lathe over the top plate mounting holes and set it down carefully 4 Insert the hex bolts 5 into the mounting...

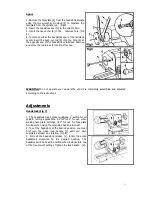
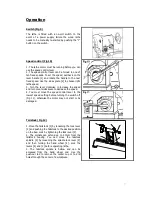
Page 7: ...lathe until it is completely assembled and adjusted according to the instructions Adjustments Headstock Fig 7 1 The headstock has 5 preset positions 00 setting for all spindle turning applications 60...

Page 8: ...n counterclockwise to decrease the speed 4 You must move the speed control lever to the lowest speed setting before turning the switch off Fig 11 otherwise the motor may not start or be damaged Tailst...

Page 9: ...be repositioned to the extension bed for use on outboard turnings Fig 14 IMPORTANT MAKE SURE THE TOOL REST IS ADJUSTED TO BE AS CLOSE TO THE WORKPIECE AS POSSIBLE ROTATE THE WORKPIECE BY HAND TO CHEC...

Page 10: ...C ring 19 1 W19 Sleeve 1 W68 Handle Assembly 1 W20 Spring 1 W69 Extension Tool Rest 1 W21 Spindle Pulley Set L R 1 W70 Tool Rest 1 W22 V Belt 625 1 W71 Center 1 W23 C ring 16 1 W72 Shaft 1 W24 Plastic...

Page 11: ...PARTS DIAGRAM...

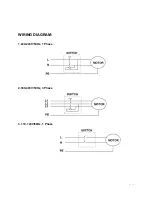
Page 12: ...WIRING DIAGRAM 1 220 240V 50Hz 1 Phase 2 380 400V 50Hz 3 Phase 3 110 120V 60Hz 1 Phase...

Reviews: