background image

ENGLISH

20

SET-UP OF OPERATIONAL
PARAMETERS

JEDI is equipped with a practical interface that
allows rapid and simple on-display programming

using four keys: 

+

-

.

Preliminary operations:

1.

Move the door so as to hook on the drive
trolley.

2.

Power up the device: the courtesy light comes
on, the control unit emits a BEEP and the 
segments of the display are illuminated one at a 

time until the display shows 

0

.

m

PLEASE NOTE:  if programming is not

completed (by means of function 
10. End programming) the parameters set are
lost. 
If there is an error in the set parameters, simply
power off the device, restore power and then
repeat the programming operation.

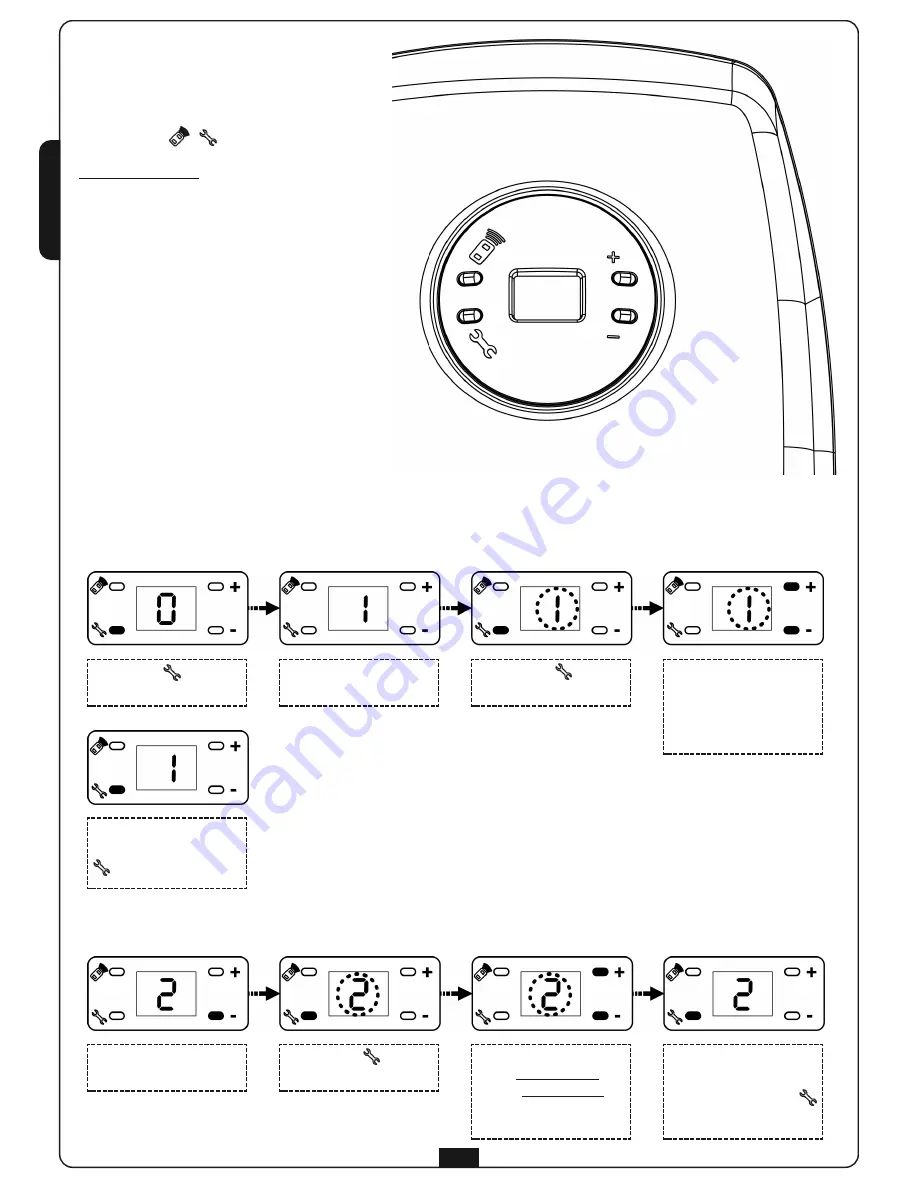
1. Setting the open limit switch

m

PLEASE NOTE:  The open limit switch must be stored prior to the close limit switch. If this

procedure is used erroneously to set the close limit switch, the parameter is NOT stored.

Press the 

key for 

5 seconds

When the door reaches the

desired position, press the

key to save the settings

The device emits a beep and

the display shows 

I

Press the 

key: 

I

flashes

Press and hold the 

+

(the door opens)

or 

-

(the door closes) 

key to reach the fully open

position

2. Setting the close limit switch

Press the 

-

key, 

the display shows 

2

Press the 

key: 

2

flashes

Press and hold the 

+

(the door opens)

or 

-

(the door closes) 

key to reach the fully 

close position

When the door reaches the

closed position, wait 2

seconds, then press the 

key to save the settings 

Summary of Contents for JEDI-700

Page 1: ...IL n 321 EDIZ 01 11 2013 JEDI ELECTROMECHANICAL ACTUATOR FOR SPRING AND COUNTERWEIGHT BALANCED DOORS GB www remotecontrolgates co uk...

Page 2: ...Directive 2004 108 EC Radio Directive 99 05 EC Directive ROHS2 2011 65 EC The relevant technical documentation is available at the national authorities request after justifiable request to V2 S p A Co...

Page 3: ...or operation in dry rooms exclusively For the safety and life of persons it is absolutely necessary to follow all instructions Keep these instructions save for later reference Do not permit children t...

Page 4: ...easily without any friction The door must be properly balanced both before and after its automation stopping the door in any position it must not move carry out a balance weight adjustment if necessa...

Page 5: ...the connecting section bar R to the end position indicated by the two holes Q on the chain guide section bar 4 Adjust the tension of the chain using the Allen head screw with a 10 mm Allen wrench tur...

Page 6: ...actly half its height mark the reference points on the upper crossbeam and on the ceiling to facilitate positioning of the guide section bar 2 3 Fasten the bracket E to the upper crossbeam of the door...

Page 7: ...in the same plane If not add shims Connect the perforated bar L to the perforated bar of the arch arm using 2 6 x 15 bolts RELEASE OF THE AUTOMATION In order to release the automation from inside pul...

Page 8: ...The control panel inside JEDI is already cabled You just need to plug it in the electrical outlet to proceed with operational parameter programming To connect the photocells and the START button plea...

Page 9: ...nd then repeat the programming operation 1 Setting the open limit switch mPLEASE NOTE The open limit switch must be stored prior to the close limit switch If this procedure is used erroneously to set...

Page 10: ...parameters set press and hold the key for 5 seconds until the segments of the display illuminate one at a time until showing 0 mPLEASE NOTE if this parameter is modified then on completion of programm...

Page 11: ...enance alarm default 0 function deactivated If this function is activated the device emits BEEPs when the motor reaches 2000 operational cycles This alarm may be useful for scheduling maintenance oper...

Page 12: ...fter approx 1 second Release the key and press the remote control button twice the device emits a BEEP and the display is turned off to confirm memorising has been successful Press and hold key 0 appe...

Page 13: ...ENGLISH 24...

Reviews: