background image

13. Backrest adjusting  
The backrest of the seat can be adjusted at four positions.  
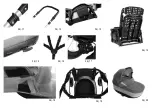
To lower the backrest, pull the plastic lever at the rear 
part of the backrest (Picture 14) and next set the correct 
position. To lift the backrest, it is enough to push it 
upward until it reaches the correct position. It automati-
cally locks by itself.

14. Backrest adjusting in carrycot
Backrest adjusting is performed by using the knob 
located in the rear, lower, outer part of the carrycot. 
(Picture 15)

15. Five-point safety belt adjusting  
 The seat is equipped with five-point safety belts. To 
install the belts on the seat, put the ends of the harnesses 
(plastic buckle) through the holes located in the seat 
backrest, under the fabric, and through the metal handles 
located on the both sides of the seat. 
In the same way, we mount the part of the belt located 
between the legs of the child. This should be used from 
the day when a baby starts to sit up unaided. Taking the 
forks out from the central buckle, undo the belts. Place 
the baby, adjust the length of the belts so as they are 
close to baby’s body, but they must  not oppress the 
baby. Then plug the forks of all the belts into the central 
buckle (Picture 16). 
The seat has an additional crotch strap which must be 
pinned to the frame with a snap. This is an additional 
element and does not exempt from the application of  
5-point safety belts. 

Warning! 
Always use the safety belts if the child can sit unaided. 
 
16. Setting of suspension stiffness  
The stroller has got adjustment of the stiffness of rear 
suspension. To adjust it, move the lever under the shock 
absorber spring (Picture 17). This action should be made 
on both rear wheels. The suspension has two settings: 
hard and soft.

17. Rain cover 
The stroller is equipped with rain cover and vent. To 
mount it, pull one end into the hood and the other at the 
end of the carrycot. 
 
18. Mosquito net  
The carrycot is equipped with a mosquito net. To mount 
it, stretch one end into the hood, next undo the Velcros 
or snaps, located on the both sides of the hood, and 
attach mosquito net “ear” to the snap or Velcro 
(Picture 18). Fasten the snap or Velcro and pull the other 
part of the net on the carrycot.

19. Installing of car seat 
The stroller is also offered in version with the car seat 
for children weighing from 0 to 13 kg. To install the seat, 
the adapters must be first attached to stroller rack/frame 
plugging them identically as in case of  carrycot. Next put 
the seat on the adapters, it connects automatically.
 
Warning ! 
Before using the seat, make sure that the adapters are 
installed properly. 
After installing of the adapters you can start to install 
the child seat. It is installed identically as in the case of 
carrycot.
Warning ! 
Before using the child seat, make sure it is installed 
properly.  
 

To take the adapters out, you should press    
the plastic buttons  located on both sides of the seat.

The strollers of  JEDO make, with adequate   
 adapter, one should mount the following seats: 
 
1. MC  adapter: 
 - Maxi – Cosi:    Cabriofix, Citi, Pebble 
 - Cybex:             Aton 3, Aton 4, CBX 
-  Kiddy:     Evolution Pro2, Evo- Lunafix  
 - Safety 1st:        Mimas 
 - Recaro:             Privia 
 2. R-YPP  adapter 
  - Recaro:             Young Profi Plus

Summary of Contents for FYN

Page 1: ......

Page 2: ......

Page 3: ......

Page 4: ...Zdj 1 Zdj 2 Zdj 3 Zdj 4 Zdj 5 Zdj 6 Zdj 7 Zdj 8 Zdj 9 Zdj 10 ...

Page 5: ...Zdj 12 Zdj 11 Zdj 13 Zdj 14 Zdj 15 Zdj 16 Zdj 17 Zdj 18 Zdj 19 Zdj 20 ...

Page 6: ...ia wózka Nie należy pozostawiać wózka w miejscach niebezpiecznych także jeśli jest pusty Nie należy pokonywać wózkiem scho dów także ruchomych oraz miejsc bar dzo stromych Może to być niebezpieczne dla dziecka Nigdy nie należy umieszczać żadnych przedmiotów na budce wózka Dostarczany w komplecie z wózkiem kosz na zakupy ma dopuszczalną ładowność 3 kg Cięższe przedmioty umieszczać zawsze na środku ...

Page 7: ...y produktu wykryte w okresie gwa rancji będą bezpłatnie usuwane w terminie 14 dni od daty dostarczenia go za pośred nictwem Sprzedawcy do Producenta 5 Okres gwarancji ulega przedłużeniu o czas naprawy 6 Sposób naprawy określa udzielający gwarancji 7 Warunkiem niezbędnym do uwzględ nienia reklamacji jest posiadanie dowodu zakupu z wypełnioną datą oraz podpisami obu stron 8 Producent bezpłatnie usun...

Page 8: ...odwozianależywcisnąć do oporu czerwonych przycisków znajdujących się w dolnej środkowej części gondoli Czynność ta nie musi być wykonywana jednocześnie po obu stronach gondoli Następnie należy unieść gondolę ku górze 5 Montaż okrycia na nóżki Założyć okrycie na nóżki na gondolę i zapiąć na napy znajdujące się na bokach budki i okrycia 6 Montaż siedziska wkładu spacerowego Siedzisko montujemy i dem...

Page 9: ...ziecko potrafi samodzielnie siedzieć 16 Regulacja sztywności zawieszenia Wózek posiada regulację sztywności tylnego zawieszenia Aby dokonać regulacji przesuń dźwignię znajdującą się pod sprężyną amortyzatora Zdj 17 Czynność wykonaj przy obu tylnych kołach Zawieszenie posiada dwa usta wienia twarde i miękkie 17 Folia przeciwdeszczowa Wózek posiada w zestawie folię przeciwdeszczową z wy wietrznikiem...

Page 10: ...nections is unbloc ked One should not use the additional mattress except the one which was delive red in the complete set The nursing bag delivered in the complete set has got permissible load of 2 kg The present product is suitable for a child who cannot sit up unaided toss and move on his her hands and knees Maximum child s mass 9 kg Newborn babies should be transported in lying position Entry W...

Page 11: ...anty period will be fixed free of charge within 14 days from the date of delivery through the Seller to the Manufacturer 5 The warranty period shall be extended by the time of repair 6 The repair method is determined by the guarantor 7 The prerequisite for accepting the com plaint is to have a proof of purchase with a date filled in and signatures of both sides 8 The manufacturer removes free of c...

Page 12: ...rrycot Next lift the carrycot upwards 5 Footcover installation Put the footcover on the carrycot and fasten it with the snaps located on the sides of hood and footcover 6 Seat installation travel insert Installing and uninstalling of the seat is the same as carrycot The seat can be installed in two ways the footboard can be in the direction of travel or vice versa Put the seat upholstery by pullin...

Page 13: ...ion stiffness The stroller has got adjustment of the stiffness of rear suspension To adjust it move the lever under the shock absorber spring Picture 17 This action should be made on both rear wheels The suspension has two settings hard and soft 17 Rain cover The stroller is equipped with rain cover and vent To mount it pull one end into the hood and the other at the end of the carrycot 18 Mosquit...

Page 14: ...í může kočárek poškodit nebo zničit Kočárek nenechávejte na nebezpečných místech i když je prázdný S kočárkem nejezděte po schodech také pohyblivých a také na velmi prudkém svahu Může to být nebezpečné pro dítě Na boudičku kočárku nepokládejte žádné předměty Nákupní koš přiložený v sadě ke kočár ku má dovolenou únosnost 3 kg Těžké předměty vždy umísťujte do středu koše Nestejnoměrné rozmístění zát...

Page 15: ...4 Vady výrobku zjištěné v záruční době bude zdarma odstraňovat ve lhůtě 14 dnů od data jeho doručení prostřednictvím prodejce výrobce 5 Záruční doba se prodlouží o dobu opravy 6 Způsob opravy určuje poskytovatel záruky 7 Podmínkou nutnou k uznání reklamace je předložení dokladu o nákupu s vypl něným datem a podpisy obou stran 8 Výrobce zdarma odstraní případnou nefunkčnost výrobku pod podmínkou že...

Page 16: ...y umístěné na bočních stranách boudičky a přikrývky 6 Montáž sedátka sportovní vložky Sedátko montujte a demontujte jako korbu Sedátko můžete namontovat dvojím způsobem podno žkou ve směru jízdy nebo opačně Nasaďte čalounění sedátka tak že jej natáhnete na kostru sedátka pak zapněte všechny cvoky Upozornění Před použitím zkontrolujte zda jsou korba případně sedátko správně zajištěny v západkách Up...

Page 17: ...é a měkké 17 Fólie proti dešti Kočárek má ve výbavě fólii proti dešti s větracím okén kem Abyste ji namontovali natáhněte jeden konec na boudičku a druhý na konec korby 18 Moskytiéra Korba kočárku je vybavena moskytiérou abyste ji namontovali natáhněte jeden z jejích konců na boudičku pak odepněte suché zipy nebo cvoky které se nacházejí na obou stranách boudičky a zavěste ouško moskytiéry na cvok...

Page 18: ...Sie den Kinderwagen nicht an gefährlichen Orten stehen auch wenn er leer ist Verwenden Sie den Kinderwagen nicht auf Stufen Rolltreppen und sehr ab schüssigem Gelände da es für das Kind gefährlich sein kann Legen Sie niemals Gegenstände auf das Verdeck des Kinderwagens Der mitgelieferte Einkaufskorb hat ein Gewichtslimit von 3 kg Schwere Gegen stände sollten immer in die Mitte des Einkaufkorbs gel...

Page 19: ...dienungsanleitung verpackt zurückgegeben werden 4 Produktfehler die während der Garan tiezeit auftreten werden innerhalb von 14 Tagen ab dem Datum der Lieferung an den Verkäufer durch den Hersteller kostenlos repariert werden 5 Die Garantiezeit wird um die Zeit der Reparatur verlängert 6 Die Reparaturmethode wird vom Her steller entschieden 7 Voraussetzung für die Annahme der Beschwerde ist der Ka...

Page 20: ...abytragetasche vom Fahr gestell indem Sie die roten Tasten im unteren zentralen Teil der Gondel bis zum Anschlag drücken Dies muss nicht gleichzeitig auf beiden Seiten der Ba bytragetasche erfolgen Dann soll die Babytragetasche angehoben werden 5 Anbringen der Beindecke Legen Sie die Beindecke auf die Babytragetasche und be festigen Sie sie mit Druckknöpfen die sich an den Seiten des Verdecks und ...

Page 21: ...cherheitsgurte verwenden Warnung Verwenden Sie immer Sicherheitsgurte wenn das Kind alleine sitzt 16 Einstellen der Aufhängungssteifigkeit Der Kinderwagen besitzt eine Einstellung der Steifigkeit der hinteren Aufhängung Zur Einstellung bewegen Sie den Hebel unter dem Federstoßdämpfer Abb 17 Die Aktion ist für beide Hinterräder durchzuführen Die Aufhängung hat zwei Einstellungen hart und weich 17 R...

Page 22: ...рудования которое не разрешено может привести к повреждению или порче коляски Не оставляйте коляску в опасных местах даже если она пустая Нельзя двигаться с коляской по эскалатору лестнице а также местам с очень крутым подъемом Это может быть опасно для ребенка Никогда не размещайте какие либо предметы на капюшоне коляски Поставляемая в комплекте корзина для покупок имеет грузоподъемность 3 кг Бол...

Page 23: ...нные в течение гарантийного периода будут устранены бесплатно в течение 14 дней с даты поставки Продавцом Производителю 5 Гарантийный срок продлевается на время ремонта 6 Способ ремонта определяет гарант 7 Условием для принятия жалобы является наличие документа подтверждающего совершение покупки с датой и подписями обеих сторон 8 Производитель бесплатно устранит возможные неисправности продукта пр...

Page 24: ...ки закрытие наступит автоматически Рис 7 8 19 20 Чтобы удалить люльку с шасси следует нажать до упора красные кнопки находящиеся в нижней центральной части люльки Это действие должно быть произведено одновременно на обеих сторонах люльки Затем следует поднять люльку верх 5 Moнтаж чехла для ножек Установить чехол для ножек на люльку и защелкнуть на кнопки находящиеся по бокам капюшона и чехла 6 Мон...

Page 25: ...ие Всегда используйте ремни безопасности если ребенок может самостоятельно сидеть 16 Регулируемая жесткость подвески Коляска имеет регулировку жесткости задней подвески Для регулировки переместите рычаг под пружину амортизатора Рис 17 Действие произвести на двух задних колесах Подвеска имеет две настройки твердая и мягкая 17 Дождевик В комплект коляски входит дождевик с вентиляционными отверстиями...

Page 26: ...tant imiê i nazwisko u ytkownika name and surname ulica street kod pocztowy miejscowoœæ postal code city tel e mail telephone e mail data zakupu date of purchase data date piecz tka i podpis signature stamp zakres naprawy service detail ...

Page 27: ......

Page 28: ......

Page 29: ......

Page 30: ......

Reviews: