WARNING!
•
Wearing your seat belt incorrectly could
make your injuries in a collision much
worse. You might suffer internal injuries, or
you could even slide out of the seat belt.
Follow these instructions to wear your seat
belt safely and to keep your passengers
safe, too.
•
Position the shoulder belt across the shoul-
der and chest with minimal, if any slack so
that it is comfortable and not resting on
your neck. The retractor will withdraw any
slack in the shoulder belt.
•
Misadjustment of the seat belt could re-
duce the effectiveness of the safety belt in
a crash.
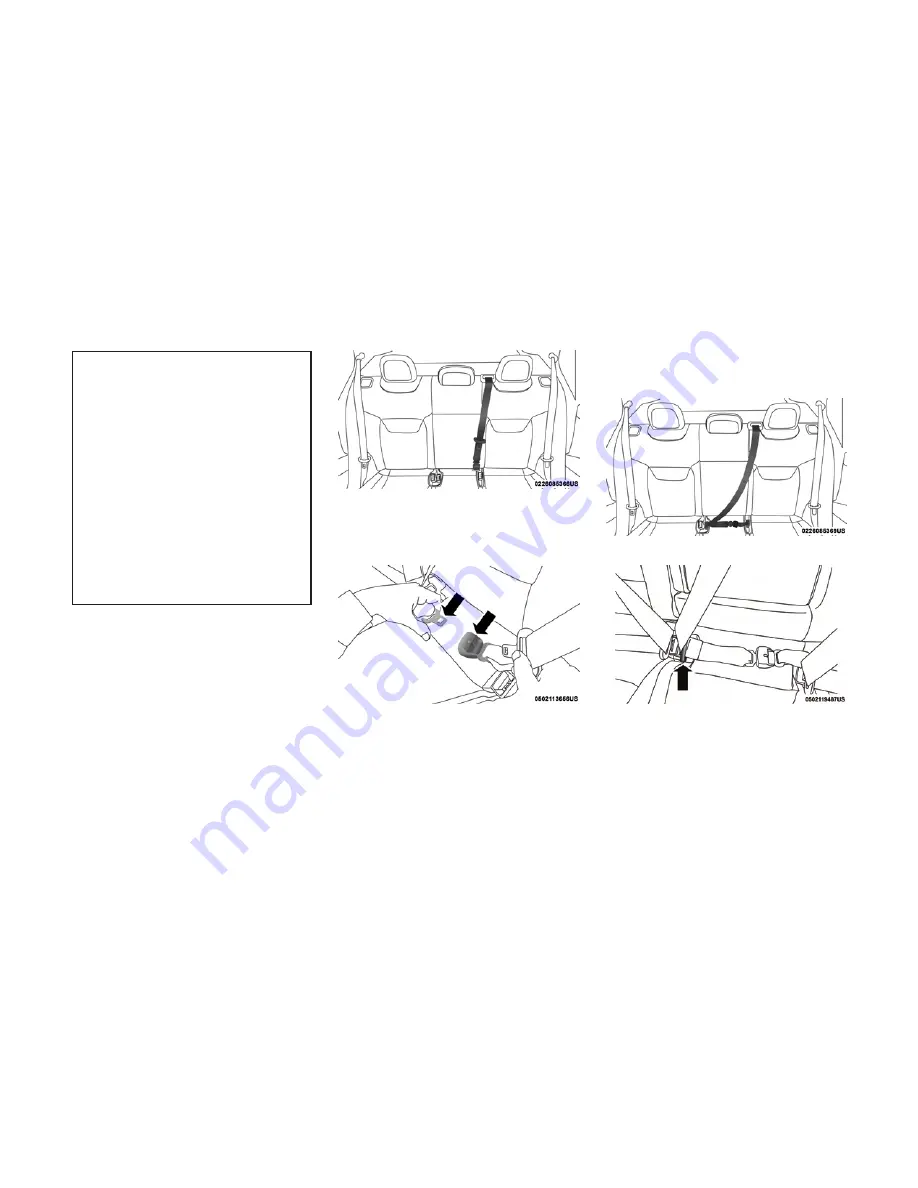
Second Row Center Seat Belt Operating
Instructions
The second row center seat belt may feature a
seat belt with a mini-latch plate and buckle. The
mini-latch plate and buckle, if equipped, should
remain connected at all times. If the mini-latch
plate and buckle become disconnected, they
must be properly reconnected prior to the rear
center seat belt being used by an occupant.
1. Grasp the mini-latch plate and pull the seat
belt over the seat.
2. When the seat belt is long enough to fit,
insert the mini-latch plate into the mini-buckle
until you hear a “click.”
3. Sit back in seat. Slide the regular latch plate
up the webbing as far as necessary to allow
the seat belt to go around your lap.
4. When the seat belt is long enough to fit,
insert the latch plate into the buckle until you
hear a “click.”
5. Position the lap belt so that it is snug and lies
low across your hips, below your abdomen.
To remove slack in the lap belt portion, pull
up on the shoulder belt. To loosen the lap belt
if it is too tight, pull on the lap belt. A snug
Pulling Out The Latch Plate
Inserting Mini-Latch Plate Into Mini-Buckle
Inserting Latch Plate Into Buckle
Inserting Latch Plate Into Buckle
112
Summary of Contents for COMPASS 2018
Page 2: ......
Page 3: ......
Page 5: ...2 ...
Page 10: ...2 GRAPHICAL TABLE OF CONTENTS FRONT VIEW 8 REAR VIEW 9 INSTRUMENT PANEL 10 INTERIOR 11 7 ...
Page 12: ...REAR VIEW Rear View 1 Rear Lights 2 Rear Windshield Wiper 3 Liftgate 9 ...
Page 15: ...12 ...
Page 50: ...Uconnect 4 4C NAV With 8 4 inch Display Automatic Climate Controls 47 ...
Page 57: ...Operating Tips Chart 54 ...
Page 71: ...68 ...
Page 73: ...INSTRUMENT CLUSTER Base Instrument Cluster 70 ...
Page 74: ...Premium Instrument Cluster 71 ...
Page 139: ...136 ...
Page 253: ...250 ...
Page 277: ...274 ...
Page 326: ...11 CUSTOMER ASSISTANCE IF YOU NEED ASSISTANCE 324 323 ...
Page 328: ...325 ...
Page 329: ...326 ...
Page 330: ...12 INDEX 327 ...
Page 338: ...٣٧٢ ...
Page 347: ...١٢ س ا ٣٦٣ ...
Page 348: ...٣٦٢ ...
Page 349: ...٣٦١ ...
Page 351: ...١١ ء ا ة ٣٦٠ ة ا إ a ا إذا ٣٥٩ ...
Page 352: ...٣٥٨ ...
Page 400: ...٣٥٧ 6 j إ ت ٣٥٧ 0 ا اص Zm ا ٣١٠ ...
Page 402: ...٣٠٨ ...
Page 410: ...٣٠٠ ...
Page 433: ... ور ا 9 ا 3 ا ف ن B وا ا u آ I را ور ا ٢٧٧ ...
Page 436: ...٢٧٤ ...
Page 474: ...٢٣٦ ...
Page 560: ...١٥٠ ...
Page 614: ...٩٦ ...
Page 636: ... س ا أ ة A Am ا س ا أ ة ٧٤ ...
Page 638: ...٧٢ ...
Page 652: ... 01 ا دات V إر ول ٥٨ ...
Page 659: ... ت Q 8 4 Q ض V V R f E E أو رة 8Q ارة ا در 6 f ا E Q ود ّ ا Uconnect 4 4C NAV م G ٥١ ...
Page 696: ...١٤ ...
Page 699: ... S G S G 3 ا اء 1TY ا 1 3 ا ج I2 ا E 2 ة w ا ب 5 3 ١١ ...
Page 701: ...٢ ت ا ول ا ١٠ أ G ١١ S G ١٢ س Z أ ة ١٣ S ا ا ٩ ...
Page 702: ...٨ ...
Page 704: ... ز ا م 3 4 ا ز 1 ا ا ول ا I را ا 9 ه ا د ت E 7 أو ر ٦ ...
Page 708: ...٢ ...
Page 710: ......
Page 711: ......


