6
USER MANUAL v1.1
JEFPDB1500
1500W
Pillar Drill • 230V ~50Hz
www.jeffersontools.com
Assembly Instructions
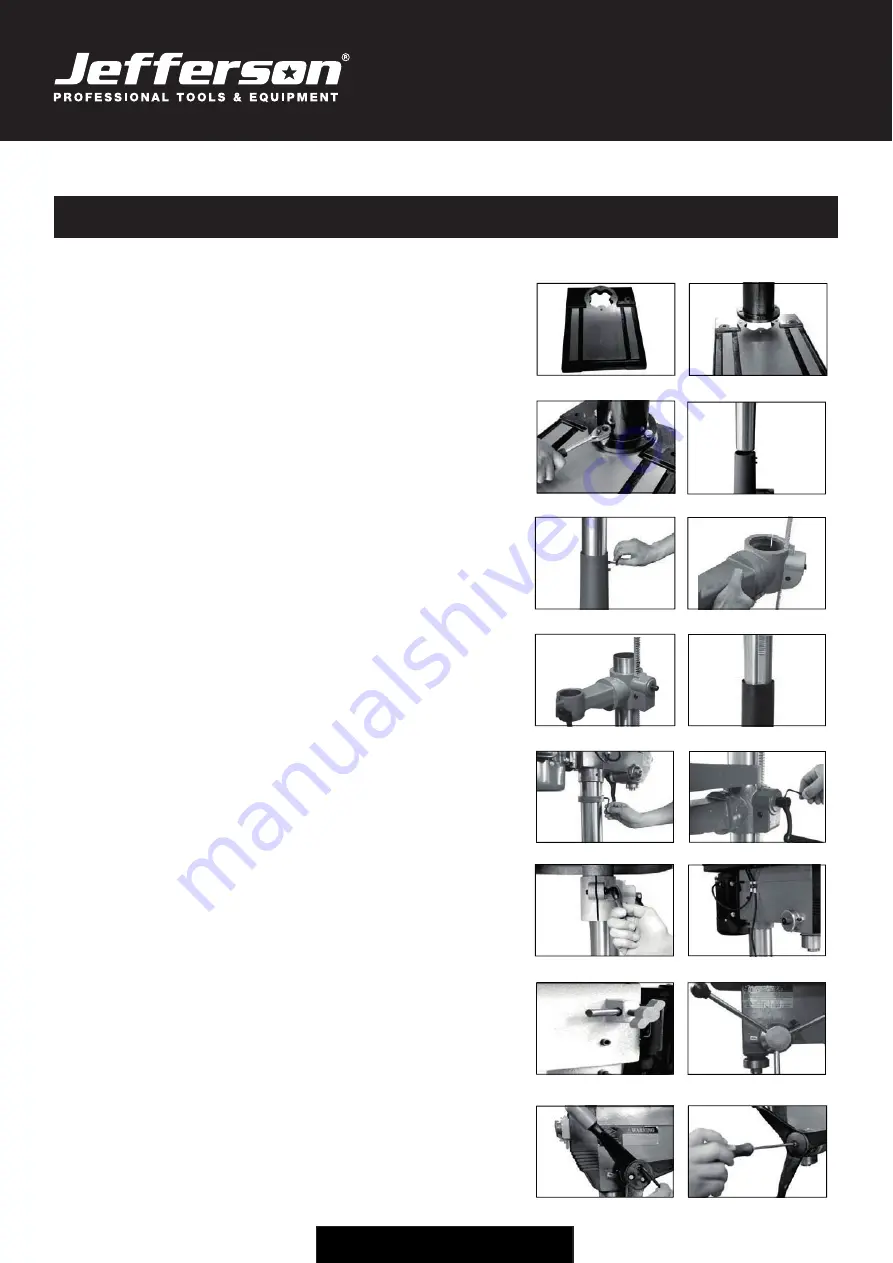
Base & Column
1. Carefully remove contents from the packing box.
2. Select a firm, level surface on which to assemble the bench drill.
3. Select the base
(Fig.1)
and align the column support over the large
hole
(Fig.2).
4. Align the holes in the column support with those in the base and
secure in place using the bolts and washers.
(Fig.5).
5. Use a spanner to securely tighten all bolts
(Fig.3)
. We recommend
mounting the base to stable surface for proper support.
6. Slide the column into the column support
(Fig.4).
7. Secure in place with 2 grub screws using the hex key
(Fig.5).
Rack & Table
1. Fix the rack on the table support as shown
(Fig.6)
.
2. Assemble the support and rack onto the column, ensuring the rack is
positioned on the right side of the column (when viewing the product
from the front)
(Fig.7).
3. Slide the rack all the way down until it locates into the lower column
support
(Fig.8)
.
4. Slide the collar, tapered side facing down, over the column until it
locates the rack.
5. Tighten the grub screw on upper collar
(Fig.9).
6. Fix table adjustment handle on the support
(Fig.10).
7. Assemble table onto table support, tighten in place with table lock
(Fig.11).
Main Housing
1. Lift the main housing and slide it down onto the column as far as it will
go
(Fig.12).
2. Ensure the spindle aligns with the table and base before securing the
housing.
3. To secure in position tighten the grub screws on the left and right hand
sides of the housing
(Fig.13).
4. To fit the feed wheel handles, screw them into feed wheel hub
(Fig.14).
5. For some cast iron feed handle, tighten the 3 grub screws to wheel hub
(Fig.15)
then fix the plastic case on cast iron feed handle as shown
(Fig.16).
Chuck & Arbor
1. Before any assembly, ensure the chuck jaws are wound all the way up
(inside the chuck) to prevent them from damage
(Fig.17).
2. Tighten Philip's head screws of the chuck guard to quill shaft
(Fig.18).
3. Fit the tapered arbor end into the chuck by hand, using reasonable
force
(Fig. 19).
5. Once it is located a firm tap on the underside of the chuck with a soft
hammer is required to secure it. The chuck & arbor are installed
correctly if they cannot be pulley out with hand force
(Fig. 21).
Fig.1
Fig.2
Fig.3
Fig.4
Fig.5
Fig.6
Fig.7
Fig.8
Fig.9
Fig.10
Fig.11
Fig.12
Fig.13
Fig.14
Fig.15
Fig.16
Summary of Contents for JEFPDB1500
Page 1: ...User Manual v 1 1 JEFPDB1500 Pillar Drill 230V 50Hz...
Page 13: ...13 USER MANUAL v1 1 JEFPDB1500 1500W Pillar Drill 230V 50Hz www jeffersontools com...
Page 14: ...14 USER MANUAL v1 1 JEFPDB1500 1500W Pillar Drill 230V 50Hz www jeffersontools com...
Page 15: ...15 USER MANUAL v1 1 JEFPDB1500 1500W Pillar Drill 230V 50Hz www jeffersontools com...

