background image

8

USER MANUAL v1.1

JEFPDB1500

1500W

 Pillar Drill • 230V ~50Hz 

www.jeffersontools.com


 Pre-Setting The Drilling Depth 

To set the depth of the hole, adjust the depth stop as follows:

• 

Loosen depth stop lock knob by turning in an anti-clockwise  
direction see (

Fig.32.1

)

• 

Rotate the to the desired depth, then tighten the half-wing  
bolt (

Fig.32.2

)

To hold the spindle (and bit) at a desired depth: 

• 

Loosen depth stop lock knob, turn feed wheel handle to lowest point 
(

Fig.32.3

).

Rotate depth scale to desired depth and re-tighten the depth stop lock 
knob. workpiece is clamped to the table.


 Adjusting Speed Settings  

You can change the drill press speed by adjusting the belt on the pulley 
system. Refer to the chart inside the pulley cover for the various speed 
configurations available for your model.

• 

Release the belt tension locking knobs located on either side of the 
main housing (

Fig.33.1

).

• 

Once the tension is released, the belt tension handle can be used to 
move the motor pulley closer to the idler pulley (

Fig.33.2

).

• 

The belt is removed by lifting it over the lip of the pulley while rotating 
the pulley simultaneously (

Fig.33.3

).

• 

After re-adjustng the belts, use the belt tension handle to move the 
motor pulley further away from the idler pulley. When the desired 
positon is achieved use the locking knobs to secure the pulleys in  
place (

Fig.33.4

).

• 

Proper belt tension is achieved when the measured deflection (by 
pushing in the centre of the belt) is approx. 5mm (

Fig.33.5

).


 Operation Guide 

Turning the Equipment On And Off

Note: The pulley cover must be closed to operate the drill.

• 

Turn the bench vice on by pressing the green button on the switch as 
shown 

(Fig.34).

• 

Switch the bench vice off by pressing the red button on the switch. 

(Fig.35).

• 

Secure your workpiece to the table if possible (for example use a vice  
or a set of clamps). 

Fig.32.1

Fig.32.2

Fig.32.3

Fig.33.1

Fig.33.2

Fig.33.3

Fig.33.4

Fig.33.5

Fig.35

Fig.34

Summary of Contents for JEFPDB1500

Page 1: ...User Manual v 1 1 JEFPDB1500 Pillar Drill 230V 50Hz...

Page 2: ...ied before carrying out any maintenance or repair By following all the general safety instructions contained in this manual you will help to ensure operator safety and extend the potential life span o...

Page 3: ...ughly familiar with drilling machines and drilling techniques If there is any doubt whatsoever you should consult a qualified person Please read all safety warnings and all instructions Failure to fol...

Page 4: ...ated from certain materials can be hazardous to your health Always operate the drill in a well ventilated area Use a dust collection system if possible Use a dust mask or other suitable respiratory pr...

Page 5: ...eplacement Do not discard the packaging until the machine is assembled The packaging consists of cardboard and appropriately marked materials which can be sent to a suitable re cycling centre To prote...

Page 6: ...ghten the grub screw on upper collar Fig 9 6 Fix table adjustment handle on the support Fig 10 7 Assemble table onto table support tighten in place with table lock Fig 11 Main Housing 1 Lift the main...

Page 7: ...of the chuck by rotating in an anti clockwise direction Fig 26 2 Insert the drill bit into the chuck Fig 27 3 While holding the drill bit in one hand rotate the top collar of the chuck in a clockwise...

Page 8: ...the main housing Fig 33 1 Once the tension is released the belt tension handle can be used to move the motor pulley closer to the idler pulley Fig 33 2 The belt is removed by lifting it over the lip...

Page 9: ...efore use Any damage should be re paired and faults fixed immediately Always remove the plug from the power supply before carrying out any adjustment servicing or maintenance on this equipment Contact...

Page 10: ...s not operating correctly a Check power cord fuse b Check motor connections c Check switch connections d Replace switch e Replace motor f Close pulley cover g Check operation of micro switch and renew...

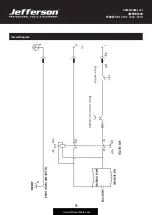
Page 11: ...11 USER MANUAL v1 1 JEFPDB1500 1500W Pillar Drill 230V 50Hz www jeffersontools com Circuit Diagram...

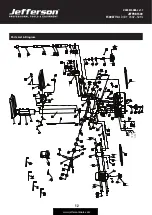
Page 12: ...12 USER MANUAL v1 1 JEFPDB1500 1500W Pillar Drill 230V 50Hz www jeffersontools com 115 116 72 Parts List Diagram...

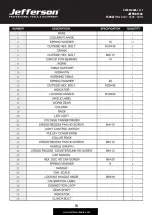
Page 13: ...13 USER MANUAL v1 1 JEFPDB1500 1500W Pillar Drill 230V 50Hz www jeffersontools com...

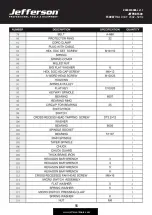
Page 14: ...14 USER MANUAL v1 1 JEFPDB1500 1500W Pillar Drill 230V 50Hz www jeffersontools com...

Page 15: ...15 USER MANUAL v1 1 JEFPDB1500 1500W Pillar Drill 230V 50Hz www jeffersontools com...

Page 16: ...ompliance with the EU Directive on Waste Electrical and Electronic Equipment WEEE Contact your local solid waste authority for recycling information for this equipment Disposing of this product correc...

Page 17: ...ibility 2006 42 EC as amended Machinery Directive 2014 35 EU as amended Low Voltage Directive 2011 65 EU as amended RoHS Directive Equipment Category Bench Drill Pillar Drill Drill Press EU Member Sta...

Page 18: ...nded as it eliminates the need to provide proof of purchase should a war ranty claim be necessary Warranty Repair Should Jefferson confirm the existence of any defect covered by this warranty the defe...

Page 19: ...eed of repair and any repairs needed are covered by the warranty policy In order to qualify for warranty cover all equipment presented must have been used serviced and maintained as instructed in the...

Page 20: ...s Park Chester United Kingdom CH4 9QR Tel 44 0 1244 646 048 Email sales jeffersontools com IMPORTANT SAFETY FIRST Before attempting to use this product please read all the safety precautions and opera...

Reviews: