background image

User Guide for 90098

Cargo Carrier

18 Cu.Ft. (510 cm

3

)

Summary of Contents for 90098

Page 1: ...User Guide for 90098 Cargo Carrier 18 Cu Ft 510 cm3 ...

Page 2: ...e of Contents 1 Parts List 02 Read Before Installation 03 Caution 03 Installation 04 07 Locks 04 Lock Orientation 04 Crossbars 05 06 Locking Carrier Open 06 Mounting 07 Loading and Securing 07 08 Warning 08 ...

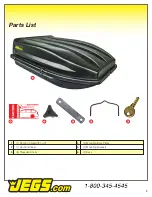
Page 3: ...Parts List 2 1 1 2 3 2 3 4 5 6 1 Rooftop Carrier 18 cu ft 4 Mounting Brackets 8 Threaded Knobs 2 Keys 4 5 6 1 Caution Sticker 4 Mounting Back Plates ...

Page 4: ... material and workmanship defects and is exclusively limited to replacement of a defective cargo carrier Any damage to your vehicle its contents or to any person or property is excluded from the warranty Due to the size and structural differences between vehicles we rely upon your discretion in attaching the cargo carrier to your roof rack cross rails Consult your owner s manual for recommended ro...

Page 5: ...make sure all four lock cams are in the unlocked position and corresponding slot Lock cam is in slot behind the bottom shell Lock cam is not in slot and not behind bottom shell Unlocked Locked On top shell make sure all four cams are in the unlocked position and in their slots Lock orientation ...

Page 6: ...Cargo carrier should be pointed in the same direction as the front of the vehicle Note Cross rails on some vehicles are not adjustable and may require additional holes drilled into the bottom of the cargo carrier to match the fixed position width If this is the case attach the cargo carrier to the rear cross rails first using the pre drilled holes Then drill holes in the front of the cargo carrier...

Page 7: ...pright and position it into the closest bracket on the open side Be sure to align the mounting holes in the bottom box on each side of the cross rails 1 Crossbar Spread Requires a crossbar spread of 24 in 2 Rear Hatch Clearance For hatch to open fully with the carrier installed there must be at least 35 in between the front crossbarandthelinewhereroofandhatchmeet 1 2 Compatible crossbar styles Max...

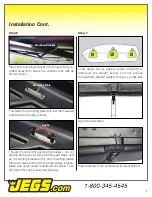
Page 8: ...ugh the pre drilled holes from below the vehicle cross rails as shown above Then slide the mounting plate 4 over the threaded posts inside the cargo carrier Thread 2 knobs 3 evenly and loosely do not tighten all the way at this point Repeat steps until all 4 mounting brackets 5 all 4 mounting plates 4 are in place and the 8 knobs are loosely in place Make sure cargo carrier is centered on vehicle ...

Page 9: ...ed Test that lid will not lift up when pulled All four locks must be engaged and keys removed whenever the vehicle is in motion Close top lid and place cam locks into their slots Engage locks and remove keys Locked Unlocked Installation Cont Step 7 Cont 8 ...

Reviews: