Page 3
REMINDER:
1. MIG100 welder is a no gas (flux) function. It could weld max 1kgs (2.2lbs) welding wire. Please remember to
use the correct size wire.
2. The nozzle size and wire roller size should be the same. For example, 0.8mm (
0.30’’) wire should use 0.8mm
(
0.30’’) electrode in the torch and select 0.8mm (0.30”) side of feeding roller.
3. When torch nozzle touches the work piece, there will be an arc. When you press torch button, it starts feeding
wire and welding.
OPERATION
CONNECTING THE WELDER TO A POWER SOURCE
The MIG100 welder requires a dedicated 120 AC, 60 Hz power input. Do not use on power sources that have voltages
less than 105V AC or higher than 132V AC. If using an extension cord, use a minimum 12 AWG cord for up to 25 feet.
CHANGING THE DRIVE ROLLER
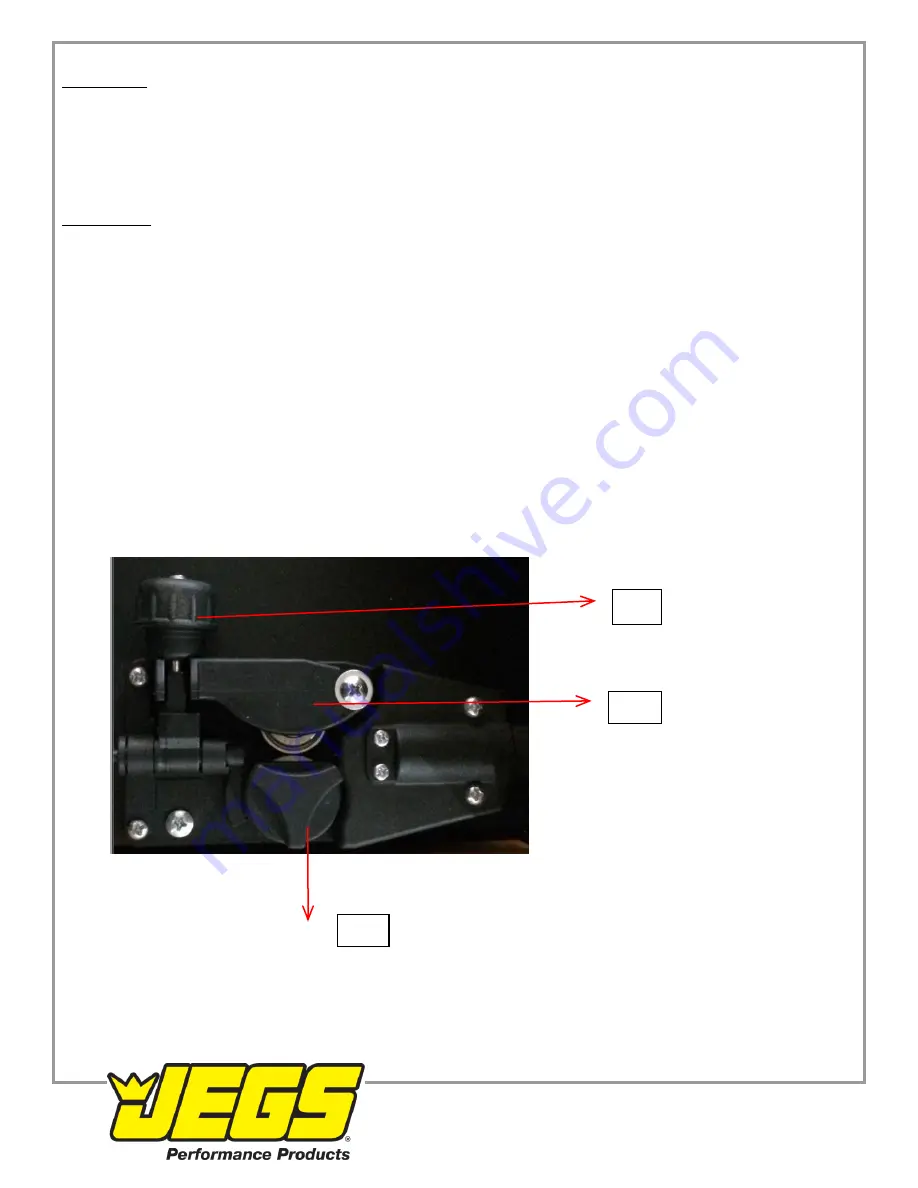
The MIG100 comes set up and ready to use 0.035" (0.9mm) Flux-Core Wire. If 0.03" (0.8mm) wire is to be used, the
drive roller needs to be adjusted. Adjust the drive roller according to the following procedure:
1. Open the top door of the welder.
2. Lift the Pressure Adjuster
(PIC. C1)
out of the way and move the Rocker Arm
(PIC. C2)
away from the drive
roller.
3. Remove the Drive Roller Thumb Screw
(PIC. C3)
by turning it counter clockwise and pulling it away from the
roller.
4. Remove the Drive Roller and view the wire sizes stamped on each side of the roller.
5. Install the Drive Roller in the orientation so that the size of the wire you are using is facing you on the side of
the drive roller.
6. Reinstall the Drive Roller Thumb Screw
(PIC. C3)
.
7. Put the Rocker Arm
(PIC. C2)
back in place and reset the Pressure Adjuster
(PIC. C1)
.
1-800-345-4545 jegs.com
C1
C2
C3


