22
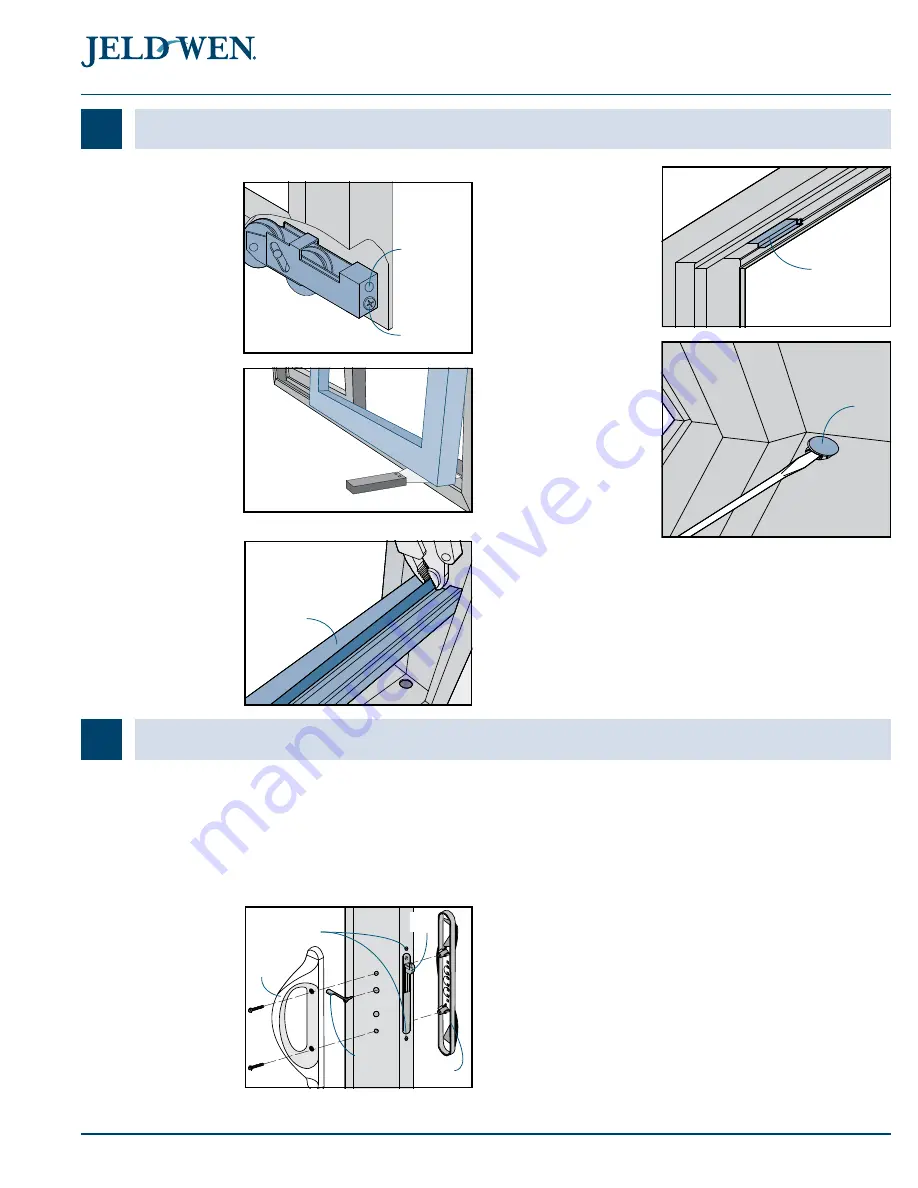
Attachment
screw
Adjustment
screw
Operating
panel track
Anti-lift
block
Dust
plug
Lock
hook
Handle
lever
Interior
handle
Exterior
handle
Attachment
screws
Installation Instructions
for Builders Vinyl Sliding Patio Door Handing Reversal (SVC001)
TITLE 1
6. Pull hook out to locked position with fingers or pliers. Maintain grip
on latch hook to keep lock from falling inside stile.
7. Remove both phillips screws to remove lock.
8. Remove and turn lock over and reinstall with hook facing the
opposite direction.
9. Reinstall the handle lever on the interior and then both handles.
3. From the interior, lift
panel bottom up and
over sill track and pull
inward (if needed,
insert a large putty
knife between the track
and the rollers to help
lift over the track).
NOTE:
DO NOT damage
track or metal track cover
when removing track; this may result in poor operation.
4. Grip one end of the
operating panel track
with pliers and lift up
carefully to remove.
REMOVE OPERATING PANEL
1. Completely open operating panel to clear anti-lifts in the header.
2. Roller adjustment
screws are at both
bottom ends of the
panel. With a Phillips
screwdriver, turn
the bottom screw
counterclockwise to
retract rollers and lower
the panel.
5. Pry both anti-lifts from
header with flat head
screwdriver.
6. Flip frame (top
to bottom).
7. Gently pry out the
frame dust plugs
in both ends of the
sill with flat head
screwdriver and
install these in the
corresponding holes in
the head jamb.
SWITCH ROLLERS AND LOCK
1. Lay the panel on a flat padded surface.
2. Remove attachment screw (top screw on each roller) from the roller
on each end of the panel and remove.
3. At other end of panel, pry the dust plugs from roller screw holes
with flat head screwdriver. Install both rollers on the opposite end of
the panel.
4. At opposite end, install dust plugs (two at each end with 1/2" in large
holes and 1/4" in small holes) into previous roller screw holes.
5. If the handle is pre-
installed, remove the 2"
machine screws from
interior handle set and
remove both handles
and handle lever.
NOTE:
Step 6 must be
performed with the
panel in a horizontal
position to keep the lock
reinforcement bar from
falling down inside the
panel.


