


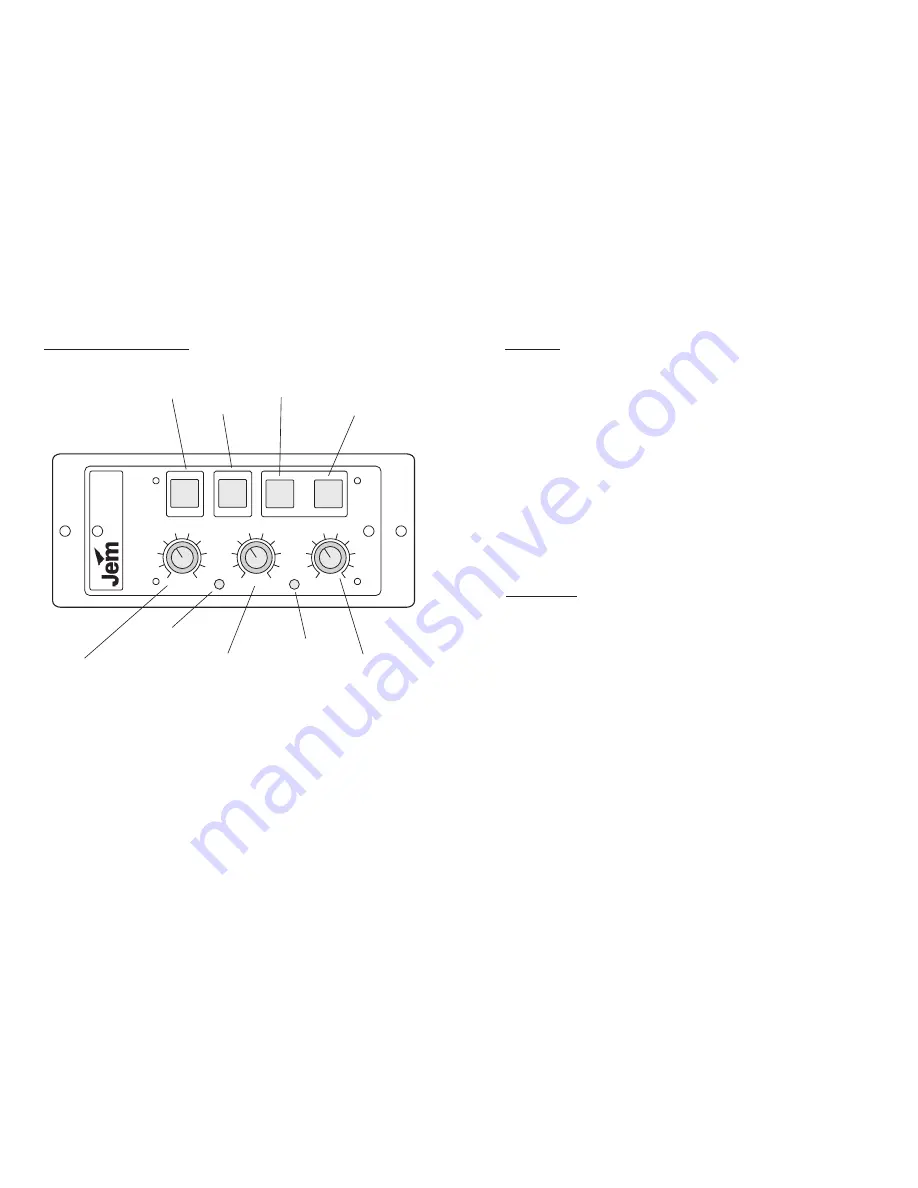
Using The Remote Control
Fog Button
Stand-by Button
Timer Value Button
Timer Engage Button
Output Control
Power LED
Delay Time Control
Timer Cycle LED
Run Time Control
The
comes with a comprehensive controller that allows the
user to manually fire the machine or set a well featured timer to operate the
machine. When the “ready” LED is lit on the top of the machine, the remote
becomes functional and the “Fog” button will operate the machine when
pressed. Sometimes a pre-determined amount of smoke is needed and the
remote has a timer that will operate over a wide range of time
periods. The x8 timer value gives even greater flexibility when a longer
delay and run time are needed.
ZR12-AL
ZR12-AL
PAGE 6
MARTIN MANUFACTURING (UK) PLC
ON
TIMER
ON
1
1
1
2
2
2
3
3
3
4
4
4
5
5
5
6
6
6
7
7
7
8
8
8
9
9
9
POWER
CYCLE
MUL
TI-FUNCTION
CONTROLLER
OUTPUT
DELAY
RUN
FOG
x8
STAND-BY
ON
ZR12-AL USER GUIDE
Functions
FOG BUTTON: Will when the machine has reached operating temperature fire
the machine when pressed and held.
STAND-BY BUTTON: This turns the machines electronics on and off.
TIMER VALUE BUTTON: When the timer is being used, the timer values can be
adjusted by a factor of 8, i.e. a 5 second minimum run time becomes 40 seconds &
a 10 second delay time becomes 1 minute 20 seconds.
TIMER ENGAGE: This will engage the timer to fire the machine according to the
present settings.
OUTPUT CONTROL: Turning this knob clockwise will increase the output of the
machine, if turned fully anti-clockwise there will be no output.
DELAY TIME CONTROL: This will adjust the amount of time the machine waits
between operating when the timer is engaged.
RUN TIME CONTROL: This will adjust the time the machine will operate for
when the timer is engaged.
POWER LED: This LED will light when the machine is switched on
CYCLE LED: This LED will light when the timer is engaged and the machine is
operating.
Timer Values
Maximum = 18 seconds
Minimum = 2 seconds
Run Time: X1 mode
Maximum = 2 minutes 24 seconds
Minimum = 16 seconds
Run Time: X8 mode
Maximum = 18 seconds
Minimum = 2 seconds
Delay Time: X1 mode
Maximum = 2 minutes 24 seconds
Minimum = 16 seconds
Delay Time: X8 mode
An extension lead is available from JEM for using the controller out of
the machine.
PAGE 7
MARTIN MANUFACTURING (UK) PLC
ZR12-AL USER GUIDE


